

There is something timeless about a batch of freshly baked cheese straws cooling on the counter. The aroma of sharp cheddar and buttery pastry drifting through the kitchen feels nostalgic and comforting all at once. Crisp on the outside, flaky inside, and packed with bold cheese flavor, they are the kind of snack that disappears faster than you expect. Trust me, you are going to love this. They are savory, delicate, and honestly, worth every bite.
A Classic That Never Goes Out of Style
Cheese straws have long been a staple at gatherings, holiday tables, and afternoon snack spreads. Their thin twisted shape makes them elegant enough for entertaining, yet simple enough to bake anytime.
What makes them special is that perfect balance between buttery pastry and sharp cheddar. Each bite gives you a satisfying snap followed by tender, flaky layers.
A Southern Tradition with Big Flavor
Often associated with Southern kitchens, cheese straws have been passed down through generations. Traditionally made with flour, butter, and strong cheddar, they were baked for celebrations and shared with friends.
Over time, small variations appeared, a dash of cayenne here, a sprinkle of paprika there, but the heart of the recipe always stayed the same. Simple ingredients, big flavor.
Why This Recipe Works Every Time
Before we dive into the details, here is why these deserve a permanent spot in your baking routine.
Versatile: Perfect for parties, holidays, or simple snacking.
Budget-Friendly: Basic pantry ingredients.
Quick and Easy: Straightforward mixing and baking.
Customizable: Adjust spice and cheese strength.
Crowd-Pleasing: Crispy and savory for all ages.
Make-Ahead Friendly: Store beautifully for days.
Great for Leftovers: Pair with soups or salads.
Pro Tips for Perfectly Crisp Straws
Crispness and flakiness are key, and these tips help you get there.
- Use cold butter for flaky layers.
- Grate cheese fresh for better melting.
- Chill the dough before rolling.
- Bake until edges are deeply golden.
Kitchen Tools You Will Need
Let us gather everything before we begin.
Mixing Bowl: For combining ingredients.
Rolling Pin: To roll dough evenly.
Sharp Knife or Pizza Cutter: For cutting strips.
Baking Sheet: Lined with parchment paper.
Ingredients You Will Need For This Recipe
Each ingredient plays an important role.
- All Purpose Flour: 1 ½ cups, forms the structure.
- Unsalted Butter: ½ cup, cold and cubed, creates flakiness.
- Sharp Cheddar Cheese: 1 ½ cups freshly shredded, delivers bold flavor.
- Salt: ½ teaspoon, enhances taste.
- Paprika: ½ teaspoon, adds subtle warmth and color.
- Cayenne Pepper: ¼ teaspoon, optional for gentle heat.
- Cold Water: 2 to 3 tablespoons, helps bring dough together.

Easy Substitutions
You can customize easily.
Cheddar Cheese: Use extra sharp for stronger flavor.
Paprika: Smoked paprika adds depth.
Cayenne Pepper: Omit for milder taste.
The Star Ingredient
One ingredient truly defines this recipe.
Sharp Cheddar Cheese: Its bold, tangy flavor shines through in every crisp bite.
Let’s Bake Them Crisp
Now let us dive into the process. Here are the steps you are going to follow.
- Preheat Your Equipment: Preheat oven to 375 degrees Fahrenheit and line a baking sheet with parchment paper.
- Combine Ingredients: In a mixing bowl, combine flour and salt. Cut in cold butter until mixture resembles coarse crumbs.
- Prepare Your Cooking Vessel: Stir in shredded cheddar, paprika, and cayenne pepper if using.
- Assemble the Dish: Add cold water one tablespoon at a time until dough forms. Shape into a disk, wrap, and chill for 20 minutes.
- Cook to Perfection: Roll dough to about ¼ inch thickness. Cut into thin strips and twist gently. Place on prepared baking sheet and bake for 12 to 15 minutes until golden brown.
- Finishing Touches: Cool on the baking sheet for 5 minutes, then transfer to a wire rack.
- Serve and Enjoy: Serve at room temperature for best texture.
The Texture and Flavor Experience
The outside is crisp and golden, while the inside stays slightly tender and flaky. The cheddar brings sharp richness, balanced by subtle spice from paprika and cayenne.
Helpful Tips
Keep these in mind.
- Chill dough to prevent spreading.
- Do not overwork the dough.
- Bake until deeply golden for maximum crispness.
What to Avoid
Small details matter.
- Avoid warm butter.
- Do not skip chilling.
- Do not underbake.
Nutrition Facts
Servings: 10
Calories per serving: 180
Note: These values are approximate.
Preparation Time
Prep Time: 20 minutes
Cook Time: 15 minutes
Total Time: 35 minutes
Make Ahead and Storage Tips
Store completely cooled straws in an airtight container at room temperature for up to 5 days. For longer storage, freeze baked straws for up to 2 months and reheat briefly in the oven.
How to Serve Them
Serve alongside soups, dips, or as part of a snack board. They pair beautifully with sparkling beverages or iced tea.
Creative Leftover Ideas
Break into pieces and sprinkle over creamy soups. Serve alongside a cheese board for extra crunch.
Additional Tips
For extra crispness, bake an additional minute or two, watching closely. Sprinkle a pinch of flaky salt before baking for added texture.
Make It a Showstopper
Arrange twisted straws in a tall glass for an elegant presentation at gatherings.
Variations to Try
- Add dried herbs like thyme.
- Mix in grated Parmesan.
- Sprinkle sesame seeds on top.
- Add a pinch of black pepper for extra warmth.
FAQ’s
Q1: Can I freeze the dough?
Yes, wrap tightly and freeze up to 1 month.
Q2: Why are mine soft?
They may need longer baking time.
Q3: Can I use pre shredded cheese?
Freshly shredded melts better.
Q4: Can I make them spicier?
Increase cayenne slightly.
Q5: Do they spread while baking?
Chilling helps prevent spreading.
Q6: Can I double the recipe?
Yes, bake in batches.
Q7: How thin should I roll the dough?
About ¼ inch thick.
Q8: Can I make them gluten free?
Use a gluten free flour blend.
Q9: Do they stay crispy?
Yes, if stored properly.
Q10: Are they good for parties?
Absolutely, they are perfect party snacks.
Conclusion
Cheese straws are one of those classic treats that never lose their charm. Crisp, cheesy, and beautifully simple, they bring comfort and elegance to any table. Once you bake a batch, you will understand why they have stood the test of time. Trust me, this one is a total game changer.
Print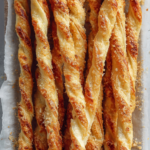
Cheese Straws
- Prep Time: 20 minutes
- Cook Time: 15 minutes
- Total Time: 35 minutes
- Yield: 10 servings
- Category: Snack
- Method: Baking
- Cuisine: Southern
- Diet: Vegetarian
Description
Classic buttery cheese straws made with sharp cheddar and a hint of paprika for subtle warmth. Crisp on the outside and flaky inside, these savory twists are perfect for parties, holidays, or everyday snacking.
Ingredients
- 1 1/2 cups all purpose flour
- 1/2 cup unsalted butter, cold and cubed
- 1 1/2 cups freshly shredded sharp cheddar cheese
- 1/2 teaspoon salt
- 1/2 teaspoon paprika
- 1/4 teaspoon cayenne pepper (optional)
- 2 to 3 tablespoons cold water
Instructions
- Preheat oven to 375 degrees Fahrenheit and line a baking sheet with parchment paper.
- In a mixing bowl, combine all purpose flour and salt.
- Cut in the cold cubed butter until the mixture resembles coarse crumbs.
- Stir in the freshly shredded sharp cheddar cheese, paprika, and cayenne pepper if using.
- Add cold water one tablespoon at a time, mixing just until the dough comes together.
- Shape the dough into a disk, wrap, and chill for 20 minutes.
- Roll the dough to about 1/4 inch thickness on a lightly floured surface.
- Cut into thin strips and gently twist each strip.
- Place on the prepared baking sheet and bake for 12 to 15 minutes until golden brown.
- Cool on the baking sheet for 5 minutes, then transfer to a wire rack to cool completely.
Notes
- Use freshly shredded cheese for the best flavor and texture.
- Keep butter cold to ensure flaky layers.
- Chill the dough to prevent spreading while baking.
- Store in an airtight container at room temperature for up to 5 days.
Nutrition
- Serving Size: 1 serving
- Calories: 180
- Sugar: 1g
- Sodium: 260mg
- Fat: 12g
- Saturated Fat: 7g
- Unsaturated Fat: 4g
- Trans Fat: 0g
- Carbohydrates: 12g
- Fiber: 0g
- Protein: 6g
- Cholesterol: 30mg