
There is something quietly magical about the way Earl Grey transforms a classic dessert into something elegant and unexpected. The first time I made this, the kitchen smelled like warm tea and vanilla cream, and I remember thinking, this one is a total game-changer. You still get that luscious mascarpone richness and those soft, delicate layers, but now there is a gentle citrusy whisper from the bergamot that makes every bite feel refined. Trust me, you’re going to love this.
Why This Dessert Feels So Special Yet So Simple
What makes this version so irresistible is the balance. It is creamy but light, sweet but not overwhelming, and fragrant without being perfumed. The tea seeps into the ladyfingers, creating a soft, melt in your mouth base that contrasts beautifully with the airy mascarpone filling. Each spoonful feels layered, both in texture and in flavor, and it somehow tastes even better the next day.
And now, let’s dive a little deeper into where this beautiful idea comes from.
A Little Story Behind the Layers
Traditional tiramisu was born in Italy, built on espresso soaked ladyfingers and rich mascarpone cream. Over time, creative cooks began experimenting with different infusions. Swapping coffee for Earl Grey keeps the spirit of the dessert intact while giving it a delicate British tea room twist.
Earl Grey itself is black tea scented with bergamot oil, which gives it that subtle citrus aroma. When paired with mascarpone and cream, the result is elegant but comforting, classic yet playful. Let me tell you, it’s worth every bite.
Why You Will Keep Coming Back to This One
Before we step into the kitchen, here is why this dessert earns a permanent spot in your rotation.
Versatile: It works beautifully for dinner parties, birthdays, or even a quiet weekend treat. You can serve it in a large dish or in individual cups.
Budget-Friendly: The ingredients are simple and easy to find, and you do not need anything fancy to make it shine.
Quick and Easy: There is no baking involved, which makes the process relaxed and approachable.
Customizable: You can adjust the sweetness, tea strength, or even add a hint of citrus zest if you like.
Crowd-Pleasing: The flavor is familiar yet surprising, and it tends to impress without trying too hard.
Make-Ahead Friendly: In fact, it tastes better after chilling overnight.
Great for Leftovers: If there are any, the texture becomes even silkier the next day.
Chef’s Insider Secrets for the Best Results
Now that you are excited, let me share a few tips that truly elevate it.
- Use strong brewed tea, it should taste slightly bolder than you would normally drink.
- Whip the cream just to soft peaks, this keeps the filling light and airy.
- Dip the ladyfingers quickly, a brief soak prevents soggy layers.
- Chill for at least 6 hours, patience allows the flavors to meld beautifully.
Essential Kitchen Tools You Will Need
Before we gather our ingredients, make sure you have these ready.
Mixing Bowls: For whipping cream and blending the mascarpone mixture.
Electric Mixer or Whisk: To create that smooth, fluffy texture.
Shallow Dish: For dipping the ladyfingers into the tea.
Spatula: To fold gently and keep the mixture airy.
9×9 inch Dish or Similar: A glass or ceramic dish works perfectly for layering.
Ingredients You Will Need For This Delightful Creation
The beauty of this dessert lies in how each ingredient plays its part. Together, they create something that feels far more luxurious than the effort involved.
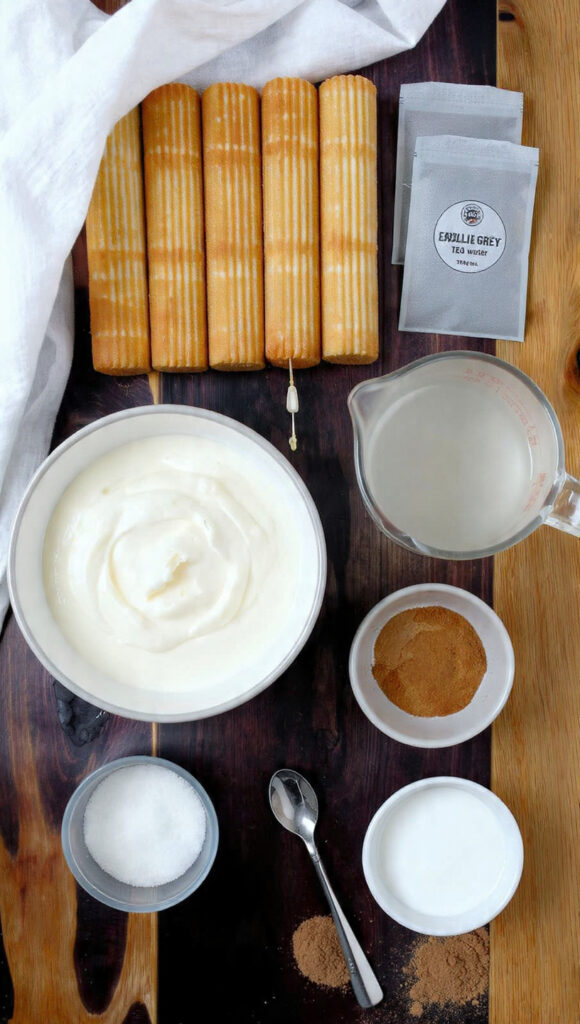
- Ladyfingers: 24 pieces, about 200 grams. These create the soft layered base.
- Earl Grey Tea Bags: 3 tea bags. They infuse the dessert with aromatic citrus notes.
- Hot Water: 1 ½ cups, 360 milliliters. Used to brew the tea.
- Mascarpone Cheese: 16 ounces, 450 grams. The creamy heart of the filling.
- Heavy Cream: 1 cup, 240 milliliters. Whipped to add lightness.
- Granulated Sugar: ½ cup, 100 grams. For gentle sweetness.
- Vanilla Extract: 1 teaspoon. Adds warmth and depth.
- Unsweetened Cocoa Powder: 2 tablespoons. For that classic finishing touch.
Easy Ingredient Swaps If You Need Them
Cooking should feel flexible, not stressful.
Mascarpone: Cream cheese blended with a splash of cream can work in a pinch.
Granulated Sugar: Powdered sugar for a smoother texture.
Ladyfingers: Sponge cake cut into strips.
Vanilla Extract: A small amount of vanilla bean paste for stronger flavor.
Spotlight on the Stars of the Show
Some ingredients truly make this shine.
Earl Grey Tea: Its bergamot aroma adds a floral citrus note that balances the richness.
Mascarpone Cheese: Silky and slightly sweet, it gives the filling its luxurious body.
Let’s Build These Beautiful Layers Together
This is the fun part, and it comes together more easily than you might expect.
- Preheat Your Equipment: No oven needed, but prepare your 9×9 inch dish and clear some workspace.
- Combine Ingredients: Brew the Earl Grey tea with 1 ½ cups hot water and steep for 5 minutes, then cool completely. In a bowl, whip the heavy cream to soft peaks. In another bowl, mix mascarpone, sugar, and vanilla until smooth, then gently fold in the whipped cream.
- Prepare Your Cooking Vessel: Pour the cooled tea into a shallow dish for dipping.
- Assemble the Dish: Dip each ladyfinger quickly into the tea and arrange in a single layer in the dish. Spread half of the mascarpone mixture on top. Repeat with another layer of dipped ladyfingers and finish with the remaining cream mixture.
- Cook to Perfection: There is no baking, but refrigerate for at least 6 hours, preferably overnight.
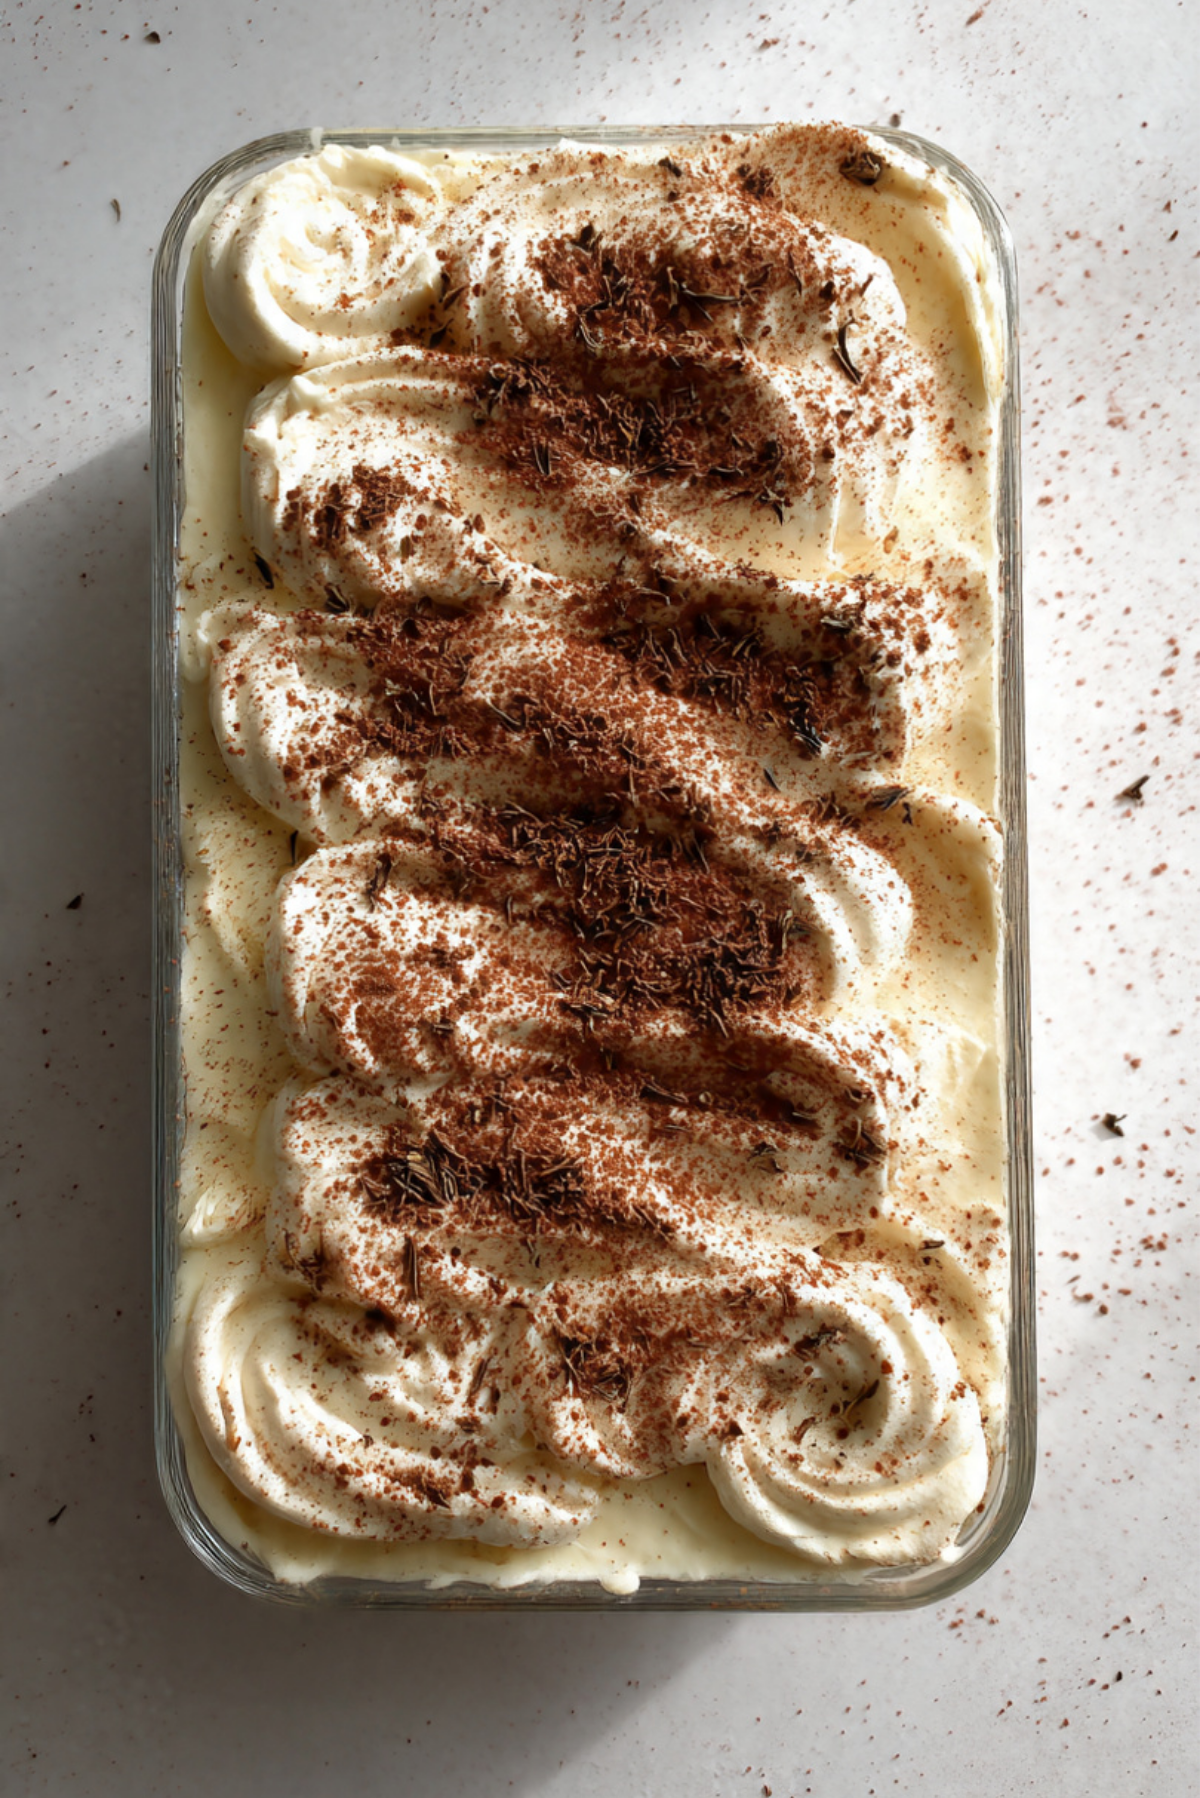
- Finishing Touches: Dust the top evenly with unsweetened cocoa powder just before serving.
- Serve and Enjoy: Slice gently and serve chilled, watching those creamy layers hold together beautifully.
The Magic of Texture and Flavor
As it chills, the tea soaked ladyfingers soften into tender layers that almost melt into the mascarpone cream. The cocoa adds a slight bitterness that balances the sweetness, and the bergamot lingers softly at the end. The contrast between airy cream and delicate sponge creates that classic spoon cutting through silk moment.
Helpful Tips for Foolproof Success
If you want to make it perfect every time, keep these in mind.
- Do not oversoak the ladyfingers, a quick dip is enough.
- Chill uncovered for the first hour to help it set slightly, then cover.
- Use a fine sieve for cocoa powder for an even finish.
Common Mistakes and How to Avoid Them
Even simple desserts can have small pitfalls.
- Overwhipping the cream can make it grainy, stop at soft peaks.
- Using warm tea will cause the layers to collapse, always cool it first.
- Skipping chill time leads to messy slices, patience is key.
Nutritional Snapshot
Servings: 9
Calories per serving: 380
Note: These are approximate values.
Time Breakdown at a Glance
Prep Time: 25 minutes
Cook Time: 0 minutes
Total Time: 25 minutes plus 6 hours chilling
Planning Ahead and Storing It Right
You can prepare this dessert up to 24 hours in advance. Store it covered in the refrigerator. It keeps well for up to 3 days. Freezing is possible for up to 1 month, though the texture may soften slightly after thawing. Thaw overnight in the refrigerator before serving.
How to Serve It Beautifully
Serve chilled with a light dusting of fresh cocoa powder. You can pair it with fresh berries on the side or a simple cup of hot tea to echo the flavors. Individual glass cups also make an elegant presentation.
Creative Ways to Use Leftovers
If you somehow have leftovers, try layering them into small parfait glasses with extra whipped cream. You can also freeze slices slightly and enjoy them almost like an ice cream cake.
Extra Tips for Flavor and Ease
Add a touch of orange zest to the mascarpone mixture for a brighter note. Always taste your tea before dipping, it should be bold and fragrant. And remember, simple ingredients shine when treated gently.
Make It Look Like a Bakery Masterpiece
Smooth the top layer carefully with a spatula and dust cocoa powder evenly through a sieve. Wipe the edges of the dish before chilling for a clean presentation. A few delicate tea leaves sprinkled on top can add charm.
Fun Variations to Try Next Time
- Add a thin layer of lemon curd between the cream layers for a citrus boost.
- Mix finely ground Earl Grey leaves into the cream for deeper tea flavor.
- Create individual servings in clear glasses for a dinner party.
- Replace cocoa powder with finely grated dark chocolate.
FAQ’s
Q1: Can I make this without dairy?
Yes, you can use dairy free cream and a plant based mascarpone alternative, though the texture may differ slightly.
Q2: How strong should the tea be?
It should taste slightly stronger than your usual cup so the flavor stands out after chilling.
Q3: Can I reduce the sugar?
Yes, you can reduce it to ⅓ cup if you prefer a less sweet dessert.
Q4: How long does it need to chill?
At least 6 hours, overnight is even better.
Q5: Can I freeze it?
Yes, for up to 1 month, thaw in the refrigerator before serving.
Q6: Why is my filling runny?
The cream may not have been whipped enough or the dessert did not chill long enough.
Q7: Can I use loose leaf tea?
Absolutely, use about 1 tablespoon and strain well.
Q8: Is it served cold?
Yes, always serve it chilled for best texture.
Q9: Can I make it in advance for a party?
Yes, it is perfect for making the day before.
Q10: Can I add fruit?
Fresh raspberries pair beautifully if you want a fresh twist.
Conclusion
This Earl Grey Tiramisu brings together comfort and elegance in the most effortless way. From the first creamy bite to the lingering citrus note, it feels special without being complicated. Trust me, once you try it, you will find yourself making it again and again, because some desserts simply deserve a permanent place at the table.
Print
Earl Grey Tiramisu
- Prep Time: 25 minutes
- Cook Time: 0 minutes
- Total Time: 25 minutes plus 6 hours chilling
- Yield: 9 servings
- Category: Dessert
- Method: No-Bake
- Cuisine: Italian Inspired
- Diet: Vegetarian
Description
A creamy and elegant Earl Grey Tiramisu made with delicate tea-soaked ladyfingers layered with fluffy mascarpone cream and finished with a light dusting of cocoa powder. This no-bake dessert is fragrant, smooth, and perfect for making ahead.
Ingredients
- 24 ladyfingers (about 200 grams)
- 3 Earl Grey tea bags
- 1 ½ cups (360 milliliters) hot water
- 16 ounces (450 grams) mascarpone cheese
- 1 cup (240 milliliters) heavy cream
- ½ cup (100 grams) granulated sugar
- 1 teaspoon vanilla extract
- 2 tablespoons unsweetened cocoa powder
Instructions
- Brew the Earl Grey tea by steeping the tea bags in 1 ½ cups hot water for 5 minutes. Remove tea bags and allow the tea to cool completely.
- In a mixing bowl, whip the heavy cream to soft peaks using an electric mixer.
- In a separate bowl, combine mascarpone cheese, granulated sugar, and vanilla extract. Mix until smooth and creamy.
- Gently fold the whipped cream into the mascarpone mixture until fully incorporated and light.
- Pour the cooled tea into a shallow dish. Quickly dip each ladyfinger into the tea, making sure not to oversoak.
- Arrange a single layer of dipped ladyfingers in a 9×9 inch dish.
- Spread half of the mascarpone cream mixture evenly over the ladyfingers.
- Repeat with another layer of dipped ladyfingers, then spread the remaining mascarpone mixture on top.
- Refrigerate for at least 6 hours, preferably overnight, to allow the layers to set.
- Before serving, dust the top evenly with unsweetened cocoa powder.
Notes
- Do not oversoak the ladyfingers, a quick dip is enough to prevent sogginess.
- For best flavor, allow the dessert to chill overnight.
- Use a fine sieve to dust cocoa powder evenly over the top.
- The dessert can be stored covered in the refrigerator for up to 3 days.
Nutrition
- Serving Size: 1 slice
- Calories: 380
- Sugar: 18g
- Sodium: 95mg
- Fat: 26g
- Saturated Fat: 15g
- Unsaturated Fat: 9g
- Trans Fat: 0g
- Carbohydrates: 30g
- Fiber: 1g
- Protein: 6g
- Cholesterol: 95mg
… [Trackback]
[…] Info to that Topic: cookingflash.com/earl-grey-tiramisu/ […]
… [Trackback]
[…] Find More to that Topic: cookingflash.com/earl-grey-tiramisu/ […]