
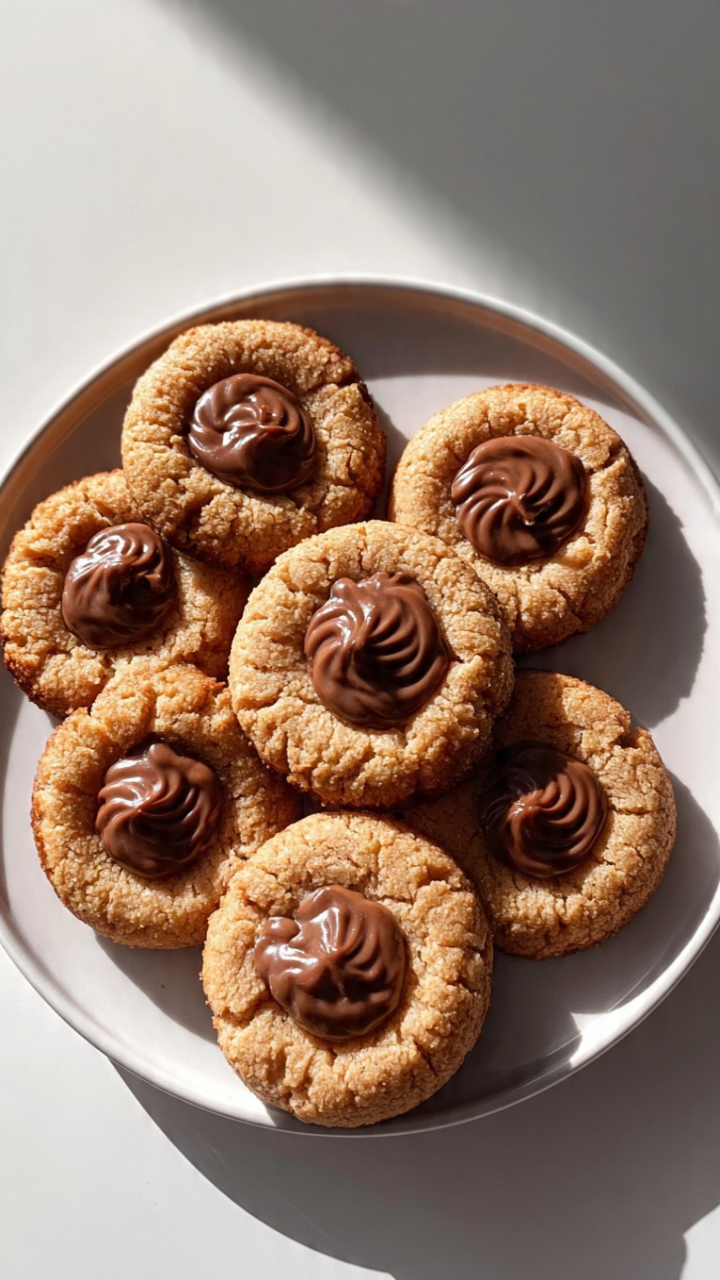
There is something almost magical about a tray of freshly baked cookies cooling on the counter, especially when each one hides a glossy pool of chocolate hazelnut spread in its center. The smell alone is enough to make everyone wander into the kitchen, pretending they just happened to be passing by. These Chocolate Hazelnut Thumbprint Cookies are soft in the middle, lightly crisp at the edges, and filled with that rich, nutty chocolate goodness we all secretly love. Trust me, you’re going to love this.
As we move from that first warm bite into the story behind these little treats, it only gets better.
A Sweet Treat That Feels Like a Hug in Every Bite
There is a comforting simplicity about thumbprint cookies. The buttery dough melts gently on your tongue, while the chocolate hazelnut center adds a creamy contrast that feels almost indulgent. They look charming and rustic, yet they taste bakery worthy. This one’s a total game changer when you want something impressive without spending hours in the kitchen.
And now that you can almost taste them, let’s take a little journey into where this delightful idea began.
The Story Behind Thumbprint Cookies
Thumbprint cookies are believed to have roots in European baking traditions, especially in Scandinavian countries where jam filled versions are popular during the holidays. Over time, bakers around the world began experimenting with different fillings, from fruit preserves to caramel and, of course, chocolate hazelnut spread.
The idea is beautifully simple, press your thumb into soft dough, fill the center, and bake until golden. What started as a festive cookie became a year round favorite, and once chocolate hazelnut spread entered the picture, there was no turning back.
And speaking of why we keep coming back to them, let me tell you exactly why this recipe works so well.
Why This Recipe Always Delivers
Before we dive into mixing bowls and measuring cups, here is why this version stands out.
Versatile: You can serve these at holiday gatherings, birthday parties, or just as an afternoon treat with coffee. They fit in everywhere.
Budget-Friendly: The ingredients are pantry staples like flour, sugar, butter, and eggs, which keeps costs low and flavors high.
Quick and Easy: The dough comes together in minutes, and the shaping is simple and even fun.
Customizable: You can swap fillings, roll the edges in nuts, or drizzle extra chocolate on top.
Crowd-Pleasing: Chocolate and hazelnut is a combination that rarely disappoints.
Make-Ahead Friendly: The dough can be prepared in advance and chilled until ready to bake.
Great for Leftovers: If there are any left, they stay delicious for days and can even be frozen.
Now that you know why this one is worth your time, let’s talk about how to get the very best results.
Insider Secrets for Perfect Thumbprints
A few small details make a big difference here.
- Chill the dough if it feels too soft, this helps the cookies hold their shape.
- Press the thumbprint gently but firmly so the well is deep enough for the filling.
- Fill the centers after baking if you prefer a silkier chocolate texture.
- Do not overbake, the edges should be lightly golden, not dark brown.
With those tips in mind, let’s gather what you need.
Kitchen Tools That Make It Easy
Before you start, having the right tools nearby makes everything smoother.
Mixing Bowl: A medium to large bowl for combining the dough.
Hand Mixer or Stand Mixer: Helps cream the butter and sugar until light and fluffy.
Measuring Cups and Spoons: Accuracy keeps the texture just right.
Baking Sheet: A flat sheet lined with parchment paper for even baking.
Cooling Rack: Allows air to circulate so the bottoms do not get soggy.
Now comes one of my favorite parts, laying out the ingredients and seeing how simple it really is.
Ingredients You Will Need For These Cookies
Each ingredient plays a role in creating that tender bite and rich center.
- All Purpose Flour: 2 cups, 240 grams, provides structure and keeps the cookies tender yet stable.
- Unsalted Butter: 1 cup, 226 grams, softened, creates a rich, melt in your mouth texture.
- Granulated Sugar: 2/3 cup, 135 grams, adds sweetness and helps with light crisp edges.
- Large Egg: 1, room temperature, binds the dough together.
- Vanilla Extract: 1 teaspoon, enhances the chocolate and hazelnut flavors.
- Salt: 1/4 teaspoon, balances the sweetness.
- Chocolate Hazelnut Spread: 1/2 cup, 150 grams, used for the soft, creamy center.
- Finely Chopped Hazelnuts: 1/2 cup, 60 grams, optional for rolling the edges and adding crunch.
And if you need a little flexibility, I have you covered.
Easy Swaps If You Need Them
Sometimes you work with what you have.
Unsalted Butter: Salted butter, simply reduce the added salt slightly.
All Purpose Flour: A gluten free baking blend in equal amount.
Chocolate Hazelnut Spread: Any chocolate spread or even thick peanut butter.
Hazelnuts: Almonds or walnuts for a different crunch.
Now let’s spotlight what really makes these unforgettable.
The Star Ingredients That Make Them Shine
Chocolate Hazelnut Spread: This is the heart of the cookie, creamy, nutty, and deeply chocolatey. It stays slightly soft even after baking, giving that irresistible center.
Unsalted Butter: High quality butter makes the dough rich and flavorful, which is the foundation of every great cookie.
And now let’s dive into the part where your kitchen starts smelling amazing.
Let’s Bake These Together
There is something so satisfying about shaping each cookie by hand. Here are the steps you are going to follow.
- Preheat Your Equipment: Preheat your oven to 350 degrees F, 175 degrees C. Line a baking sheet with parchment paper.
- Combine Ingredients: In a mixing bowl, cream the softened butter and granulated sugar until light and fluffy. Add the egg and vanilla extract, mixing until smooth. Gradually mix in the flour and salt until a soft dough forms.
- Prepare Your Cooking Vessel: Place the baking sheet on a flat surface and ensure parchment is evenly laid out.
- Assemble the Dish: Roll the dough into 1 inch balls. If using chopped hazelnuts, roll the edges of each ball in the nuts. Place on the baking sheet and gently press your thumb into the center of each to create a well. Spoon about 1 teaspoon of chocolate hazelnut spread into each indentation.
- Cook to Perfection: Bake for 10 to 12 minutes, until the edges are lightly golden. The centers should look set but still soft.
- Finishing Touches: Allow cookies to cool on the baking sheet for 5 minutes, then transfer to a cooling rack. Add a small extra dollop of chocolate hazelnut spread if desired for a glossy finish.
- Serve and Enjoy: Serve slightly warm or at room temperature. Let me tell you, it’s worth every bite.
As they cool, the texture settles into something truly special.
The Texture and Flavor Experience
The edges turn gently crisp while the centers stay tender and soft. The buttery base carries subtle vanilla notes, and then you hit that creamy chocolate hazelnut middle. The optional chopped nuts add a delicate crunch that contrasts beautifully with the smooth filling. Each bite feels balanced, rich but not overwhelming.
Helpful Tips for Even Better Results
If you want to elevate them just a bit more, keep these in mind.
- Chill the dough for 20 minutes if your kitchen is warm.
- Use a measuring spoon to keep filling amounts consistent.
- Lightly toast the hazelnuts for deeper flavor.
- Rotate the baking sheet halfway through baking for even color.
Common Mistakes and How to Avoid Them
Even simple recipes can go sideways without a little care.
- Overbaking the cookies, which makes them dry. Remove them when edges are lightly golden.
- Pressing too shallow an indentation, which causes filling to spill over. Make a deep enough well.
- Adding too much filling before baking, which can bubble over. Stick to about 1 teaspoon.
Nutritional Snapshot
Servings: 24 cookies
Calories per serving: 150
Note: These are approximate values.
Time Breakdown for Easy Planning
Prep Time: 15 minutes
Cook Time: 12 minutes
Total Time: 27 minutes
Now that you know how quick they are, let’s talk about storing them.
Storing and Making Ahead
You can prepare the dough up to 2 days in advance and keep it covered in the refrigerator. Baked cookies can be stored in an airtight container at room temperature for up to 5 days. For longer storage, freeze them in a single layer, then transfer to a freezer safe bag for up to 2 months. To enjoy again, let them thaw at room temperature or warm briefly in the oven.
Serving Ideas to Make Them Shine
Serve them on a simple white platter for a classic look, or dust lightly with powdered sugar for a festive touch. They pair beautifully with coffee, milk, or even a scoop of vanilla ice cream for an extra treat.
Creative Ways to Use Leftovers
If you somehow have extras, crumble them over ice cream for a crunchy topping. You can also sandwich two cookies together with extra chocolate hazelnut spread for a decadent dessert sandwich.
Extra Tips for Success
Keep your butter properly softened, not melted. Measure flour carefully by spooning and leveling. And always use good quality chocolate hazelnut spread for the best flavor.
Presentation Tips to Impress
Arrange the cookies in neat rows or a circular pattern. A small drizzle of melted chocolate over the top adds elegance without much effort.
Fun Variations to Try
- Add a pinch of cinnamon to the dough for warmth.
- Swap the filling for raspberry jam for a fruity twist.
- Mix mini chocolate chips into the dough.
- Sprinkle a tiny bit of sea salt on top before baking.
FAQ’s
Q1: Can I freeze the dough?
Yes, you can freeze the shaped dough balls without filling for up to 2 months.
Q2: Can I make them gluten free?
Yes, use a gluten free baking blend in equal measure.
Q3: Why did my cookies crack too much?
The dough may have been too dry or overmixed.
Q4: Can I use store brand chocolate spread?
Absolutely, just choose one you enjoy the taste of.
Q5: How do I keep the centers soft?
Do not overbake and store in an airtight container.
Q6: Can I double the recipe?
Yes, simply double all ingredients evenly.
Q7: Do I have to use nuts?
No, they are optional.
Q8: Can I add cocoa powder to the dough?
Yes, replace 2 tablespoons of flour with cocoa powder.
Q9: How do I prevent spreading?
Chill the dough briefly before baking.
Q10: Are these good for gifting?
They are perfect for gifting and travel well.
Conclusion
There is something deeply comforting about baking a batch of Chocolate Hazelnut Thumbprint Cookies and sharing them with people you love. The buttery base, the creamy center, the slight crunch, it all comes together in the most satisfying way. Trust me, once you make these, they will find a permanent spot in your baking rotation. Now it is your turn to preheat that oven and let the magic happen.
Print
Chocolate Hazelnut Thumbprint Cookies
- Prep Time: 15 minutes
- Cook Time: 12 minutes
- Total Time: 27 minutes
- Yield: 24 cookies
- Category: Dessert
- Method: Baking
- Cuisine: European-inspired
- Diet: Vegetarian
Description
Soft and buttery thumbprint cookies filled with rich chocolate hazelnut spread, lightly crisp on the edges and tender in the center. These classic cookies are simple to make, beautifully balanced in flavor, and perfect for sharing.
Ingredients
- 2 cups (240 grams) all purpose flour
- 1 cup (226 grams) unsalted butter, softened
- 2/3 cup (135 grams) granulated sugar
- 1 large egg, room temperature
- 1 teaspoon vanilla extract
- 1/4 teaspoon salt
- 1/2 cup (150 grams) chocolate hazelnut spread
- 1/2 cup (60 grams) finely chopped hazelnuts, optional
Instructions
- Preheat the oven to 350 degrees F (175 degrees C) and line a baking sheet with parchment paper.
- In a mixing bowl, cream the softened butter and granulated sugar until light and fluffy.
- Add the egg and vanilla extract, mixing until smooth and fully combined.
- Gradually mix in the flour and salt until a soft dough forms.
- Roll the dough into 1 inch balls. If using chopped hazelnuts, roll the edges of each ball in the nuts.
- Place the dough balls on the prepared baking sheet and gently press your thumb into the center of each to create a well.
- Spoon about 1 teaspoon of chocolate hazelnut spread into each indentation.
- Bake for 10 to 12 minutes, until the edges are lightly golden and the centers are set but still soft.
- Allow the cookies to cool on the baking sheet for 5 minutes, then transfer to a cooling rack.
- If desired, add a small extra dollop of chocolate hazelnut spread on top for a glossy finish before serving.
Notes
- Chill the dough for 20 minutes if it feels too soft before shaping.
- Do not overbake to keep the centers tender.
- Store in an airtight container at room temperature for up to 5 days.
- Freeze baked cookies for up to 2 months and thaw at room temperature before serving.
Nutrition
- Serving Size: 1 cookie
- Calories: 150
- Sugar: 9g
- Sodium: 45mg
- Fat: 9g
- Saturated Fat: 4g
- Unsaturated Fat: 4g
- Trans Fat: 0g
- Carbohydrates: 16g
- Fiber: 1g
- Protein: 2g
- Cholesterol: 20mg