
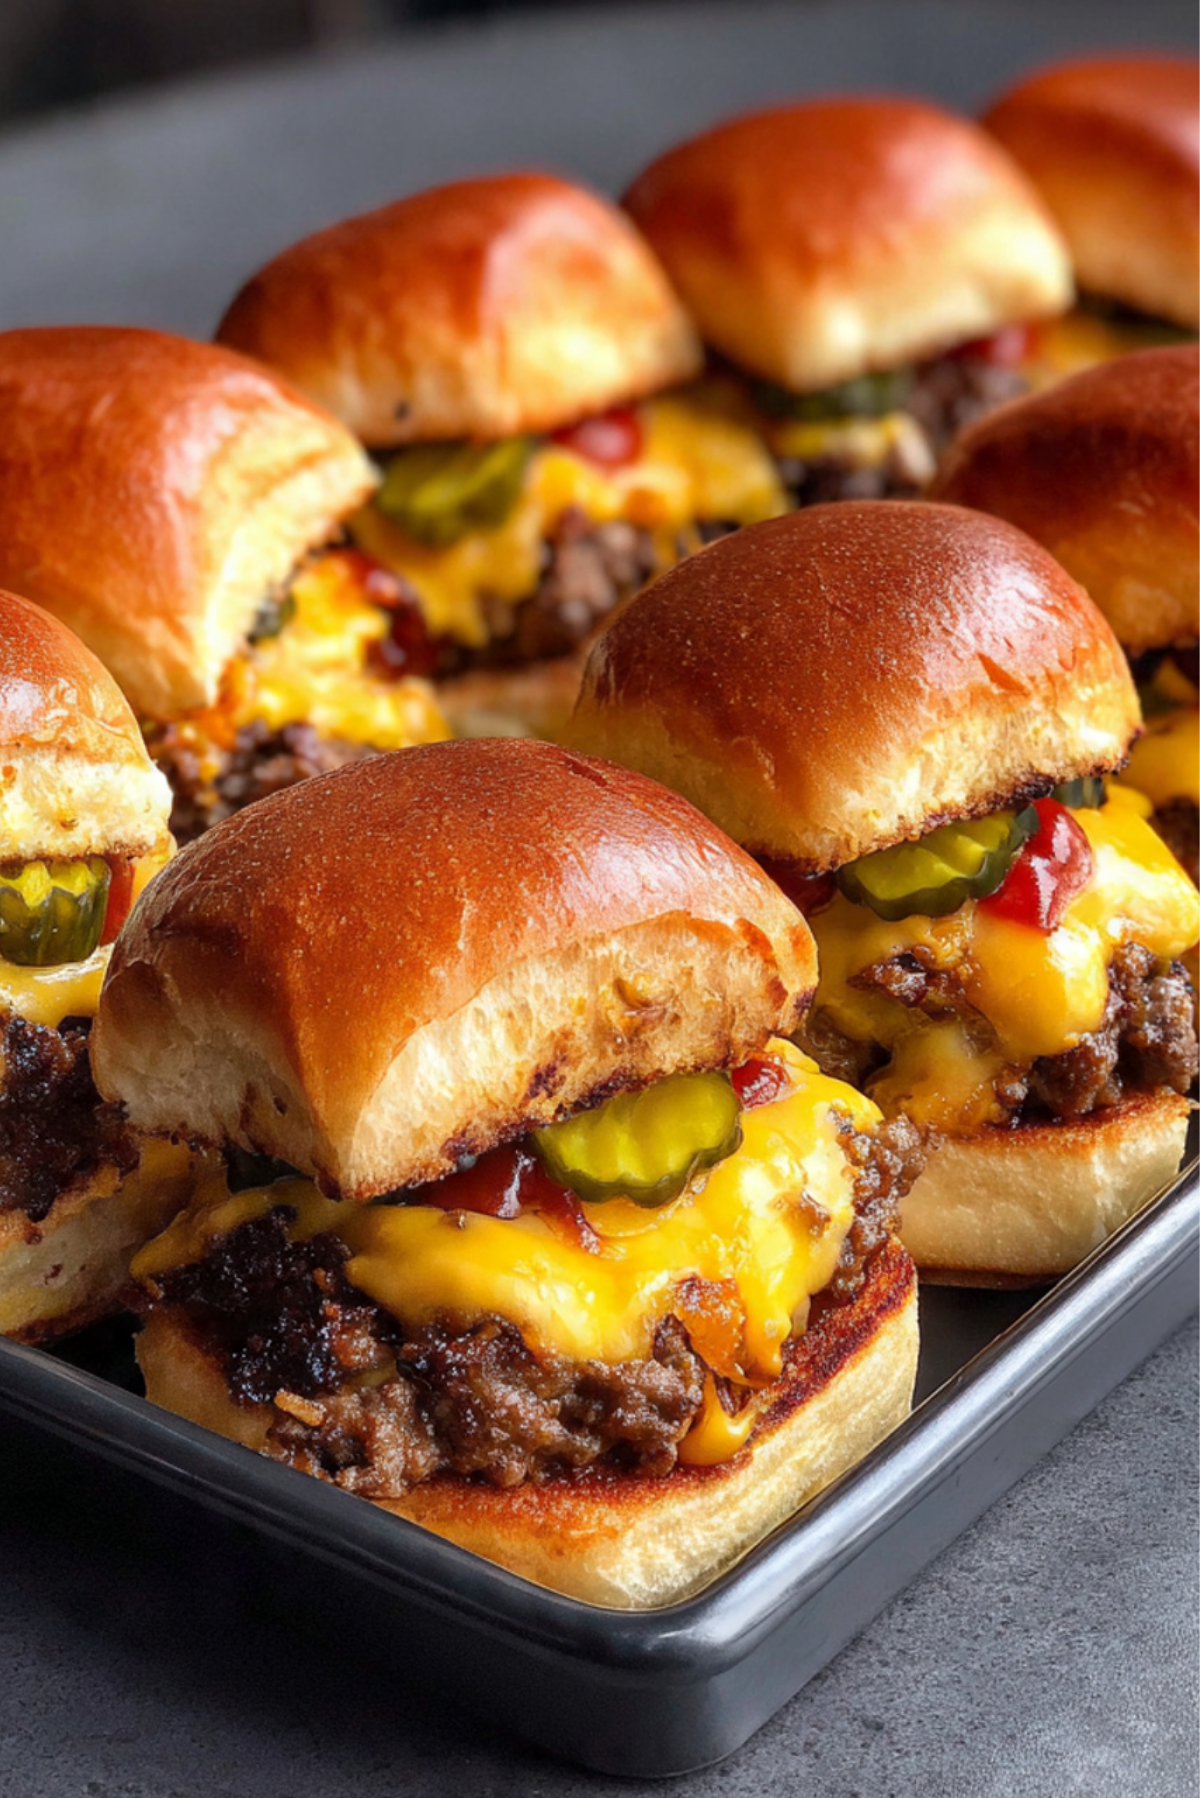
There’s something undeniably comforting about biting into a perfectly warm, cheesy slider. The soft bun, the juicy beef, that molten layer of cheese, and a little crunch from pickles or onions—it’s like all the best parts of a cheeseburger shrunk down into two perfect bites. Whether you’re prepping for a game day, a casual backyard gathering, or just craving something fun for dinner, cheeseburger sliders are that one crowd-pleaser you can always count on.
Behind the Recipe
The idea for these cheeseburger sliders came from a lazy Sunday afternoon when I wanted all the burger vibes without firing up the grill. I had some ground beef in the fridge, a pack of Hawaiian rolls in the pantry, and not a whole lot of energy. So I layered everything into a baking dish, let the oven do the work, and what came out was magic—gooey, crispy-topped sliders that vanished faster than I could snap a photo. Trust me, once you make these, they’ll be on repeat.
Recipe Origin or Trivia
While sliders have roots in American diner culture, the term originally referred to small, greasy burgers from White Castle, popularized in the 1920s. Today, sliders have evolved into their own playful category of food—compact, packed with flavor, and ideal for parties or picky eaters. The key is the soft pull-apart buns and a simple assembly that makes cooking and serving effortless. Cheeseburger sliders may not have a single origin, but they’ve definitely carved their spot in modern comfort food.
Why You’ll Love Cheeseburger Sliders
It’s not just the flavor that makes these sliders a favorite. It’s how easy and fun they are to make and share.
Versatile: Add your favorite toppings or swap the cheese to make them your own.
Budget-Friendly: Uses affordable pantry staples and stretches ground beef into 12 sliders.
Quick and Easy: Minimal prep and just 15 minutes of bake time.
Customizable: Make them spicy, tangy, or sweet depending on your sauce and seasoning choices.
Crowd-Pleasing: Everyone loves them—adults, kids, picky eaters, and foodies alike.
Make-Ahead Friendly: Assemble ahead and bake when ready to serve.
Great for Leftovers: Reheat well in the oven or air fryer for another tasty snack.
Chef’s Pro Tips for Perfect Results
Here are some simple yet powerful tips to elevate your sliders from good to irresistible.
- Use lean ground beef to avoid sogginess but not too lean so it stays juicy.
- Don’t overbake—15 minutes is usually enough to melt the cheese and toast the buns just right.
- Add a layer of sliced cheese over the beef while it’s still hot so it melts smoothly.
- Brush the tops of the buns with melted butter and sesame seeds for that golden finish.
- Let them rest for 5 minutes before slicing so the cheese sets slightly and holds together better.
Kitchen Tools You’ll Need
These basic tools will help you pull off this recipe with ease.
Baking Dish: A 9×13 inch pan works perfectly for fitting 12 sliders snugly.
Skillet: For browning the beef and cooking the onions evenly.
Sharp Knife or Bread Knife: To cleanly cut the slider buns without tearing.
Small Brush: For buttering the tops of the buns before baking.
Aluminum Foil: Helps prevent the tops from browning too quickly while baking.
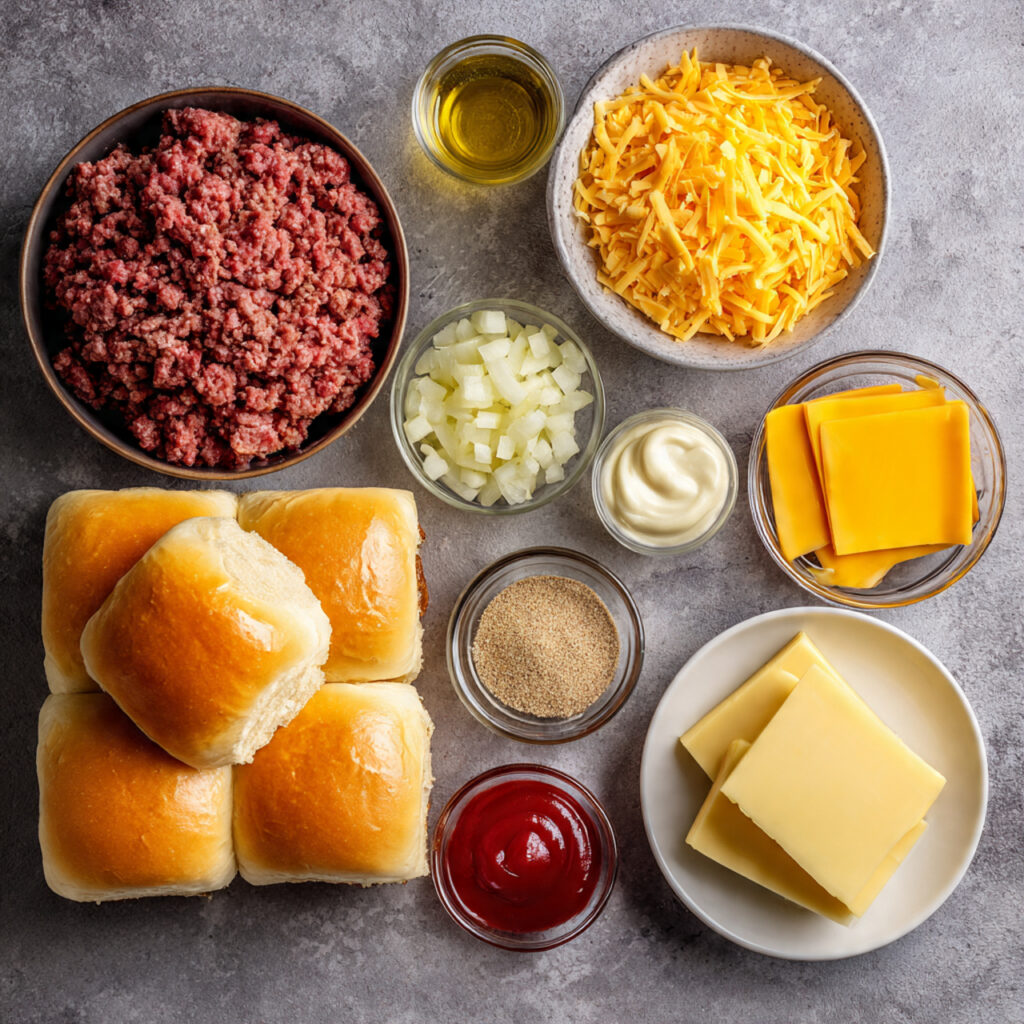
Ingredients in Cheeseburger Sliders
The magic of these sliders lies in how simple and familiar the ingredients are, yet together they make something downright addictive.
- Ground Beef: 1 pound. The juicy star of the show, seasoned and cooked to savory perfection.
- Hawaiian Sweet Rolls: 12 rolls. Soft, slightly sweet buns that pull apart beautifully.
- Cheddar Cheese: 6–8 slices. Melts perfectly and adds that creamy, sharp flavor.
- Yellow Onion: 1 small, diced. Adds sweetness and depth when sautéed with the beef.
- Garlic Powder: 1 teaspoon. Brings warmth and flavor without overpowering.
- Salt: ½ teaspoon. Enhances all the savory notes in the beef.
- Black Pepper: ¼ teaspoon. Adds a subtle kick and complexity.
- Pickles: 12 slices. A tangy contrast that cuts through the richness.
- Ketchup: 2 tablespoons. Adds sweetness and moisture to the beef layer.
- Mustard: 1 tablespoon. A tangy zip that ties the flavors together.
- Butter: 2 tablespoons, melted. Brushed on top of the buns for flavor and browning.
- Sesame Seeds: 1 teaspoon. Optional but adds a fun, toasted finish.
Ingredient Substitutions
Ran out of something? No worries. Here are some easy swaps.
Ground Beef: Ground turkey or plant-based ground “meat.”
Cheddar Cheese: American, provolone, or Monterey Jack.
Hawaiian Rolls: Slider buns, dinner rolls, or even cut brioche.
Pickles: Jalapeños or grilled onions for a twist.
Ketchup: Tomato paste with a bit of sugar.
Mustard: Dijon or spicy brown mustard for extra tang.
Ingredient Spotlight
Hawaiian Rolls: These fluffy, sweet rolls create the perfect contrast with savory beef and tangy pickles. Their soft texture makes every bite melt in your mouth.
Cheddar Cheese: Classic, melty, and sharp, cheddar brings that essential cheeseburger flavor. Go for thin slices so it melts quickly and evenly.
Instructions for Making Cheeseburger Sliders
Making these sliders is a breeze, and trust me, once you get into the groove, you’ll want to make them for every occasion.
-
Preheat Your Equipment:
Preheat your oven to 350°F (175°C). Lightly grease your baking dish or line it with parchment paper. -
Combine Ingredients:
In a skillet over medium heat, cook diced onions until soft, then add ground beef. Season with garlic powder, salt, and pepper. Stir in ketchup and mustard once the meat is fully cooked. -
Prepare Your Cooking Vessel:
Slice the Hawaiian rolls in half horizontally, keeping the top and bottom halves intact. Place the bottom half in the baking dish. -
Assemble the Dish:
Spread the cooked beef evenly over the bottom layer of buns. Add cheese slices to cover the meat, then place pickles evenly across. Top with the other half of the buns. -
Cook to Perfection:
Brush the tops with melted butter and sprinkle with sesame seeds. Cover with foil and bake for 10 minutes. Remove foil and bake another 5 minutes until tops are golden. -
Finishing Touches:
Let the sliders rest for 5 minutes to firm up. This makes them easier to slice and handle. -
Serve and Enjoy:
Slice and serve warm, right out of the pan. Add extra pickles, ketchup, or mustard if you like!
Texture & Flavor Secrets
These sliders hit all the right notes—soft, pillowy buns, gooey melted cheese, tender seasoned beef, and a pop of tang from the pickles. The contrast of textures between the crisped top bun and the melty center is what makes every bite addictive. The flavors are layered, starting with the umami-rich beef, followed by the creamy cheese, and ending with the sweet and tangy balance of condiments and pickles.
Cooking Tips & Tricks
Some quick tips to make the process smoother:
- Use thin cheese slices so they melt fast without overcooking the buns.
- Don’t skip the butter topping—it adds flavor and color.
- If assembling ahead, store in the fridge and bake just before serving.
What to Avoid
These mistakes are easy to make, but also easy to fix:
- Overcooking the beef: It will dry out. Cook just until browned.
- Skipping foil while baking: You’ll end up with burnt bun tops.
- Using too much sauce: The sliders can get soggy.
Nutrition Facts
Servings: 12 sliders
Calories per serving: 290
Note: These are approximate values.
Preparation Time
Prep Time: 15 minutes
Cook Time: 15 minutes
Total Time: 30 minutes
Make-Ahead and Storage Tips
These sliders are perfect for prepping ahead. You can cook the beef and assemble the sliders up to a day in advance. Store covered in the fridge, then bake fresh when ready to eat. Leftovers? Just pop them in the oven at 350°F for about 5–7 minutes or reheat in the air fryer for an extra toasty top. You can also freeze unbaked sliders wrapped in foil for up to 2 months.
How to Serve Cheeseburger Sliders
Serve these straight from the pan with a side of fries, sweet potato chips, or a fresh green salad. They pair beautifully with a fizzy drink or sparkling lemonade. For parties, add a mini slider bar with toppings like lettuce, jalapeños, caramelized onions, or different sauces.
Creative Leftover Transformations
If you happen to have a few leftovers (which is rare), here’s what you can do:
- Slider Breakfast Bake: Chop and mix with scrambled eggs and cheese, then bake in a casserole.
- Beefy Grilled Sandwich: Flatten and toast between bread with extra cheese.
- Stuffed Bell Peppers: Use slider filling in halved peppers with rice and bake.
Additional Tips
- Slightly toast the bottom buns before assembling to avoid sogginess.
- Add a layer of shredded lettuce after baking for a fresh crunch.
- For spicy lovers, mix in a little hot sauce with the ketchup and mustard.
Make It a Showstopper
Presentation is everything! Brush those buns with butter and sesame seeds, slice cleanly, and stack them high on a wooden board. Add small skewers or party picks for a playful touch. A little fresh parsley or microgreens scattered around takes it to the next level visually.
Variations to Try
- Spicy Jalapeño Sliders: Add sliced jalapeños and pepper jack cheese.
- BBQ Bacon Sliders: Swap mustard for BBQ sauce and use smoked cheddar.
- Mushroom Swiss Sliders: Add sautéed mushrooms and Swiss cheese.
- Caramelized Onion & Gruyere: Sweet onions and nutty cheese take it upscale.
- Tex-Mex Style: Add taco seasoning and top with crushed tortilla chips after baking.
FAQ’s
Q1: Can I make these vegetarian?
A1: Absolutely. Use plant-based ground meat and dairy-free cheese for a delicious vegetarian version.
Q2: Can I freeze them?
A2: Yes. Assemble and freeze before baking, then bake straight from frozen at 350°F for 25–30 minutes covered with foil.
Q3: How long do leftovers last?
A3: Store in an airtight container in the fridge for up to 3 days.
Q4: What kind of cheese works best?
A4: Cheddar is classic, but American, provolone, or mozzarella all melt beautifully too.
Q5: Can I use regular buns instead of sliders?
A5: Yes, just cut full-sized buns in half or use dinner rolls.
Q6: Are they good served cold?
A6: They’re best warm, but still tasty cold, especially as a quick snack.
Q7: How can I make them healthier?
A7: Use lean meat, low-fat cheese, and whole wheat rolls.
Q8: Can I prep them in the morning for dinner?
A8: Yes. Assemble in the morning, cover and refrigerate, then bake before serving.
Q9: Do I need to grease the pan?
A9: Yes, or use parchment paper to prevent sticking.
Q10: Can I double the recipe?
A10: Definitely. Use a larger pan or two 9×13 pans and bake the same way.
Conclusion
Cheeseburger sliders are the kind of recipe you keep in your back pocket. They’re quick, customizable, and they disappear fast. Whether it’s a busy weeknight or a festive gathering, these little bites of joy never fail to hit the spot. Let me tell you, it’s worth every bite.
Print
Cheeseburger Sliders
- Prep Time: 15 minutes
- Cook Time: 15 minutes
- Total Time: 30 minutes
- Yield: 12 sliders
- Category: Main Dish
- Method: Baking
- Cuisine: American
- Diet: Halal
Description
Juicy, cheesy, and packed with flavor, these easy cheeseburger sliders are the ultimate crowd-pleasing snack or meal. Perfect for game day, parties, or casual dinners.
Ingredients
- 1 pound ground beef
- 12 Hawaiian sweet rolls
- 6–8 slices cheddar cheese
- 1 small yellow onion, diced
- 1 teaspoon garlic powder
- 1/2 teaspoon salt
- 1/4 teaspoon black pepper
- 12 pickle slices
- 2 tablespoons ketchup
- 1 tablespoon mustard
- 2 tablespoons butter, melted
- 1 teaspoon sesame seeds (optional)
Instructions
- Preheat your oven to 350°F (175°C). Lightly grease a 9×13 inch baking dish.
- In a skillet over medium heat, cook diced onions until soft. Add ground beef and cook until browned. Stir in garlic powder, salt, pepper, ketchup, and mustard. Remove from heat.
- Slice the Hawaiian rolls in half horizontally and place the bottom half in the baking dish.
- Spread the beef mixture evenly over the bottom buns. Layer with cheddar cheese slices and pickle slices.
- Place the top half of the rolls on top. Brush with melted butter and sprinkle with sesame seeds.
- Cover with foil and bake for 10 minutes. Remove foil and bake for another 5 minutes until tops are golden.
- Let rest for 5 minutes, slice, and serve warm.
Notes
- Use lean ground beef to avoid sogginess but not too lean so it stays juicy.
- To make ahead, assemble the sliders and refrigerate until ready to bake.
- Reheat leftovers in the oven or air fryer for the best texture.
Nutrition
- Serving Size: 1 slider
- Calories: 290
- Sugar: 5g
- Sodium: 430mg
- Fat: 16g
- Saturated Fat: 7g
- Unsaturated Fat: 7g
- Trans Fat: 0g
- Carbohydrates: 22g
- Fiber: 1g
- Protein: 14g
- Cholesterol: 45mg