

There’s something about the first bite into a Butterfinger Ball that instantly transports you back to childhood. The creamy peanut butter, the crunch of Butterfinger candy, and the silky smooth chocolate coating come together in one delightful bite-sized treat that feels both nostalgic and indulgent. Imagine the sweet aroma of chocolate melting in your kitchen, the sound of candy crunching as you stir it in, and the joy of rolling little orbs of goodness that you know will disappear in seconds once they’re ready. Trust me, you’re going to love this one.
Behind the Recipe
Every family has that one no-bake recipe that shows up at every gathering, and Butterfinger Balls often take that role. They’re playful, fuss-free, and a little bit mischievous, because no one can ever stop at just one. For me, they remind me of holidays when my mom would let us kids crush the candy bars with a rolling pin, filling the kitchen with laughter and sticky fingers. They’ve carried that same cozy spirit with me, becoming a tradition that bridges childhood fun with grown-up indulgence.
Recipe Origin or Trivia
Butterfinger candy bars were first introduced in 1923 and quickly became a favorite for their unique flaky, crunchy peanut butter core coated in chocolate. The name “Butterfinger” itself was actually chosen from a public contest. Over the decades, the bar has found its way into countless desserts, from pies to ice cream toppings, but Butterfinger Balls are one of the most charming and creative uses. It’s a little piece of candy history transformed into a treat that feels homemade and heartfelt.
Why You’ll Love Butterfinger Balls
They’re more than just a sweet bite, they’re the kind of treat that brings people together. Here’s why you’ll keep coming back to this recipe:
Versatile: Perfect for holidays, bake sales, potlucks, or just as a snack tucked away in the fridge.
Budget-Friendly: A few simple ingredients create dozens of treats without breaking the bank.
Quick and Easy: No baking, no complicated steps, just mix, roll, and dip.
Customizable: Swap in different coatings, add sprinkles, or drizzle with white chocolate for flair.
Crowd-Pleasing: Loved by kids and adults alike, these vanish as soon as they hit the table.
Make-Ahead Friendly: They keep beautifully in the fridge, making them perfect for planning ahead.
Great for Leftovers: If you have extra, they can be repurposed into ice cream toppings or crumbled over cakes.
Chef’s Pro Tips for Perfect Results
Getting these just right is all about the little details.
- Chill your peanut butter mixture before rolling so the balls hold their shape.
- Crush the Butterfinger bars finely for a smoother texture, or leave them chunkier for extra crunch.
- Use a fork or dipping tool when coating with chocolate for a neat, even finish.
- Let the chocolate set on parchment paper to avoid sticking.
- Store in an airtight container to keep the chocolate shell crisp.
Kitchen Tools You’ll Need
Before you begin, gather your tools so the process flows smoothly:
- Mixing Bowl: For combining peanut butter, sugar, and candy.
- Spatula: To fold everything together with ease.
- Rolling Pin or Food Processor: To crush the Butterfinger bars.
- Baking Sheet: Lined with parchment for setting the dipped balls.
- Microwave-Safe Bowl: For melting chocolate smoothly.
Ingredients in Butterfinger Balls
The magic of this recipe lies in the harmony between creamy, crunchy, and chocolatey.
- Creamy Peanut Butter: 1 cup adds a smooth, nutty base that binds everything together.
- Powdered Sugar: 1 cup sweetens and thickens the mixture for rolling.
- Butterfinger Candy Bars: 6 full-size bars, crushed bring that signature crunchy peanut butter flavor.
- Chocolate Chips: 2 cups (semisweet or milk) melt into a luscious coating that seals the deal.
- Shortening or Coconut Oil: 1 tablespoon helps the chocolate melt smoothly and coat evenly.
Ingredient Substitutions
Sometimes your pantry needs a little flexibility, and that’s perfectly fine.
Peanut Butter: Swap with almond butter or sunflower seed butter for a nut-free version.
Powdered Sugar: Use coconut sugar blended into a fine powder for a natural option.
Chocolate Chips: Dark chocolate or white chocolate chips make a fun twist.
Butterfinger Candy Bars: Try Heath bars or Reese’s Pieces for a different flavor profile.
Ingredient Spotlight
Butterfinger Candy Bars: Their flaky, crunchy peanut butter core is unlike any other candy, giving these balls their unique texture.
Peanut Butter: Not just the binder, but the flavor anchor that balances sweetness with richness.

Instructions for Making Butterfinger Balls
Here comes the fun part, and I promise it’s as enjoyable to make as it is to eat.
- Preheat Your Equipment: No oven needed here, but clear counter space and line a baking sheet with parchment paper.
- Combine Ingredients: In a large bowl, mix peanut butter, powdered sugar, and crushed Butterfinger bars until fully combined.
- Prepare Your Cooking Vessel: Chill the mixture for 20–30 minutes to firm up, making rolling easier.
- Assemble the Dish: Roll the chilled mixture into 1-inch balls and place them on the lined baking sheet.
- Cook to Perfection: Melt the chocolate chips with shortening in the microwave in 30-second intervals, stirring until smooth.
- Finishing Touches: Dip each ball into the melted chocolate, letting excess drip off, then return to parchment to set.
- Serve and Enjoy: Once the chocolate hardens, arrange them on a platter and get ready to watch them disappear.
Texture & Flavor Secrets
The beauty of these little bites lies in their contrast. The creamy peanut butter filling meets the delicate crunch of Butterfinger, all cloaked in a crisp chocolate shell. Each bite gives you a play of smooth, crunchy, and melt-in-your-mouth sensations, with flavors that swing between nutty, chocolatey, and sweetly nostalgic.
Cooking Tips & Tricks
To make your batch flawless every time:
- Chill the balls before dipping to prevent them from falling apart.
- Use toothpicks for dipping if you want less mess.
- Sprinkle crushed candy or drizzle extra chocolate for decoration.
What to Avoid
Even simple recipes have their pitfalls, so here’s what to watch out for:
- Rolling the mixture too warm, it won’t hold shape.
- Overheating the chocolate, it can seize and become grainy.
- Skipping parchment paper, you’ll end up with sticky bottoms.
Nutrition Facts
Servings: 24
Calories per serving: 180
Note: These are approximate values.
Preparation Time
Prep Time: 30 minutes
Cook Time: 0 minutes
Total Time: 30 minutes
Make-Ahead and Storage Tips
Butterfinger Balls are wonderful make-ahead treats. You can prepare the mixture a day in advance, roll them out, and store in the fridge until ready to dip. Once coated, they’ll keep well in an airtight container for up to a week. For longer storage, freeze them for up to three months and simply thaw before serving.
How to Serve Butterfinger Balls
These little gems shine at parties, holiday platters, or even as a sweet lunchbox surprise. Serve them alongside coffee or hot cocoa for a cozy treat, or display them on a tiered dessert stand for a special event.
Creative Leftover Transformations
If you somehow have leftovers, try crumbling them over vanilla ice cream, folding into milkshakes, or sprinkling over cupcakes for instant decoration and flavor.
Additional Tips
For extra depth, mix in a pinch of sea salt with the filling. Want more crunch? Leave some candy pieces chunkier. And if presentation matters, drizzle melted white chocolate in thin zig-zags over the top.
Make It a Showstopper
Presentation is everything, and Butterfinger Balls can absolutely steal the spotlight. Arrange them in mini paper cups, dust lightly with edible glitter, or stack in a glass jar with a ribbon for gifting. Their glossy chocolate shells catch the light beautifully.
Variations to Try
- Peanut Butter & White Chocolate: Dip in white chocolate instead of dark for a sweeter bite.
- Crunchy Peanut Butter: Swap creamy peanut butter with crunchy for extra texture.
- Holiday Style: Add red and green sprinkles for Christmas or pastel for Easter.
- Double Dipped: Coat in milk chocolate first, then drizzle with dark chocolate.
- Nut-Free Delight: Use sunflower seed butter and Reese’s Pieces instead of Butterfinger.
FAQ’s
1. Can I use natural peanut butter?
Yes, but choose one with minimal oil separation to keep the mixture firm.
2. How do I crush the Butterfinger bars?
A rolling pin and a zip-top bag work perfectly, or pulse them in a food processor.
3. Can I make these ahead for a party?
Absolutely, they can be made several days in advance and stored chilled.
4. Do they freeze well?
Yes, they freeze beautifully for up to three months.
5. Can I use white chocolate instead of milk or dark?
Yes, it gives a sweeter flavor and a pretty contrast.
6. What if my chocolate coating is too thick?
Add a little more shortening or coconut oil to thin it out.
7. How do I prevent sticky hands when rolling?
Chill the mixture and lightly dust your hands with powdered sugar.
8. Can I make these bite-sized or larger?
Yes, just adjust rolling size, but smaller balls are easier to coat.
9. Do I need to refrigerate after dipping?
Yes, refrigeration helps set the chocolate and keeps them fresh.
10. Are these gluten-free?
Most Butterfinger bars are gluten-free, but always check labels to be sure.
Conclusion
Butterfinger Balls are more than just a treat, they’re a memory wrapped in chocolate. With every bite, you get the joy of peanut butter, the crunch of candy, and the sweetness of nostalgia. They’re quick, fun, and guaranteed to win hearts wherever they go. Let me tell you, it’s worth every bite, and once you make them, you’ll find yourself coming back to this recipe again and again.
Print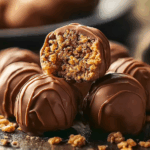
Butterfinger Balls
- Prep Time: 30 minutes
- Cook Time: 0 minutes
- Total Time: 30 minutes
- Yield: 24 balls
- Category: Dessert
- Method: No-bake
- Cuisine: American
- Diet: Vegetarian
Description
Bite-sized, no-bake treats combining creamy peanut butter, crushed Butterfinger candy, and a smooth chocolate coating. Perfect for parties, make-ahead snacks, or a nostalgic sweet tooth fix.
Ingredients
- Creamy peanut butter, 1 cup
- Powdered sugar, 1 cup
- Butterfinger candy bars, 6 full-size bars, crushed
- Chocolate chips (semisweet or milk), 2 cups
- Shortening or coconut oil, 1 tablespoon
Instructions
- Clear counter space and line a baking sheet with parchment paper.
- In a large bowl, combine 1 cup creamy peanut butter and 1 cup powdered sugar, stirring until smooth.
- Add 6 crushed Butterfinger bars to the peanut butter mixture and fold until evenly distributed.
- Chill the mixture for 20 to 30 minutes to firm up for easier rolling.
- Roll the chilled mixture into 1-inch balls and place them on the prepared baking sheet.
- In a microwave-safe bowl, melt 2 cups chocolate chips with 1 tablespoon shortening or coconut oil in 30-second intervals, stirring between intervals until smooth.
- Dip each ball into the melted chocolate, letting excess drip off, and return to the parchment-lined sheet.
- Let the chocolate set in the refrigerator until firm, about 15 to 30 minutes.
- Serve chilled or store in an airtight container in the refrigerator.
Notes
- Chill the mixture before rolling to prevent the balls from falling apart.
- Pulse Butterfinger bars in a food processor for fine crumbs, or crush by hand for chunkier texture.
- If chocolate becomes too thick, stir in a bit more shortening or coconut oil.
- Store in an airtight container in the fridge for up to one week, or freeze for up to three months.
Nutrition
- Serving Size: 1 ball
- Calories: 180
- Sugar: 14 g
- Sodium: 90 mg
- Fat: 11 g
- Saturated Fat: 4 g
- Unsaturated Fat: 6 g
- Trans Fat: 0 g
- Carbohydrates: 16 g
- Fiber: 1 g
- Protein: 4 g
- Cholesterol: 5 mg