
If you’re craving a dessert that’s equal parts nostalgic and indulgent, you’re in for a treat. These Peanut Butter Cup Rice Krispies Treats are the perfect blend of crispy, gooey, chocolatey magic that brings back childhood memories—with a peanut butter twist that makes them absolutely irresistible. From the first chewy bite to the rich chocolate-peanut butter topping, this is one of those desserts that disappears faster than you expect.
Behind the Recipe
This recipe was born on a lazy Saturday afternoon, sparked by a craving for something sweet but easy. I had a box of Rice Krispies, a jar of peanut butter, and a stash of peanut butter cups leftover from Halloween (shocking, I know). And just like that, a new family favorite was created. These bars have become a regular request, especially when we need something quick to bring to parties or bake sales.
Recipe Origin or Trivia
Rice Krispies Treats first appeared in the 1930s thanks to Kellogg’s home economists and have since become a staple in American kitchens. The addition of peanut butter cups is a modern twist, combining two comfort food icons into one. The result? A crowd-pleasing dessert that blends Midwestern charm with the candy aisle’s best flavors.
Why You’ll Love Peanut Butter Cup Rice Krispies Treats
This dessert doesn’t just taste amazing—it’s practical, flexible, and made for sharing.
Versatile: You can dress these up with different toppings or leave them plain. They fit in at bake sales, birthday parties, or just lazy weekends.
Budget-Friendly: Made with pantry staples and just a few store-bought treats, this dessert doesn’t break the bank.
Quick and Easy: No baking required. From start to finish, you’ll be done in under 30 minutes.
Customizable: Swap in other candies or nut butters for a totally different vibe.
Crowd-Pleasing: These are a guaranteed hit with both kids and adults. Everyone loves that classic peanut butter-chocolate combo.
Make-Ahead Friendly: Whip these up the night before, and they’ll still be perfect the next day.
Great for Leftovers: If you happen to have any left (unlikely), they store wonderfully.
Chef’s Pro Tips for Perfect Results
To make these treats truly unforgettable, here are a few insider tips that make all the difference.
- Use fresh marshmallows: Older ones tend to melt unevenly and get tough.
- Low heat is key: Melting everything slowly ensures a smooth texture.
- Grease your spatula: It keeps the mixture from sticking as you press it into the pan.
- Chop the peanut butter cups finely: This helps them distribute more evenly throughout each bite.
- Let it set properly: Give it at least an hour to cool and firm up before slicing for clean, perfect bars.
Kitchen Tools You’ll Need
You don’t need anything fancy here, just a few basics that make the process smooth and mess-free.
Large Pot: To melt the butter, peanut butter, and marshmallows together.
Rubber Spatula: Ideal for stirring and pressing the sticky mixture into the pan.
9×13-inch Baking Dish: The perfect size for even, thick squares.
Parchment Paper: Makes removing the bars from the pan a breeze.
Sharp Knife: For clean, beautiful slices.
Ingredients in Peanut Butter Cup Rice Krispies Treats
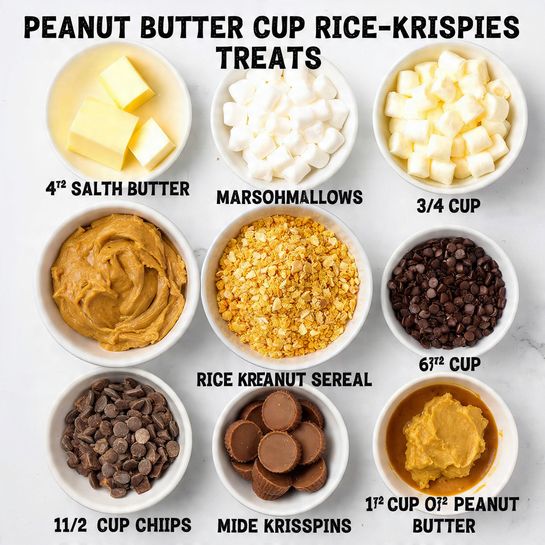
The magic of this recipe lies in how just a few ingredients come together into something completely addictive.
- Unsalted Butter: 4 tablespoons Adds richness and helps bind the marshmallows.
- Mini Marshmallows: 10 ounces The gooey glue that holds the treats together.
- Creamy Peanut Butter: ¾ cup Brings that salty-sweet nutty flavor and extra chew.
- Rice Krispies Cereal: 6 cups Light, crispy, and the heart of this treat.
- Mini Peanut Butter Cups: 1½ cups chopped Melt-in-your-mouth chocolate-peanut butter pockets.
- Semisweet Chocolate Chips: 1 cup For a glossy, decadent top layer.
- Peanut Butter (for topping): ¼ cup Mixed with the chocolate to make that dreamy, swirled finish.
Ingredient Substitutions
Feel free to adapt the recipe depending on what you have on hand.
Creamy Peanut Butter: Almond butter or sunflower seed butter.
Mini Marshmallows: Regular marshmallows chopped into smaller pieces.
Mini Peanut Butter Cups: Chopped Reese’s bars, peanut M&M’s, or even chocolate chips.
Semisweet Chocolate Chips: Milk or dark chocolate chips.
Rice Krispies Cereal: Any puffed rice cereal.
Ingredient Spotlight
Mini Peanut Butter Cups: These tiny candies bring a creamy, chocolatey surprise in every bite. When they slightly melt into the warm mixture, it creates pockets of decadence that feel luxurious in such a humble dessert.
Rice Krispies Cereal: Their light crunch gives this treat its signature texture, creating contrast with the gooey marshmallow base and smooth chocolate topping.
Instructions for Making Peanut Butter Cup Rice Krispies Treats
Let’s dive into how you can whip these up in no time. No oven, no stress, just layers of deliciousness waiting to happen.
-
Preheat Your Equipment:
No need to turn on the oven. Just line a 9×13-inch baking dish with parchment paper. -
Combine Ingredients:
In a large pot over low heat, melt the butter. Add the marshmallows and stir until fully melted. Stir in the peanut butter until smooth and creamy. -
Prepare Your Cooking Vessel:
Once your base is ready, remove the pot from the heat and stir in the cereal until well coated. Quickly fold in half of the chopped peanut butter cups. -
Assemble the Dish:
Press the mixture evenly into the prepared baking dish using a greased spatula or your hands. Flatten the top gently. -
Cook to Perfection:
In a small microwave-safe bowl, melt the chocolate chips and additional peanut butter in 30-second bursts until smooth. Pour over the bars and spread evenly. -
Finishing Touches:
Sprinkle the remaining chopped peanut butter cups on top and gently press them into the chocolate. Let everything cool at room temperature until set. -
Serve and Enjoy:
Slice into squares and watch them vanish.
Texture & Flavor Secrets
What makes these bars unforgettable is the contrast. The crispy cereal base is gooey and chewy, thanks to the marshmallows, while the topping adds a smooth, rich finish with a satisfying bite from the chilled chocolate. The chopped peanut butter cups sneak in bursts of flavor that keep each bite exciting.
Cooking Tips & Tricks
Sometimes, the simplest treats have the best hacks.
- Use fresh, fluffy marshmallows for better melt and stretch.
- Wet your hands slightly when pressing the mixture to avoid sticking.
- Chill the bars for 15–20 minutes for cleaner slicing.
What to Avoid
These are easy to get right, but a few slip-ups can lead to frustration.
- Overheating the marshmallows: This makes the bars hard instead of chewy.
- Packing the mixture too tightly: This removes all the air and crunch.
- Adding chocolate while the base is hot: It can melt the topping unevenly.
Nutrition Facts
Servings: 16
Calories per serving: 280
Note: These are approximate values.
Preparation Time
Prep Time: 10 minutes
Cook Time: 10 minutes
Total Time: 20 minutes
Make-Ahead and Storage Tips
These bars are perfect for prepping ahead. Once set, you can store them in an airtight container at room temperature for up to 5 days. For longer storage, wrap them tightly and freeze for up to 1 month. Let them thaw at room temperature before serving. No one will ever guess they were frozen.
How to Serve Peanut Butter Cup Rice Krispies Treats
These bars are ready to impress. Serve them on a platter with a drizzle of extra melted peanut butter or a sprinkle of flaky sea salt. Pair with coffee or a cold glass of milk for the ultimate comfort snack.
Creative Leftover Transformations
Turn these leftovers into a dessert masterpiece.
- Crumble them over vanilla ice cream for a sundae topping.
- Chop and stir into brownie batter for an epic mashup.
- Layer with whipped cream and bananas for a no-bake parfait.
Additional Tips
Here are a few more tricks to make sure your treats are next-level.
- Try lining your pan with foil for easy lifting and slicing.
- Add a dash of vanilla extract to the melted marshmallow mixture for a richer flavor.
- Sprinkle crushed pretzels or chopped peanuts on top for added crunch.
Make It a Showstopper
For a visual wow factor, swirl the chocolate-peanut butter topping with a toothpick before it sets. Garnish with extra chopped peanut butter cups or a drizzle of white chocolate. Serve on a dark slate platter to really make the colors pop.
Variations to Try
- S’mores Style: Add mini marshmallows and crushed graham crackers into the mix.
- Salted Caramel: Drizzle caramel sauce over the chocolate topping.
- Nut-Free: Use sunflower seed butter and chocolate chips instead of peanut butter cups.
- Holiday Theme: Add festive sprinkles or colored candy on top.
- Double Chocolate: Stir in mini chocolate chips along with the cereal.
FAQ’s
Q1: Can I make these in advance?
A1: Yes, they’re perfect for making a day or two ahead. Just store in an airtight container.
Q2: Do I have to use mini peanut butter cups?
A2: Not at all. You can chop regular-sized ones or substitute your favorite candy.
Q3: How do I keep the bars from sticking to the pan?
A3: Line your pan with parchment paper and grease it lightly.
Q4: Can I use chunky peanut butter?
A4: Yes, it’ll add a bit of crunch to the texture.
Q5: What if I don’t have marshmallows?
A5: You can use marshmallow fluff in a pinch, though the texture may be slightly different.
Q6: Are these gluten-free?
A6: If you use certified gluten-free Rice Krispies, yes.
Q7: Can I skip the chocolate topping?
A7: Sure, but trust me, it adds a lot of flavor and makes them more indulgent.
Q8: How long do they last?
A8: Up to 5 days at room temp or 1 month in the freezer.
Q9: Can kids help make these?
A9: Absolutely. It’s a fun, simple recipe perfect for little hands.
Q10: What’s the best way to cut them?
A10: Use a sharp knife and wipe it clean between cuts for the neatest results.
Conclusion
There’s something magical about a recipe that takes just minutes to make but delivers major flavor and texture in every single bite. These Peanut Butter Cup Rice Krispies Treats hit all the right notes—sweet, salty, crunchy, and creamy. Whether you’re whipping them up for a party or just craving a treat, trust me, these are worth every bite.
Print
Peanut Butter Cup Rice Krispies Treats
- Prep Time: 10 minutes
- Cook Time: 10 minutes
- Total Time: 20 minutes
- Yield: 16 squares
- Category: Dessert
- Method: No-Bake
- Cuisine: American
- Diet: Vegetarian
Description
These Peanut Butter Cup Rice Krispies Treats are the ultimate no-bake dessert—crispy, gooey, chocolatey, and packed with peanut butter cups for an irresistible twist on a classic favorite.
Ingredients
- 4 tablespoons unsalted butter
- 10 ounces mini marshmallows
- ¾ cup creamy peanut butter
- 6 cups Rice Krispies cereal
- 1½ cups mini peanut butter cups, chopped
- 1 cup semisweet chocolate chips
- ¼ cup peanut butter (for topping)
Instructions
- Line a 9×13-inch baking dish with parchment paper.
- In a large pot over low heat, melt the butter. Add the marshmallows and stir until melted and smooth. Stir in the peanut butter.
- Remove from heat and stir in the Rice Krispies cereal until fully coated. Fold in half of the chopped peanut butter cups.
- Press the mixture evenly into the prepared baking dish using a greased spatula.
- In a microwave-safe bowl, melt the chocolate chips with the remaining ¼ cup peanut butter in 30-second intervals until smooth.
- Pour the melted chocolate mixture over the bars and spread evenly. Sprinkle the remaining chopped peanut butter cups on top and gently press them in.
- Let the bars cool at room temperature until set, then slice into squares and serve.
Notes
- Use fresh marshmallows for the best texture.
- Wet your hands slightly when pressing the mixture to avoid sticking.
- Chill briefly before slicing for cleaner cuts.
Nutrition
- Serving Size: 1 square
- Calories: 280
- Sugar: 21g
- Sodium: 150mg
- Fat: 13g
- Saturated Fat: 5g
- Unsaturated Fat: 7g
- Trans Fat: 0g
- Carbohydrates: 38g
- Fiber: 1g
- Protein: 4g
- Cholesterol: 10mg