
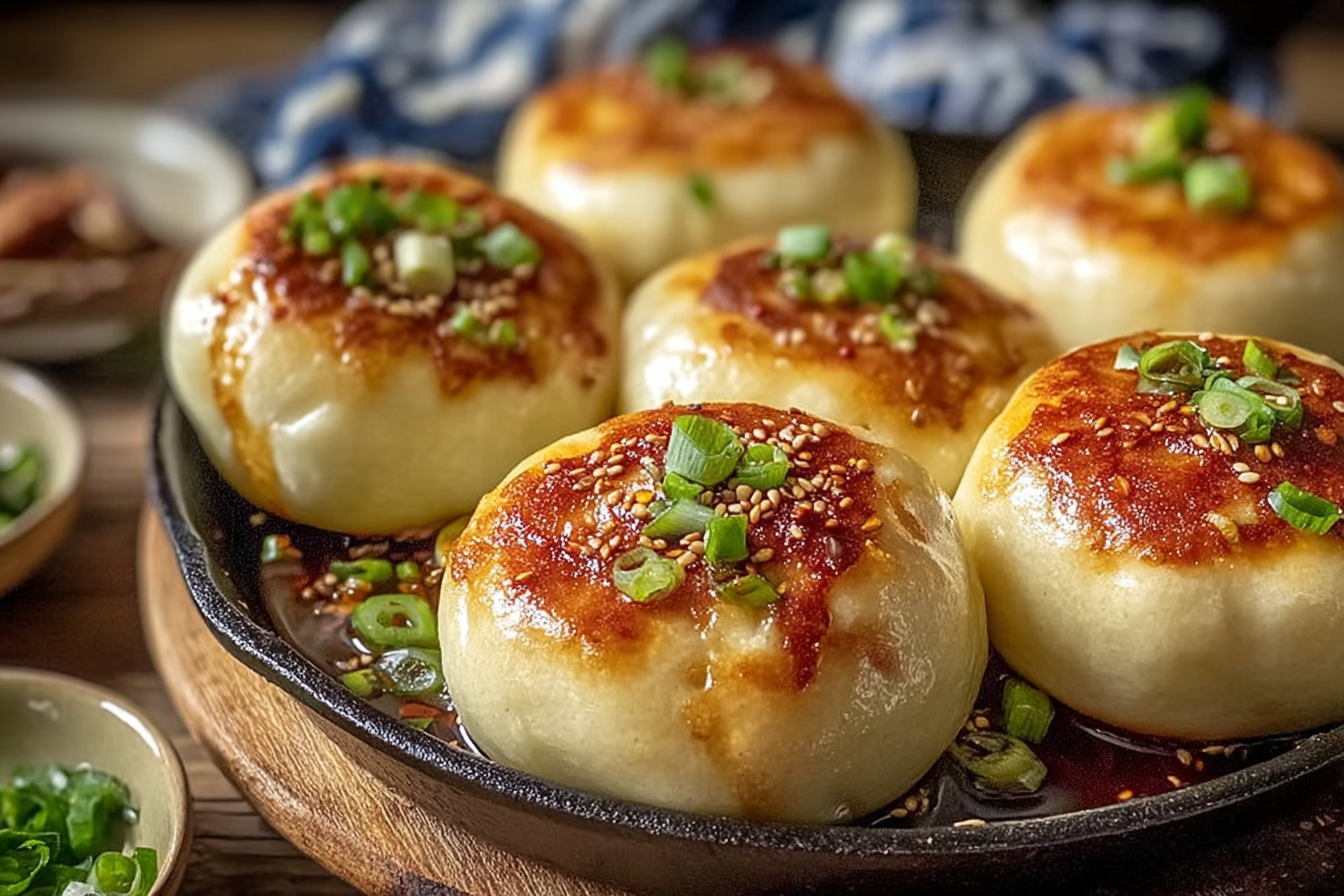
There’s something magical about biting into a perfectly golden pan-fried bun, crisp on the bottom yet soft and steamy inside. The aroma of sizzling dough fills the air as each bun turns a beautiful amber hue. Whether you’re enjoying them for breakfast, lunch, or as a snack, these buns are the kind of comfort food that makes you close your eyes and savor the moment.
Behind the Recipe
I first learned to make pan-fried buns in a tiny kitchen in Shanghai, where the air always smelled of fresh dough and sesame oil. Locals called them “Sheng Jian Bao,” a staple found sizzling on street corners in big cast iron pans. The process fascinated me — the combination of frying and steaming created a texture that was crisp, chewy, and juicy all at once. It quickly became one of my favorite things to recreate at home.
Recipe Origin or Trivia
Pan-fried buns originated in Shanghai, where they evolved from traditional steamed buns. The idea was simple yet brilliant: to give the soft, steamed dough a crispy base by pan-frying. Over time, variations spread across Asia, each with its own filling twist — pork, chicken, or even vegetables. These buns are often enjoyed as part of breakfast or dim sum, served hot right from the pan with a touch of soy sauce and vinegar.
Why You’ll Love Pan Fried Buns
Warm, pillowy, and filled with flavor, these buns are sure to become a staple in your kitchen.
Versatile: You can fill them with pork, chicken, or vegetables depending on your mood.
Budget-Friendly: Simple pantry ingredients come together to create an impressive dish.
Quick and Easy: With a few steps and a bit of patience, you’ll have restaurant-quality buns at home.
Customizable: Adjust the filling to your liking, from savory to spicy.
Crowd-Pleasing: Perfect for family dinners or gatherings, they disappear fast.
Make-Ahead Friendly: The dough and filling can be prepped ahead for convenience.
Great for Leftovers: Reheat them in a pan and they taste freshly made again.
Chef’s Pro Tips for Perfect Results
Getting the perfect pan-fried bun is all about balance between softness and crispiness.
- Use warm water when making the dough for better elasticity.
- Let the dough rest enough so it becomes light and fluffy.
- Seal the buns tightly to keep the filling juices inside.
- When frying, start with medium heat to prevent burning.
- Steam them in the same pan to lock in moisture for a tender top and crispy bottom.
Kitchen Tools You’ll Need
Before we start, make sure you’ve got everything ready to go.
Mixing Bowl: For preparing and kneading the dough.
Rolling Pin: To roll out even dough rounds.
Cast Iron Pan or Non-Stick Skillet: Essential for even frying and steaming.
Spatula: Helps with flipping and removing the buns safely.
Measuring Cups and Spoons: To ensure ingredient accuracy.
Ingredients in Pan Fried Buns
Each ingredient contributes to that irresistible texture and flavor harmony.
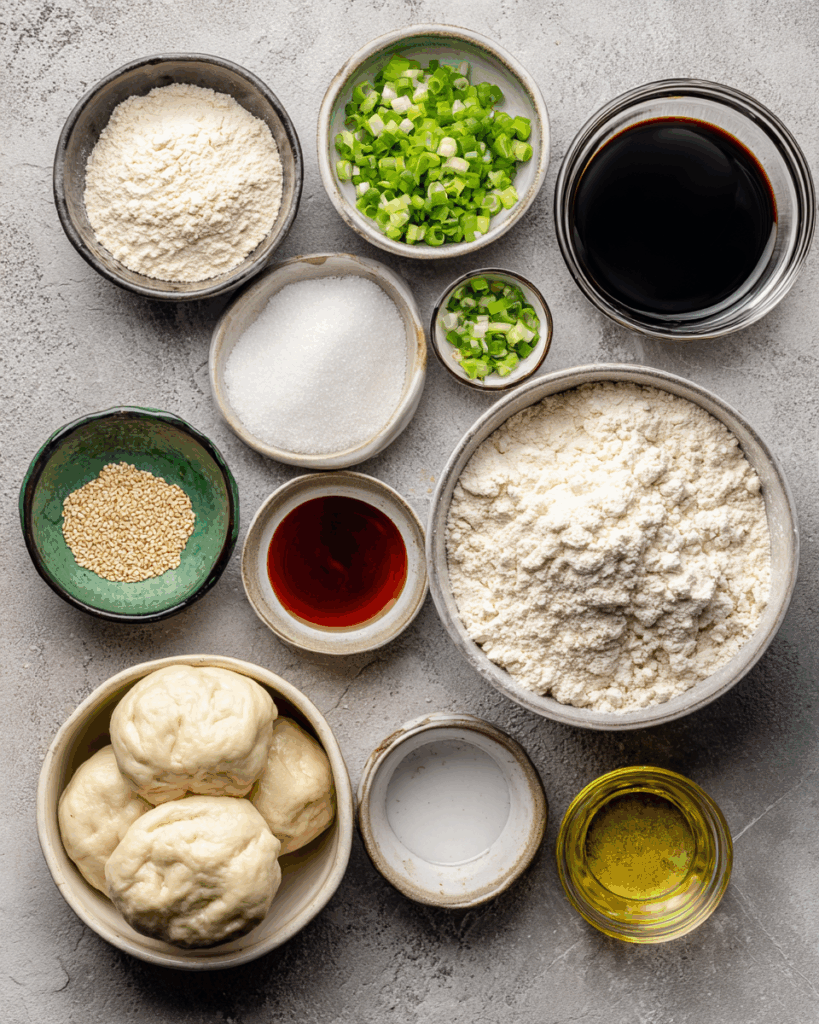
- All-Purpose Flour: 2 ½ cups, forms the soft yet strong dough.
- Warm Water: ¾ cup, activates the yeast and gives elasticity.
- Instant Yeast: 1 teaspoon, helps the dough rise beautifully.
- Sugar: 1 tablespoon, balances flavor and feeds the yeast.
- Salt: ½ teaspoon, enhances taste.
- Ground Pork: ½ pound, traditional juicy filling base.
- Green Onions: 2 tablespoons finely chopped, adds freshness.
- Ginger: 1 tablespoon minced, brings warm spice notes.
- Soy Sauce: 2 tablespoons, adds savory depth.
- Sesame Oil: 1 teaspoon, for rich aroma and moisture.
- Water for Cooking: ½ cup, used during steaming.
- Vegetable Oil: 2 tablespoons, creates that perfect crispy crust.
Ingredient Substitutions
Even if you’re missing something, don’t worry. Here’s how to adapt.
Ground Pork: Use ground chicken or tofu for a lighter version.
Soy Sauce: Replace with tamari for a gluten-free option.
Sesame Oil: Use olive oil if needed, though the aroma will differ.
All-Purpose Flour: Substitute half with whole wheat flour for a heartier texture.
Ingredient Spotlight
Ginger: Adds warmth and complexity, perfectly complementing savory fillings.
Sesame Oil: Its nutty fragrance ties the entire flavor profile together, making every bite unforgettable.
Instructions for Making Pan Fried Buns
Now let’s roll up our sleeves and bring these buns to life. Here are the steps you’ll follow:
- Preheat Your Equipment: Prepare your skillet or cast iron pan and set aside.
- Combine Ingredients: In a bowl, mix flour, sugar, salt, yeast, and warm water. Knead until smooth, then let it rest covered for 1 hour.
- Prepare Your Cooking Vessel: Heat a drizzle of oil in the skillet while shaping the buns.
- Assemble the Dish: Roll out small dough circles, spoon in the pork filling, and pinch tightly to seal.
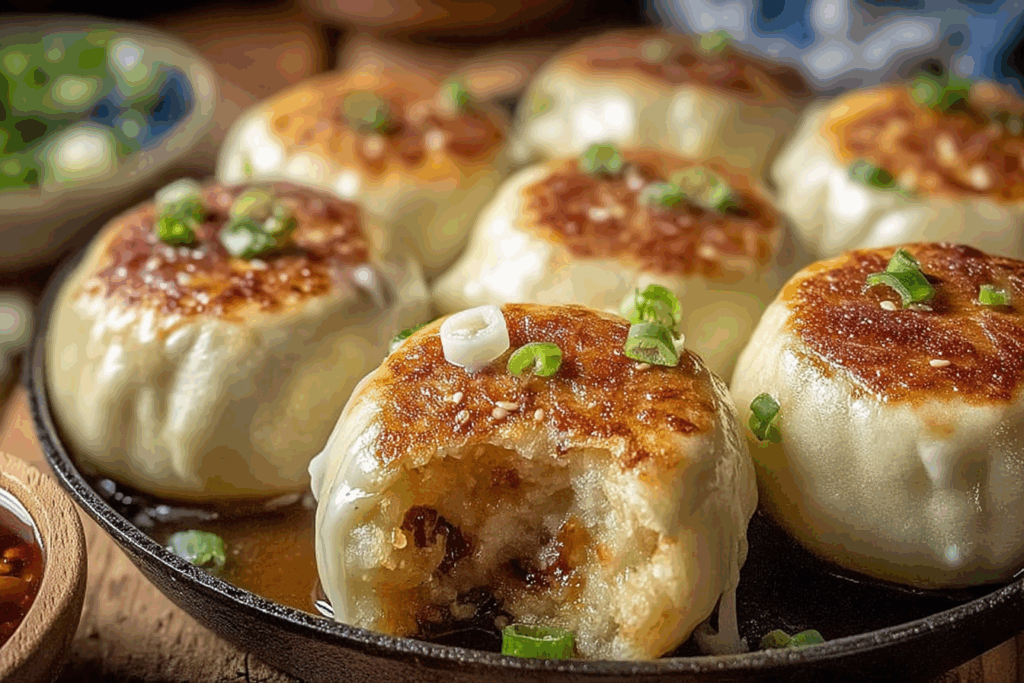
- Cook to Perfection: Place the buns seam-side down in the oiled pan. Fry on medium until golden, then add water and cover to steam for 6–8 minutes.
- Finishing Touches: Uncover and cook another minute to re-crisp the bottoms.
- Serve and Enjoy: Sprinkle green onions and sesame seeds on top and serve warm.
Texture & Flavor Secrets
The magic lies in the contrast: a crispy, golden base that crackles when you bite, followed by a soft, pillowy top filled with juicy, savory goodness. The soy and sesame bring richness, while ginger and green onions lift everything with freshness.
Cooking Tips & Tricks
- Always use medium heat to ensure even browning.
- Don’t overcrowd the pan so the buns cook evenly.
- Add water carefully when steaming to avoid oil splatter.
- Let the buns rest a minute before serving to retain juiciness.
What to Avoid
Even experienced cooks can trip up here, so keep these in mind.
- Don’t use cold water when making dough or it won’t rise properly.
- Avoid overstuffing or the buns may burst.
- Don’t skip the steaming step or the top will be too dry.
- Resist turning the buns too early, or they won’t crisp up nicely.
Nutrition Facts
Servings: 4
Calories per serving: Approximately 320
Note: These values may vary depending on filling choices.
Preparation Time
Prep Time: 1 hour 15 minutes
Cook Time: 20 minutes
Total Time: 1 hour 35 minutes
Make-Ahead and Storage Tips
You can prepare the dough and filling a day ahead and refrigerate them separately. Once cooked, the buns keep well in the fridge for up to 3 days. To reheat, pan-fry again for a few minutes to bring back that signature crispiness. They also freeze beautifully — just steam straight from frozen until heated through.
How to Serve Pan Fried Buns
Serve these buns fresh from the pan with a side of soy-vinegar dipping sauce. They pair wonderfully with hot green tea or a crisp cucumber salad for balance. For brunch, serve alongside congee or a bowl of noodle soup for a complete Asian-inspired meal.
Creative Leftover Transformations
Leftover buns? Chop them up and stir-fry with eggs and veggies for a quick breakfast. You can also slice and toast them for crispy sandwiches filled with lettuce and hoisin sauce.
Additional Tips
For extra fragrance, brush the tops lightly with sesame oil before serving. If you prefer a lighter crust, reduce frying time slightly and add an extra minute of steaming.
Make It a Showstopper
Garnish with toasted sesame seeds and thinly sliced scallions for a touch of color. Serve them stacked on a wooden board for that rustic, street-food charm that impresses instantly.
Variations to Try
- Vegetable Delight: Swap the pork with mushrooms, cabbage, and carrots.
- Chicken and Chive: A lighter filling with an aromatic kick.
- Spicy Pork: Add chili oil or flakes for heat lovers.
- Shrimp Mix: Combine minced shrimp and pork for a juicy, flavorful twist.
- Sweet Red Bean: Make a dessert version using red bean paste filling.
FAQ’s
Q1. Can I use store-bought dough?
Yes, but homemade dough gives a better texture and flavor.
Q2. Can these buns be baked instead of fried?
You can bake them at 375°F for 15 minutes, but you’ll miss that signature crispy bottom.
Q3. What’s the best dipping sauce?
A mix of soy sauce, rice vinegar, and chili oil works beautifully.
Q4. How do I know when the buns are cooked through?
When the bottoms are golden and the tops feel soft but firm, they’re done.
Q5. Can I freeze uncooked buns?
Yes, freeze them on a tray first, then store in a bag. Steam or fry directly from frozen.
Q6. What if I don’t eat pork?
Chicken, beef, or plant-based proteins work just as well.
Q7. How can I make them fluffier?
Letting the dough rise properly and resting it before frying makes a big difference.
Q8. Why are my buns too dense?
Over-kneading or not enough resting time can make them tough.
Q9. What oil is best for frying?
Neutral oils like vegetable or canola are perfect.
Q10. Are pan-fried buns spicy?
Not traditionally, but you can easily make them spicy with chili paste.
Conclusion
Pan-fried buns are one of those dishes that bridge the gap between street food and homemade comfort. The crispy base, soft top, and juicy filling create a perfect bite every time. Trust me, you’re going to love this one — it’s a recipe that fills both your kitchen and your heart with warmth and delicious aroma.
Print
Pan Fried Buns
- Prep Time: 1 hour 15 minutes
- Cook Time: 20 minutes
- Total Time: 1 hour 35 minutes
- Yield: 4 servings
- Category: Snack
- Method: Pan Frying and Steaming
- Cuisine: Chinese
- Diet: Halal
Description
These Pan Fried Buns are golden and crispy on the outside, soft and juicy inside, filled with savory pork and fragrant green onions. A beloved Shanghai street food turned homemade comfort dish that’s irresistible in every bite.
Ingredients
- 2 ½ cups all-purpose flour
- ¾ cup warm water
- 1 teaspoon instant yeast
- 1 tablespoon sugar
- ½ teaspoon salt
- ½ pound ground pork
- 2 tablespoons finely chopped green onions
- 1 tablespoon minced ginger
- 2 tablespoons soy sauce
- 1 teaspoon sesame oil
- ½ cup water for steaming
- 2 tablespoons vegetable oil
Instructions
- In a large bowl, combine flour, sugar, salt, yeast, and warm water. Knead until smooth, then cover and let rest for 1 hour.
- In another bowl, mix ground pork, green onions, ginger, soy sauce, and sesame oil until combined.
- Roll the dough into small circles and place a spoonful of filling in the center. Pinch tightly to seal.
- Heat vegetable oil in a skillet over medium heat. Place buns seam-side down and fry until golden.
- Add ½ cup water to the pan, cover immediately, and steam for 6–8 minutes until the tops are soft and cooked through.
- Uncover and cook another minute to crisp the bottoms again. Sprinkle with green onions and serve warm.
Notes
- Make sure to seal buns tightly to keep the filling juicy.
- Use medium heat for even cooking and perfect browning.
- You can substitute pork with chicken or tofu for variety.
- Freeze uncooked buns for later and steam them directly when needed.
Nutrition
- Serving Size: 1 bun
- Calories: 320
- Sugar: 2g
- Sodium: 410mg
- Fat: 14g
- Saturated Fat: 3g
- Unsaturated Fat: 9g
- Trans Fat: 0g
- Carbohydrates: 36g
- Fiber: 1g
- Protein: 12g
- Cholesterol: 35mg