
Easy ice cream cake is more than just a dessert—it’s a memory-maker. At CookingFlash,About page , we believe in creating delicious dishes that are achievable, no matter your kitchen skill. When we launched our blog, our goal was to make comfort food fun, simple, and accessible for every home cook. That passion has led us to discover incredibly satisfying and easy recipes, and this no-bake layered wonder is one of our favorites.
Whether you’re looking for easy ice cream cake recipes no bake or a unique ice cream birthday cake recipe, you’re in the right place. This article breaks down a foolproof way to create a cake that not only looks stunning but also tastes divine. From Oreo cookie crusts to layers of your favorite flavors, this recipe is packed with inspiration.
Before we jump into the steps, check out our guide on Raspberry Swirl Ice Cream Cake—a favorite among our summer readers.
Let’s dive into this frozen treat.
Table of Contents
Table of Contents
Why This Easy Ice Cream Cake Will Change Your Dessert Game
What Makes This Ice Cream Cake Easy and Unique
The easy ice cream cake we’re diving into today isn’t just a showstopper—it’s shockingly simple to make. Forget the oven, hours of baking, or complicated decorating tools. This dessert is designed for maximum taste with minimal fuss. The beauty lies in its no-bake structure and customizable layers. Whether you go with classic chocolate and strawberry, or swap in birthday cake and mint chip, it’s up to you.
Another unique part? It only takes 5 minutes to assemble each layer, which makes it ideal for last-minute plans. And because it’s frozen, you can prepare it 1–2 days in advance, leaving you stress-free on party day.
How No-Bake Desserts Became the Summer Trend
There’s no denying that no bake desserts are dominating right now, especially during the warmer months. Turning on an oven in July? No thanks. Instead, home cooks are leaning into chilled, layered sweets that impress guests while keeping the kitchen cool. This layered ice cream cake recipe hits that sweet spot perfectly—literally.
In fact, easy ice cream cake recipes no bake are trending across Pinterest and YouTube, proving just how popular these desserts are for birthdays, BBQs, and even anniversaries.
The History Behind the Layered Ice Cream Cake Recipe
While traditional Easy ice cream birthday cake recipes date back decades, their popularity spiked when brands like Carvel and Dairy Queen made them mainstream. But homemade versions have surged in the last decade thanks to Pinterest and food blogs. Today’s homemade versions, like this one, include not just two but sometimes three flavors, customized crusts, and fun toppings.
And if you’re looking for other dessert hits, check out this Strawberry Eclair Cake—another icebox dessert with no oven required.
Print
Deliciously Easy Ice Cream Cake You’ll Want to Make Again and Again
- Prep Time: 45 minutes
- Cook Time: 0 minutes
- Total Time: 12 hours 45 minutes (including freeze time)
- Yield: 12 servings
- Category: Dessert
- Method: Freezing
- Cuisine: American
- Diet: Vegetarian
Description
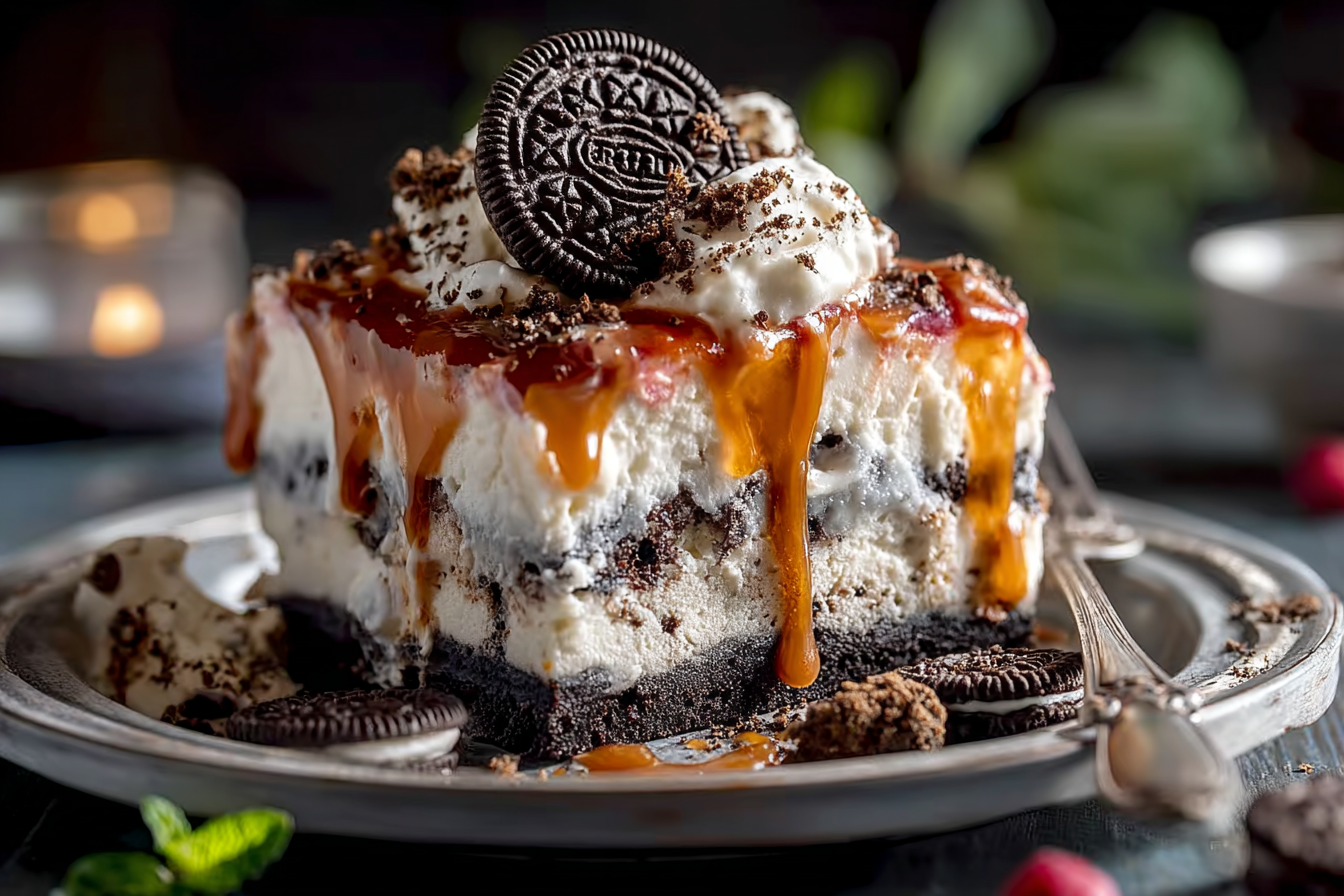
This dreamy layered ice cream cake features chocolate and strawberry ice cream, crushed Oreos, rich hot fudge, and fluffy whipped cream—perfect for birthdays or any celebration! #icecreamcake #layereddessert
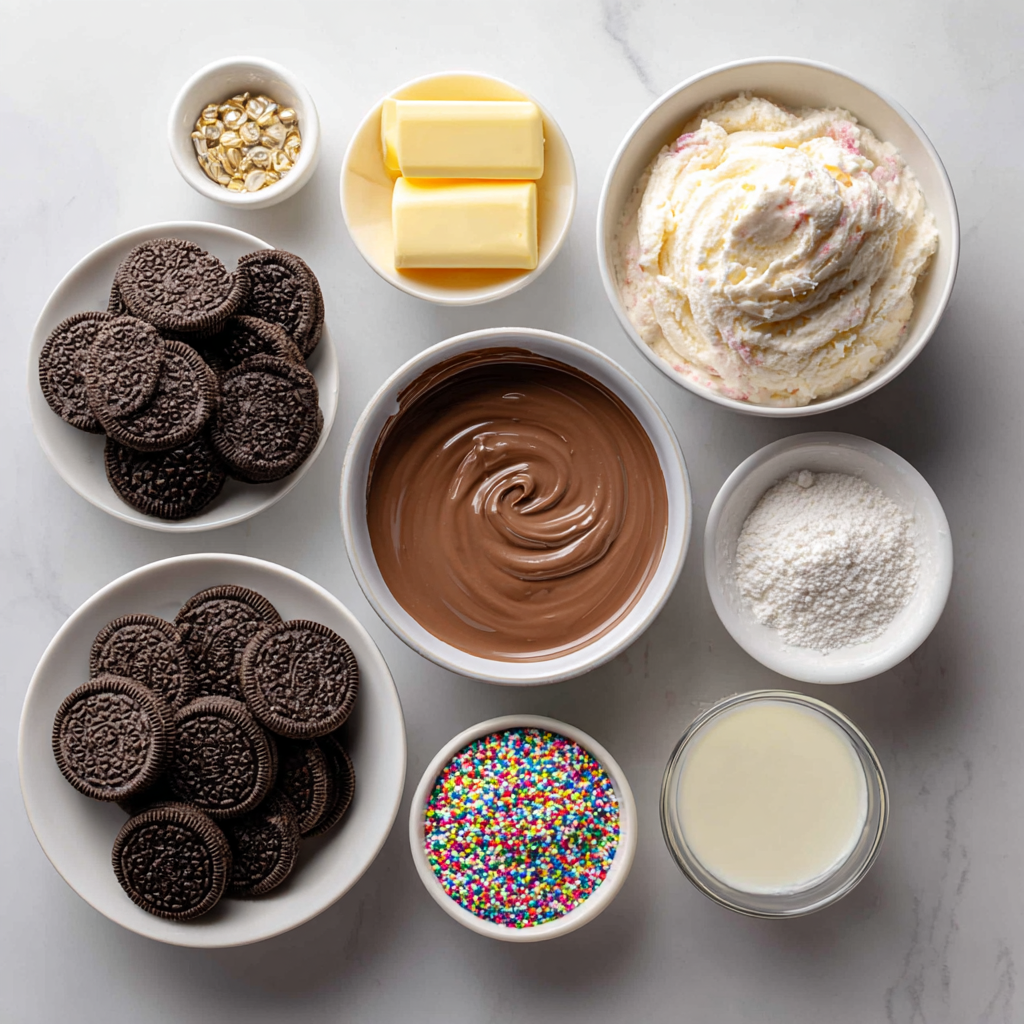
Ingredients
- 10 Oreo cookies (110g)
- 2 Tablespoons (28g) unsalted butter, melted
- 1.5 quarts (1.42L) chocolate ice cream, softened (or other flavor)
- 1 cup (8 ounces/227g) homemade hot fudge (or store-bought), divided
- 1.5 quarts (1.42L) strawberry ice cream, softened (or other flavor)
- 2 cups (480ml) heavy cream, cold
- 1/3 cup (40g) confectioners’ sugar
- 1 and 1/2 teaspoons pure vanilla extract
- Optional for garnish: sprinkles
Instructions
- Pulse Oreos (with filling) in a food processor or blender into coarse crumbs. Mix with melted butter and set aside.
- Let chocolate ice cream soften for 10 minutes. Meanwhile, line a 9×3-inch or 10×3-inch springform pan with plastic wrap.
- Spread softened chocolate ice cream into the pan as an even layer. Freeze for 30 minutes.
- Warm 1/2 cup hot fudge sauce to a spreadable consistency. Spread over chocolate ice cream layer, then top with Oreo crumb mixture. Freeze for 30 minutes.
- Let strawberry ice cream soften for 10 minutes. Drizzle remaining 1/2 cup hot fudge over Oreo layer. Spread softened strawberry ice cream evenly on top. Cover and freeze for at least 12 hours or up to 2 days.
- If using a different cake plate, freeze it for at least 30 minutes before assembling the cake on it.
- Make whipped cream topping by beating heavy cream, confectioners’ sugar, and vanilla on medium-high until stiff peaks form (about 4 minutes).
- Remove cake from springform pan. Peel off plastic wrap and place on frozen cake plate. Spread whipped cream on top and sides. Pipe border and garnish with sprinkles if desired.
- Serve immediately or freeze for up to 1 hour before slicing. Use a hot knife for clean slices. Store leftovers covered in the freezer.
Notes
- You can customize the ice cream flavors to your liking—try mint, peanut butter, or cookies & cream.
- Make the hot fudge ahead of time or use your favorite store-bought brand.
- Freeze cake plate before assembly to prevent melting.
- Use a warm, sharp knife for easy slicing.
- Store leftovers covered in the freezer for up to a week for best texture.
Nutrition
- Serving Size: 1 slice
- Calories: 430
- Sugar: 32g
- Sodium: 180mg
- Fat: 27g
- Saturated Fat: 16g
- Unsaturated Fat: 9g
- Trans Fat: 0g
- Carbohydrates: 44g
- Fiber: 1g
- Protein: 5g
- Cholesterol: 80mg
Ingredients That Make It Irresistible
Layer by Layer: Choosing Ice Cream Flavors That Wow
What makes an easy ice cream cake truly irresistible is the flavor combination. In this recipe, we use chocolate and strawberry ice cream—an all-time favorite duo. But here’s the secret: you can use any flavors that melt your heart. Want something rich? Go with peanut butter or mocha. Craving something fruity? Mango, raspberry, or blueberry blends in beautifully.
The trick is balance. Pair a bold flavor like coffee with something lighter like vanilla bean. This layered approach gives the cake that wow factor when sliced.
Explore more layered options like our Strawberry Crunch Cheesecake Chunks for bold inspiration.
The Oreo Crust Secret and Butter Ratio Tips
Oreo crusts are not only iconic—they’re unbelievably easy. Just 10 Oreos and 2 tablespoons of melted butter are all it takes. Blend them up and press the mix gently for a crust that holds firm but stays chewy.
Want to mix it up? You can replace Oreos with Nutter Butters, Biscoff, or even chocolate graham crackers. Just keep the same cookie-to-butter ratio and you’re golden. Yes, if you’re wondering, you absolutely can use other cookies besides Oreos.
Quick tip: if you’re making this for a summer birthday bash, try adding a hint of cinnamon to the crust for a spicy twist.
Why Homemade or Store-Bought Hot Fudge Both Work for Easy ice cream cake
Let’s be honest—sometimes you want that homemade touch. But there are days when store-bought hot fudge is all you’ve got. The good news? Both work perfectly. The goal is to create a rich middle layer that firms up just enough when chilled.
Warm up your fudge slightly before layering—it should be spreadable, not runny. Pour half over the chocolate ice cream and half over the Oreo layer for that beautiful, indulgent stripe that oozes flavor in every bite.
Want a next-level dessert hack? Try our Brown Sugar Caramel Sauce instead of fudge for a buttery twist.
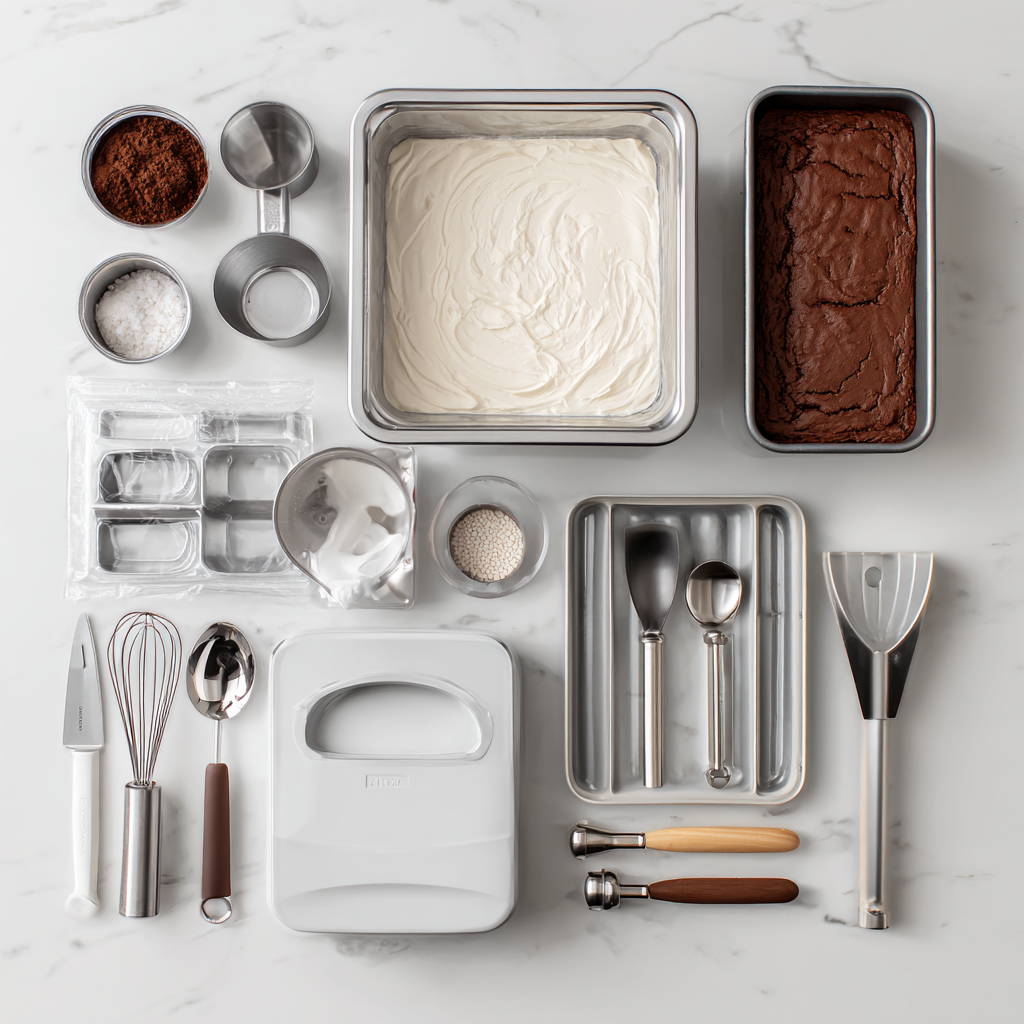
The Perfect Pan Setup for the Best Results
The Power of the Springform Pan (And Smart Alternatives If You Don’t Own One)
A smooth, well-layered easy ice cream cake starts with the right pan—and nothing beats the simplicity of a springform. Its detachable sides allow for effortless release without damaging the cake’s structure. That said, if you don’t have one in your kitchen arsenal, you’re not out of options.
A deep 9×13-inch dish, 8-inch square pan, or even a loaf tin can step in just fine. Just be sure to line the interior with plastic wrap or foil that extends over the edges. This acts like a sling to lift your frozen dessert out with ease and precision.
Wondering about your 9×2-inch springform pan? Yes, you can absolutely use it. Just know your layers will be a bit taller, so give each section ample time to freeze solid before adding the next.
For more clever dessert tips, check out our guide on Frozen Mud Pie—a cool classic that follows similar pan tricks.
Choosing the Right Pan Shape for Your Easy ice cream cake
Here’s a closer look at common pan alternatives and when to use them:
| Pan Type | Ideal For | Pro Tip |
|---|---|---|
| 9×13-inch glass or metal dish | Rectangular slices for parties or potlucks | Line tightly with plastic wrap for clean edges |
| 8-inch square baking pan | Compact freezer space, smaller servings | Freeze plate before transferring |
| Pre-frozen cake plate or serving stand | Beautiful display on birthday tables | Keeps bottom layer from melting on contact |
Using a cake plate? Make sure to chill it for 30 minutes before transferring your frozen masterpiece. This trick prevents the bottom layer from softening too quickly once removed from the mold.
Looking for display-ready no-bake options? You might love our Hot Fudge Brownie Bread—perfect for slicing and serving with flair.
How to Line Your Pan Like a Pro for Effortless Release
One of the most underrated steps when making an easy ice cream cake is lining the pan properly. Don’t skip this—it’s the key to picture-perfect slices.
Here’s what to do:
- Tear two long sheets of plastic wrap.
- Lay one horizontally and the other vertically inside your pan, making sure there’s overhang on all sides.
- Press down and smooth the wrap so it hugs the shape of the pan snugly.
This setup acts like a lift tab when your dessert is fully frozen. Just tug gently at the edges, and your cake will pop right out—ready to be topped, sliced, and devoured.
Step-by-Step Instructions for an Easy Ice Cream Cake
Crushing Cookies and Creating the Dreamy Crust FOR Easy ice cream cake
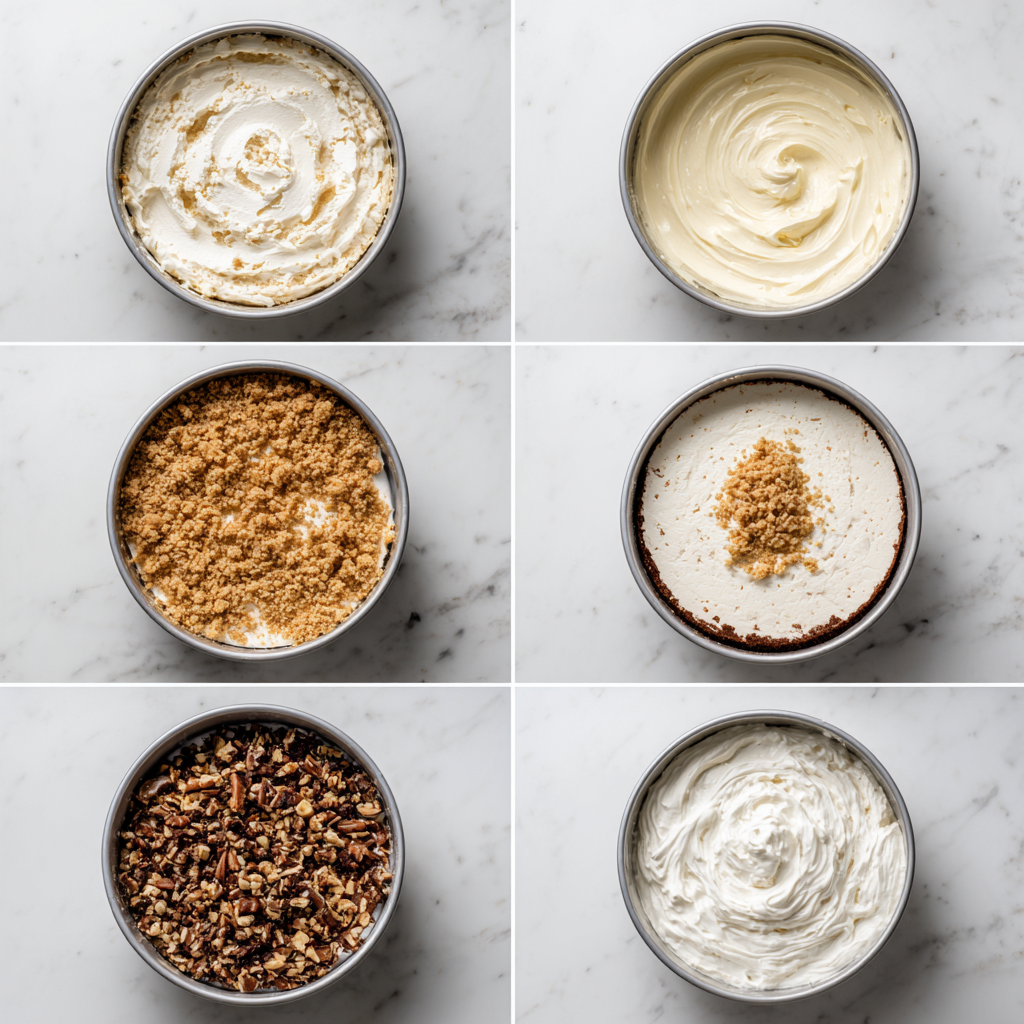
Let’s kick off your easy ice cream cake with the base: a cookie crust that holds every sweet layer together. Grab 10 Oreo cookies, cream filling and all, and pulse them in a food processor or blender. You’re aiming for a coarse crumb—think sandy but with some tasty chunks for texture.
Now melt 2 tablespoons of unsalted butter, and mix it with your cookie crumbs. The result? A rich, chocolatey mixture ready to be transformed into your cake’s solid foundation. Set this aside for later—your masterpiece is about to begin.
Quick idea: If you’re feeling creative, swap Oreos for peanut butter cookies or graham crackers. Yep, you can use other cookies besides Oreos. Just keep the texture right and the butter ratio close.
Need crust ideas? You’ll love this crust twist in our No Bake Peanut Butter Oat Cups.
Layering Chocolate and Strawberry Ice Cream Like a Dessert Pro FOR Easy ice cream cake
Here comes the magic: the ice cream layers.
Start with chocolate ice cream—about 1.5 quarts (1.42L). Let it sit on the counter for 10 minutes to soften, then scoop it into your lined 9×3-inch or 10×3-inch springform pan. Use the back of a spoon to spread it evenly. It doesn’t need to be perfect—it’s homemade charm, not perfection.
Pop it in the freezer for 30 minutes to firm up. During this time, warm your homemade hot fudge sauce or get your store-bought version silky and spreadable.
Once the chocolate layer is set, drizzle ½ cup hot fudge over it and sprinkle the Oreo-butter crust mixture on top. Gently press it down. Freeze again for 30 minutes. At the 20-minute mark, remove the strawberry ice cream (1.5 quarts) and let it soften.
This layered method is what makes the layered ice cream cake recipe so stunning when sliced—clear, delicious divisions of flavor and texture.
How to Freeze and Stack Like a Dessert Chef FOR Easy ice cream cake
With your base and middle layers chilled, it’s time to finish strong.
Spread the softened strawberry ice cream over the Oreo layer and smooth it out with a spoon or spatula. Aim for an even top so your whipped cream topping doesn’t slide off later. Cover with plastic wrap or foil and freeze for at least 12 hours—or up to 48 hours.
Pro tip: Freeze your serving platter or cake plate for at least 30 minutes before transferring the cake. This prevents melting when you’re ready to serve.
Wondering how to get neat slices? Dip your knife in hot water between each cut—the cake slices like butter.
Topping It Off—The Whipped Cream Magic FOR Easy ice cream cake
Fluffy, Fast, and Foolproof: Make the Ultimate Whipped Topping
The final step to elevating your easy ice cream cake from basic to bakery-worthy is a thick swirl of homemade whipped cream. This cloud-like topping not only adds eye-catching volume but brings a cool, creamy contrast to the frozen layers below.
To make it from scratch, you’ll need 2 cups of cold heavy cream, 1/3 cup of powdered sugar, and 1½ teaspoons of vanilla extract. Pour everything into a chilled bowl and whip it on medium-high speed with a mixer until the cream holds its shape. You’ll know you’ve nailed it when firm peaks stand tall without collapsing.
It’s quick, it’s fresh, and it beats anything store-bought in both flavor and texture. Still, if you’re in a time crunch, a tub of frozen whipped topping can get the job done.
Explore more whipped creations in our Cream Cheese Frosting recipe—it’s another great way to top chilled desserts.
Customizing Sweetness and Flavor Like a Pro FOR Watch How to Make
The beauty of whipped cream is how easily you can tailor it to suit your flavor preferences. Want a lighter finish? Cut the sugar to 1/4 cup. Prefer a bolder taste? Add a splash of almond extract, maple syrup, or a pinch of cinnamon.
Your topping doesn’t need to be overly sweet—it should gently enhance the ice cream’s flavor without competing with it. The vanilla adds depth while letting your cake’s chocolate and strawberry layers shine through.
This kind of personalization turns your simple ice cream cake idea into a signature dessert everyone will remember.
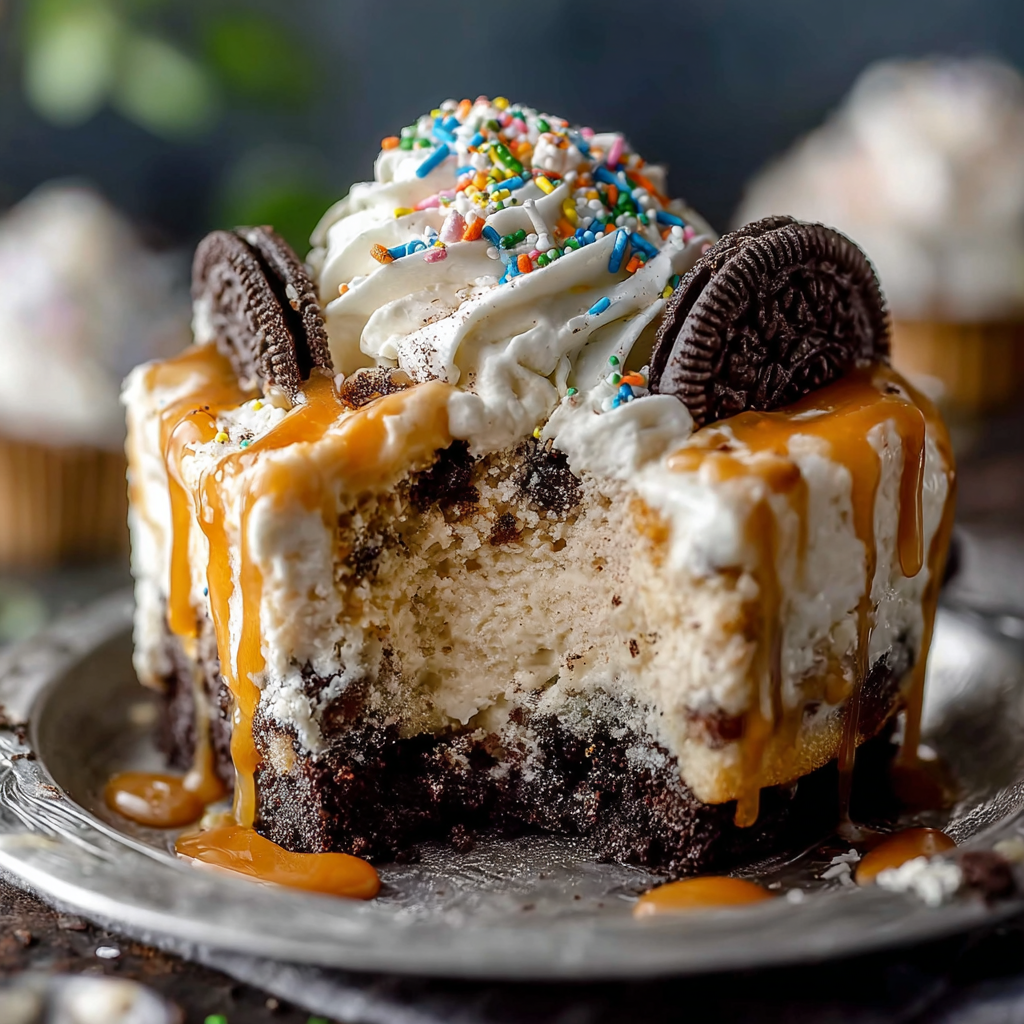
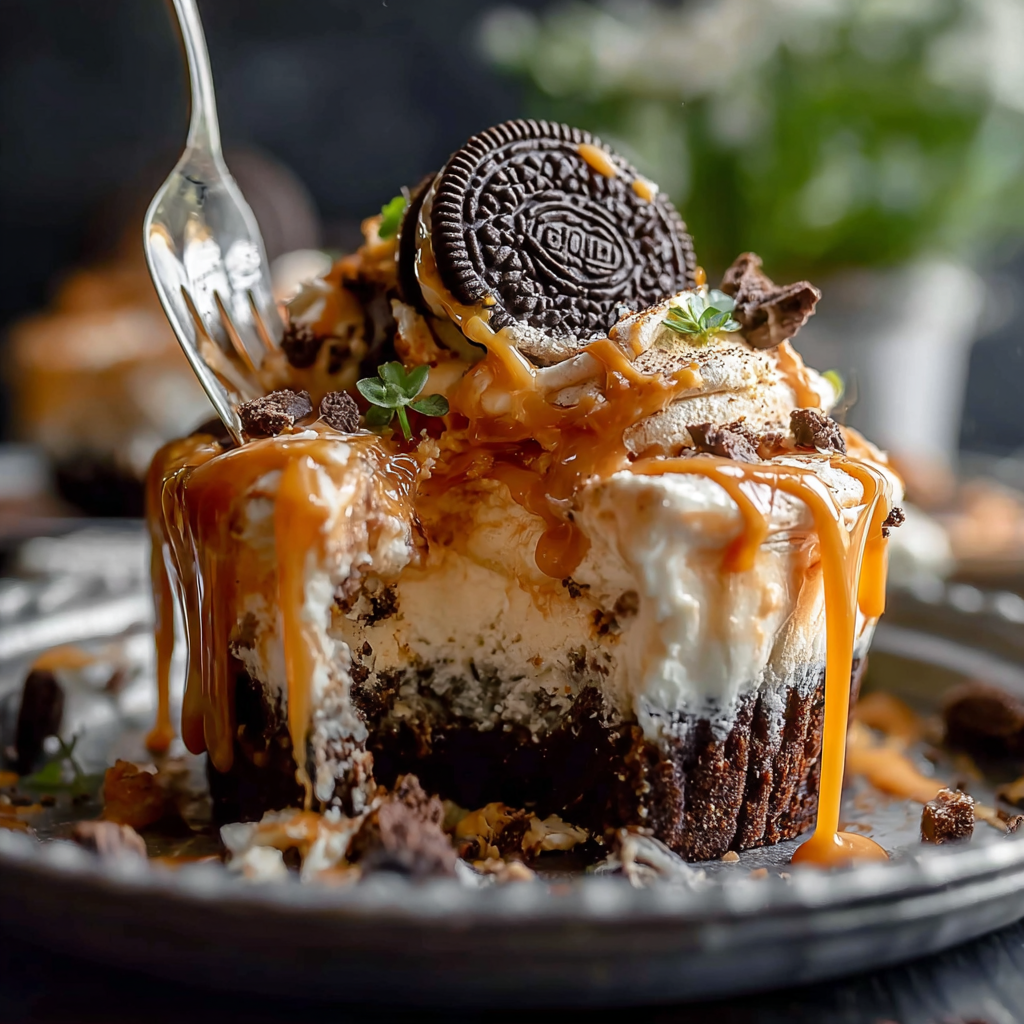
Dress It Up: Easy Decorating That Looks Impressive
When your cake is frozen solid and ready to be revealed, remove the outer pan and peel off the plastic. Transfer the cake to a pre-frozen serving plate and get ready to frost.
Use a spatula to spread your whipped topping evenly over the top and around the sides. If you’re feeling creative, grab a piping bag and add rosettes or borders using your favorite tip—swirls, stars, or scallops all work beautifully.
Finish with a handful of toppings that add both texture and flair:
- Bright sprinkles or edible glitter
- Crushed Oreos or cookies
- Chopped nuts or toasted coconut
- Fresh fruit or shaved chocolate
This simple step gives your easy ice cream cake a polished look that feels party-ready—even if you’re just celebrating Tuesday night.
Ice Cream Cake Ideas for Easy ice cream cake
A Birthday Bash Classic: Build-Your-Own Ice Cream Cake
When it comes to celebrations, nothing beats a good ice cream birthday cake recipe—especially one you can personalize. With this easy ice cream cake as your foundation, you can build out a party-worthy dessert that’s completely tailored to your guest of honor.
Start by picking two favorite ice cream flavors (think cookies & cream with caramel, or strawberry and lemon sorbet for a fruity vibe). Use colored sprinkles or edible letters to write a name on top. Add birthday candles, and just like that—you’ve got a showstopping centerpiece with no baking involved.
Want to make it even more special? Let kids (or adults!) customize their own mini cakes using muffin tins. Freeze, decorate, and enjoy personalized frozen treats.
For another celebration-ready dessert idea, take a look at our Strawberry Eclair Cake—it’s perfect for summer parties and potlucks.
Creative Twists: Fun Flavor Combinations to Try
If you’ve mastered the classic combo of chocolate and strawberry, it’s time to get playful. This easy ice cream cake recipe can easily be reinvented to match any theme or craving. Here are some flavor combinations to kick-start your creativity:
| Bottom Layer | Middle Layer | Topping Idea |
|---|---|---|
| Cookies & Cream | Mint Chocolate Chip | Crushed Andes mints |
| Peanut Butter | Banana | Chopped peanuts and caramel drizzle |
| Coffee | Vanilla Bean | Chocolate-covered espresso beans |
| Birthday Cake Ice Cream | Cotton Candy | Rainbow sprinkles & marshmallows |
Whether you’re aiming for elegant or fun, the flavors you choose will shape the personality of your dessert. This flexibility is what makes layered ice cream cake recipes such a crowd-pleaser.
Need a flavor fix in five minutes? Our 5 Ingredient Strawberry Shortcake Bites offer a fast and fruity take on frozen desserts.
Last-Minute Party Hero: The 5-Minute Ice Cream Cake Hack
In a rush? Don’t worry—you can still pull off a fantastic easy ice cream cake in just five minutes. Instead of layering and freezing for hours, try this speedy trick:
- Buy a box of ice cream sandwiches.
- Stack them into a rectangle (about 2 layers high).
- Spread whipped topping over the top and sides.
- Drizzle with fudge or caramel and sprinkle with crushed cookies or candy.
- Freeze for 30 minutes or serve right away.
This 5-minute Easy ice cream cake hack is a game-changer when you need something sweet and impressive but don’t have time to spare. It’s perfect for impromptu guests, last-minute birthdays, or midnight cravings.
Make-Ahead, Serving, and Storage Tips
Plan Ahead: When and How to Freeze Your Ice Cream Cake
Timing matters when it comes to a perfect easy ice cream cake. Once all your delicious layers are stacked and topped, the most important step is letting it freeze thoroughly. To get those clean cuts and firm slices, you need to freeze your cake for at least 12 hours, though overnight (or up to 2 full days) is even better.
This advance prep makes it a dream dessert for parties—you can assemble the entire thing days ahead and simply pull it out when it’s time to wow your guests. Just remember to cover it tightly with foil or plastic wrap to prevent freezer burn or unwanted odors.
Hosting a party this weekend? Pair this cake with our Strawberry Crunch Cheesecake Chunks for a dessert table guests won’t forget.
The Smart Way to Slice (No Ice Cream Mess)
If you’ve ever tried to cut through a frozen dessert with a dull knife, you know it’s not pretty. To serve your easy ice cream cake like a pro, follow this tried-and-true method:
- Fill a tall glass or bowl with hot water.
- Dip a sharp knife into the water, then dry it off quickly with a towel.
- Slice into the cake in one clean motion.
- Repeat the dip-dry-slice routine between each cut.
This method ensures clean edges, reduces crumbling, and keeps your top layers from sliding apart. Want to take it a step further? Use a cake server or offset spatula to lift each piece with precision.
Pro tip: Place your serving plates in the freezer for 10 minutes before plating. That way, slices stay cold longer—especially helpful in summer heat.
Want more no-sweat serving solutions? See how we handle delicate slicing in our Lemon Poppyseed Zucchini Bread tutorial.
Keeping Leftovers Fresh Without Freezer Burn
You’ve done the work. You’ve enjoyed the cake. Now what about those extra slices? Store leftovers in an airtight container or wrap the entire cake tightly in multiple layers of plastic wrap. For longer storage, you can also add a layer of foil.
It’s best to eat leftover Easy ice cream cake within 5–7 days, while the texture and flavor are still at their peak. Be sure to label the container so it doesn’t become a mystery block in your freezer weeks later.
Avoid storing the cake next to strong-smelling foods like fish or onions—ice cream absorbs odors quickly, and that’s not the twist you want in your strawberry layer.
Troubleshooting Common Ice Cream Cake Mistakes
Problem: Cake Won’t Release from the Pan
So, your easy ice cream cake is frozen solid and ready to serve—but it’s stuck in the pan. Don’t panic! This happens more often than you’d think, especially if the pan wasn’t properly lined.
Here’s how to fix it fast:
- Run a clean kitchen towel under hot water, then wrap it around the outside of your springform pan for about 30 seconds.
- Alternatively, leave the pan out on the counter for 3–5 minutes—just enough to slightly loosen the edges without melting the cake.
- If you used plastic wrap or foil to line the pan, gently lift the cake using the overhanging edges.
Next time, double-layer your plastic wrap and leave a generous overhang to make removal effortless.
Problem: Top Layer Melts or Slips During Decorating
Ever tried spreading whipped cream on your cake and found that it’s melting before your eyes—or worse, the layers start sliding apart? That’s a classic sign the top layer wasn’t firm enough when removed from the freezer.
How to fix it:
- Pop the cake back into the freezer for 15–20 minutes before attempting to decorate.
- Chill your whipped cream bowl and tools in advance to keep everything cold while working.
- Always frost and garnish quickly, then return the cake to the freezer until it’s time to serve.
This tip also works for other frozen desserts—like our layered Peanut Butter Chocolate Corn Flakes Clusters—where temperature makes all the difference.
Problem: Layers Look Messy or Don’t Hold Their Shape
If your cake looks more like a melty mess than a showpiece, the culprit is probably rushed freezing between layers. For a beautiful layered Easy ice cream cake, patience is key.
Here’s what to do next time:
- Freeze each layer for at least 30 minutes before adding the next one.
- Let your ice cream soften at room temperature for only 8–10 minutes—too soft and it won’t spread evenly.
- Use the back of a spoon or an offset spatula to level each layer for clean edges when sliced.
Sloppy layers? We’ve all been there. But a few timing tweaks and better tools can make all the difference.
Need more guidance on layer prep? See how we handled cake structure in our Peach Pretzel Salad Recipe—a salty-sweet stunner with beautiful stacked layers.
Your Go-To Easy Ice Cream Cake for Every Celebration
If you’re looking for a no-fail, crowd-pleasing dessert that’s simple yet stunning, this easy ice cream cake hits the mark every time. With no baking required, endless flavor combos, and make-ahead convenience, it’s perfect for birthdays, backyard BBQs, or just cooling off on a hot day.
Whether you keep it classic with chocolate and strawberry or go bold with peanut butter and mint chip, the result is a layered frozen masterpiece that looks bakery-made—but was built right in your kitchen.enjoy this recipe :Easy ice cream cake and tray this Better Than Sex Dessert Recipe
Can I add a cake layer to my easy ice cream cake?
Absolutely! Many people love adding a sponge cake layer for extra texture. You can use a thin layer of chocolate or vanilla cake as your base before the ice cream layers go in. Just make sure it’s completely cool before layering anything on top—any heat will start melting your ice cream.
If you go this route, consider brushing the cake with a little milk or flavored syrup to keep it soft even after freezing. This combo of warm cake flavor with cold creaminess is a game-changer for ice cream birthday cake recipes.
I don’t have a springform pan. What can I use instead?
No springform pan? No worries. You’ve got plenty of options for building a great easy ice cream cake without one.
Here are some great alternatives:
9×13-inch glass dish
8×8-inch square pan
Loaf pan for a mini version
Whatever you choose, line it generously with plastic wrap or foil, making sure it extends over the edges. This way, you can easily lift the cake out once it’s frozen. For prettier presentation, transfer your cake to a frozen cake plate or board before decorating.
Can I use cookies other than Oreos in the crust?
Of course! While Oreos bring that classic chocolate crunch, they’re just one of many options. Crushed graham crackers, Biscoff, chocolate chip cookies, or even gingersnaps work beautifully in this recipe.
Keep the same basic ratio—about 1 cup of crushed cookies and 2 tablespoons of melted butter—to get that firm but crumbly crust. Feel free to match the cookie flavor with your chosen ice cream for a coordinated dessert experience.
I only have a 9×2-inch springform pan. Is that okay?
Yes, you can still use a 9×2-inch springform pan—just know your layers will sit a little higher, and you may need to be extra careful when spreading your ice cream evenly. Because it’s not as deep, freeze each layer thoroughly before adding the next to prevent mixing or sliding.
You can also slightly reduce the amount of ice cream in each layer to avoid overfilling. The result will still be a stunning and delicious easy ice cream cake, just a bit more compact in height.
If height becomes an issue, try a creative twist like individual cakes made in ramekins or jumbo muffin tins.