
Burger foil packs bring together everything you love about a homemade meal—hearty, flavorful, and ridiculously easy to make. Whether you’re planning a weeknight dinner or a weekend cookout under the stars, these foil-wrapped bundles deliver comfort, convenience, and crowd-pleasing taste with every bite.
Our journey into foil packet cooking started years ago and is a big part of what we share on our About page. It all began with a spontaneous family camping trip—limited supplies, no grill gear, and a craving for something satisfying. We wrapped ground beef, onions, and veggies in foil, placed them over the campfire, and hoped for the best. What came out was unexpectedly delicious: juicy beef, tender potatoes, and a rustic, smoky aroma that we still talk about to this day.
Since then, burger foil packs have become a staple in our kitchen and our outdoor adventures. From cozy winter nights baking them in the oven to tossing them on the grill during summer BBQs, we’ve perfected the method—and now we’re passing it on to you.
In this guide, we’ll break down every step of making the perfect burger foil packs, offer tips for grilling and oven baking, show how to customize for picky eaters or dietary needs, and answer all your most-asked questions. Whether you’re searching for the best burger foil packs recipe or experimenting with foil packet meals for camping, you’re in the right place.
Looking for inspiration? Try our juicy air fryer hamburgers for a modern twist on the classic burger experience.
Table of Contents
Table of Contents
Unbelievably Easy Burger Foil Packs That Everyone Will Crave
- Prep Time: 15 minutes
- Cook Time: 45 minutes
- Total Time: 1 hour
- Yield: 4 servings
- Category: Dinner
- Method: Baking
- Cuisine: American
- Diet: Halal
Description
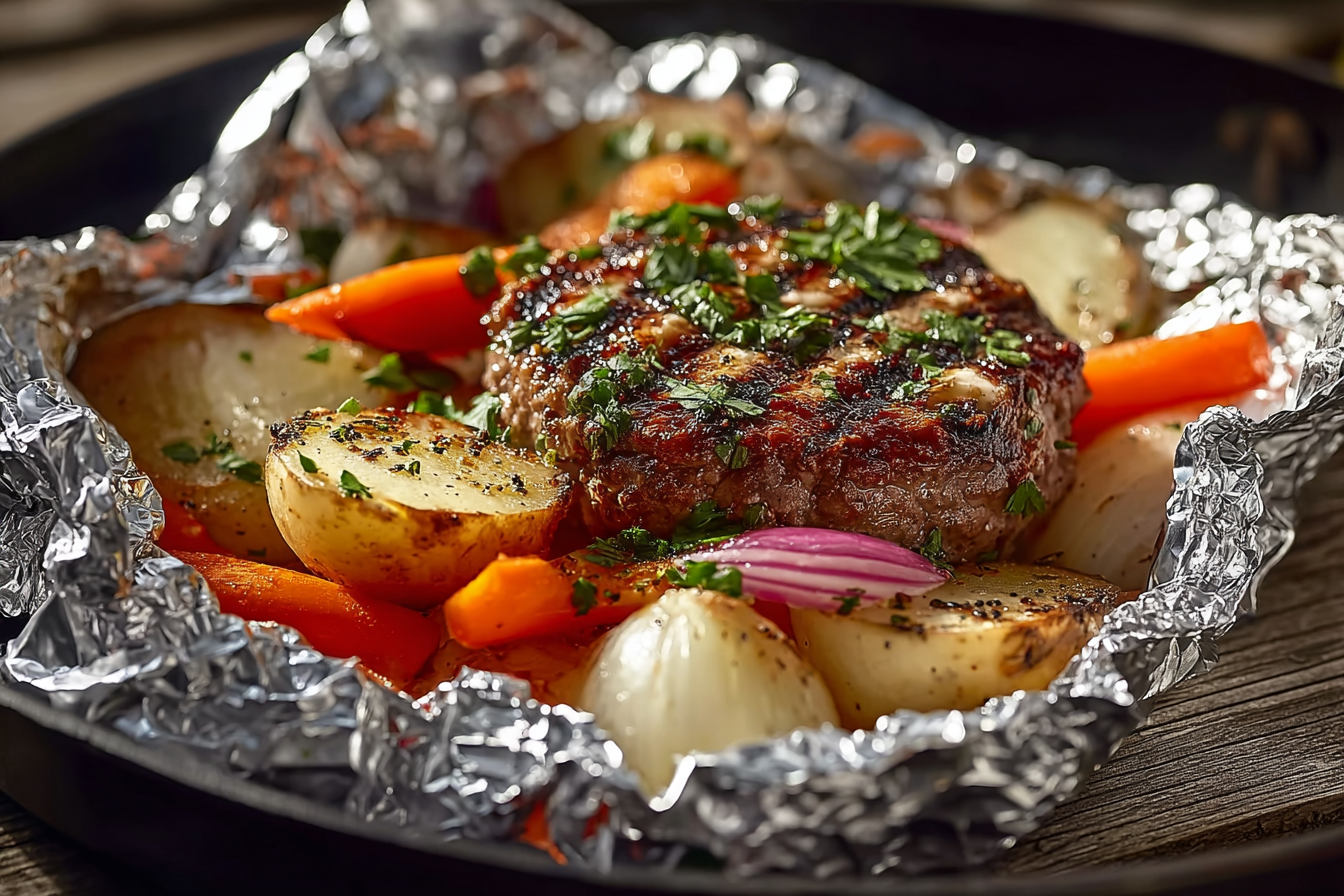
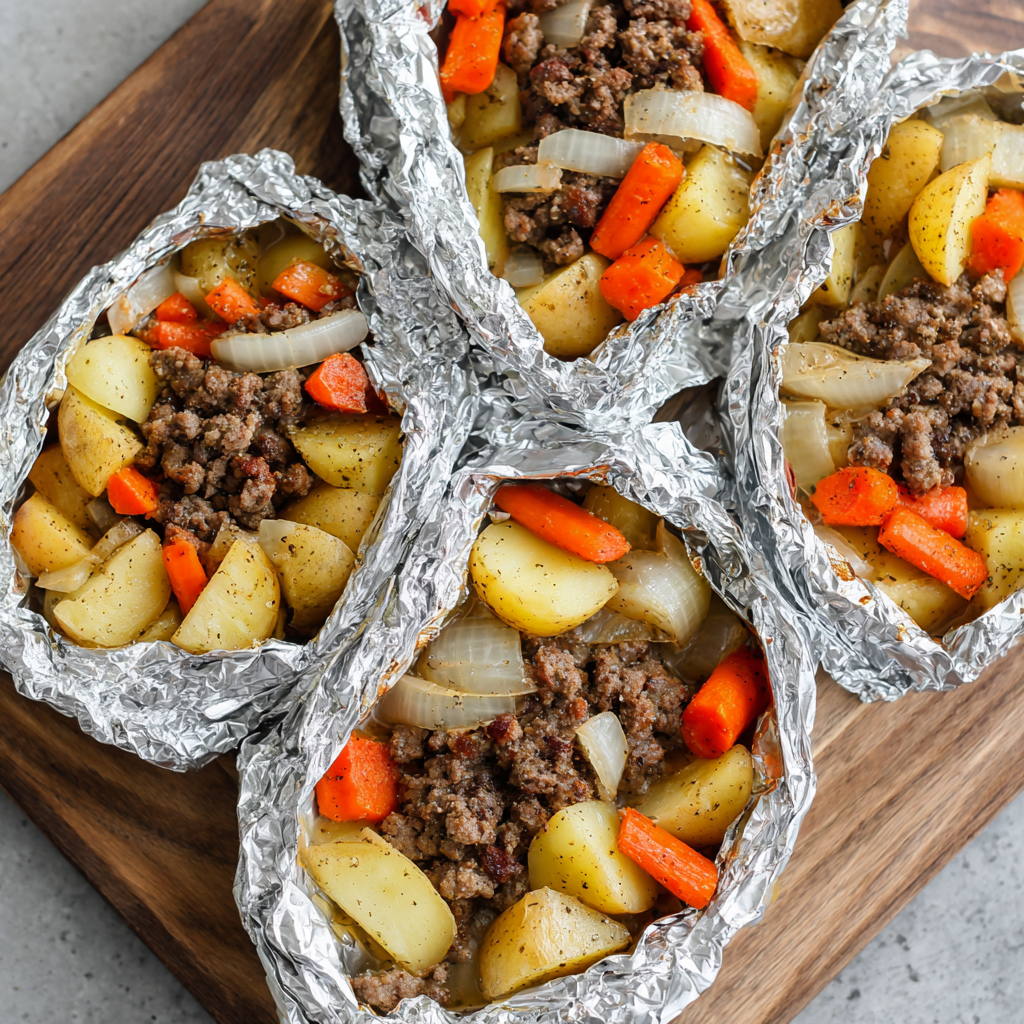
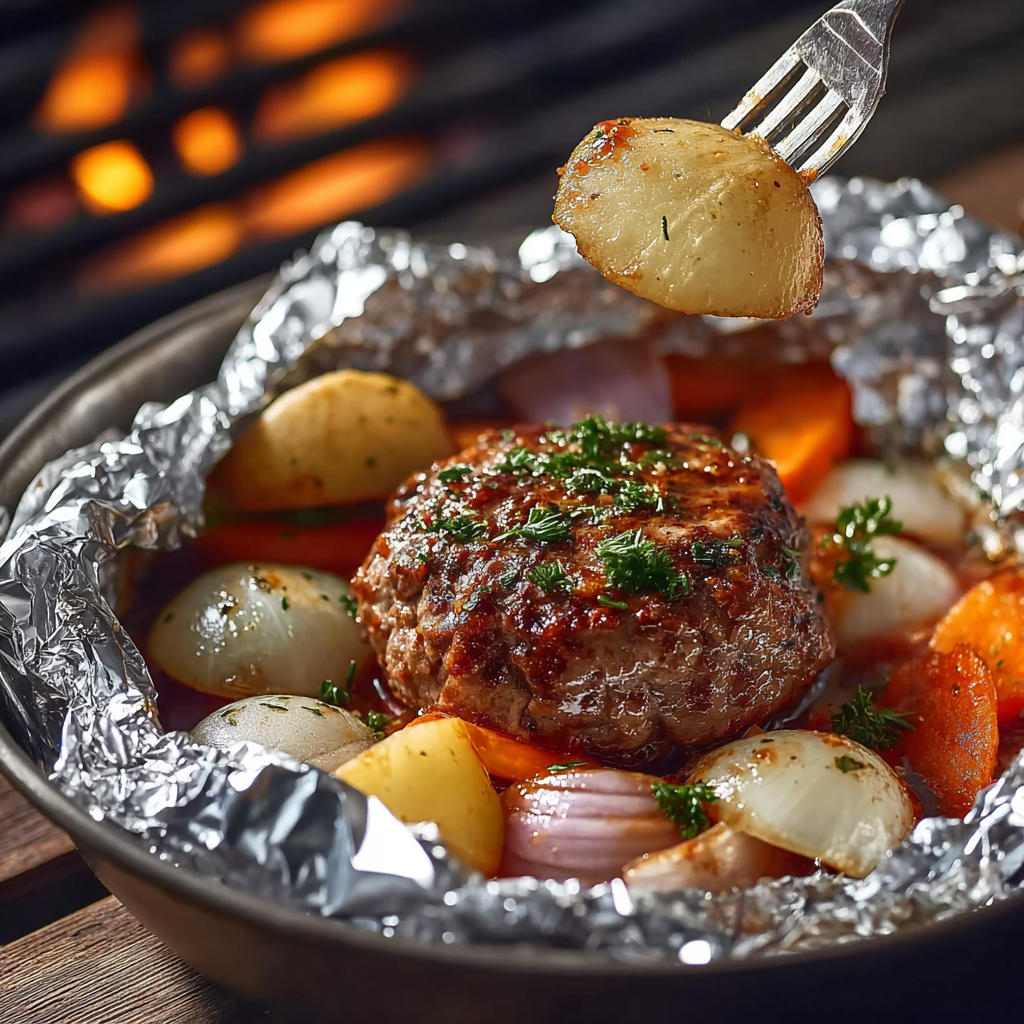
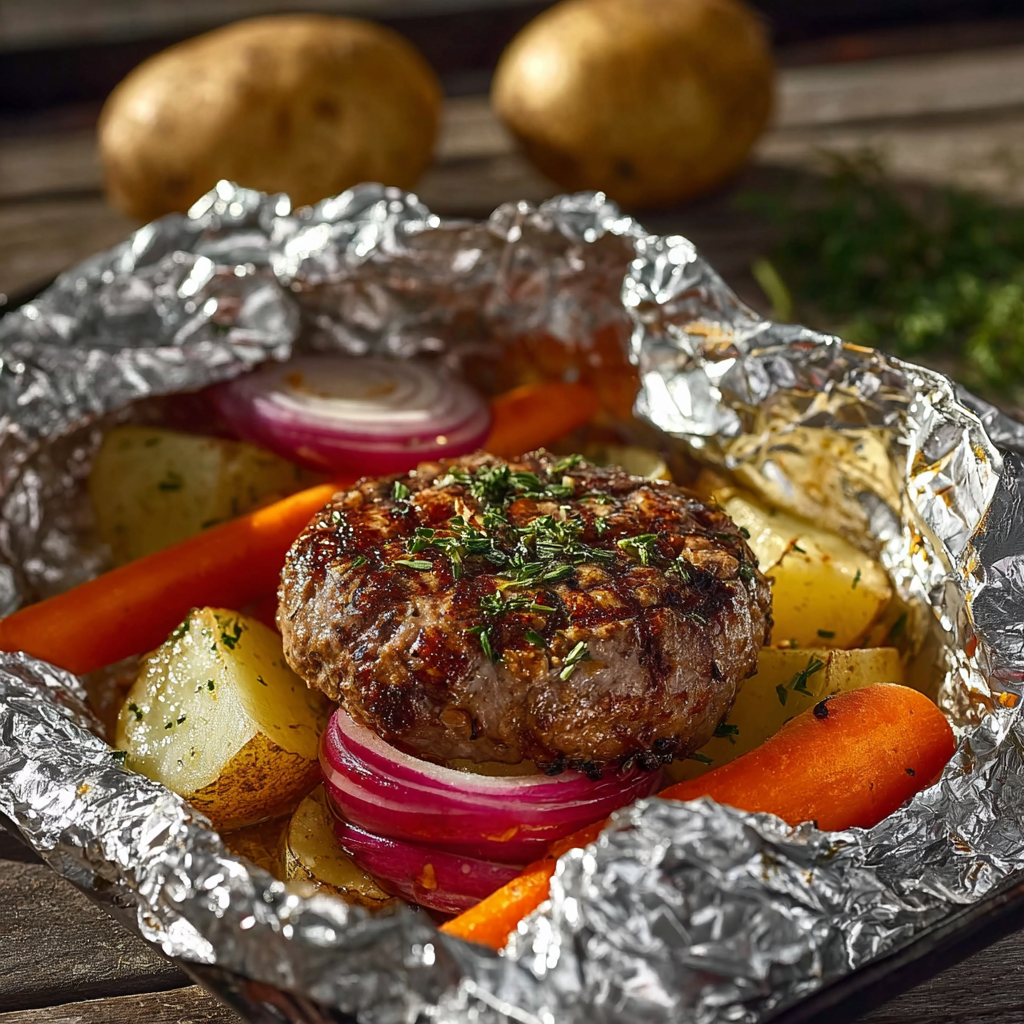
These foil packet beef and veggie dinners are hearty, simple, and full of flavor. Lean ground beef patties are paired with seasoned vegetables and creamy mushroom soup, all baked together in individual foil pouches for easy cleanup and maximum taste!
Ingredients
- 1 pound lean ground beef
- 1 ounce dry onion soup mix (1 packet)
- 4 small potatoes, peeled and sliced
- 2 cups diced carrots
- 1 large onion or 2 small onions, sliced
- 2 tablespoons olive oil
- 1 teaspoon garlic powder
- Salt and black pepper, to taste
- 10.5 ounces condensed cream of mushroom soup (1 can)
Instructions
- Preheat oven to 375°F (190°C).
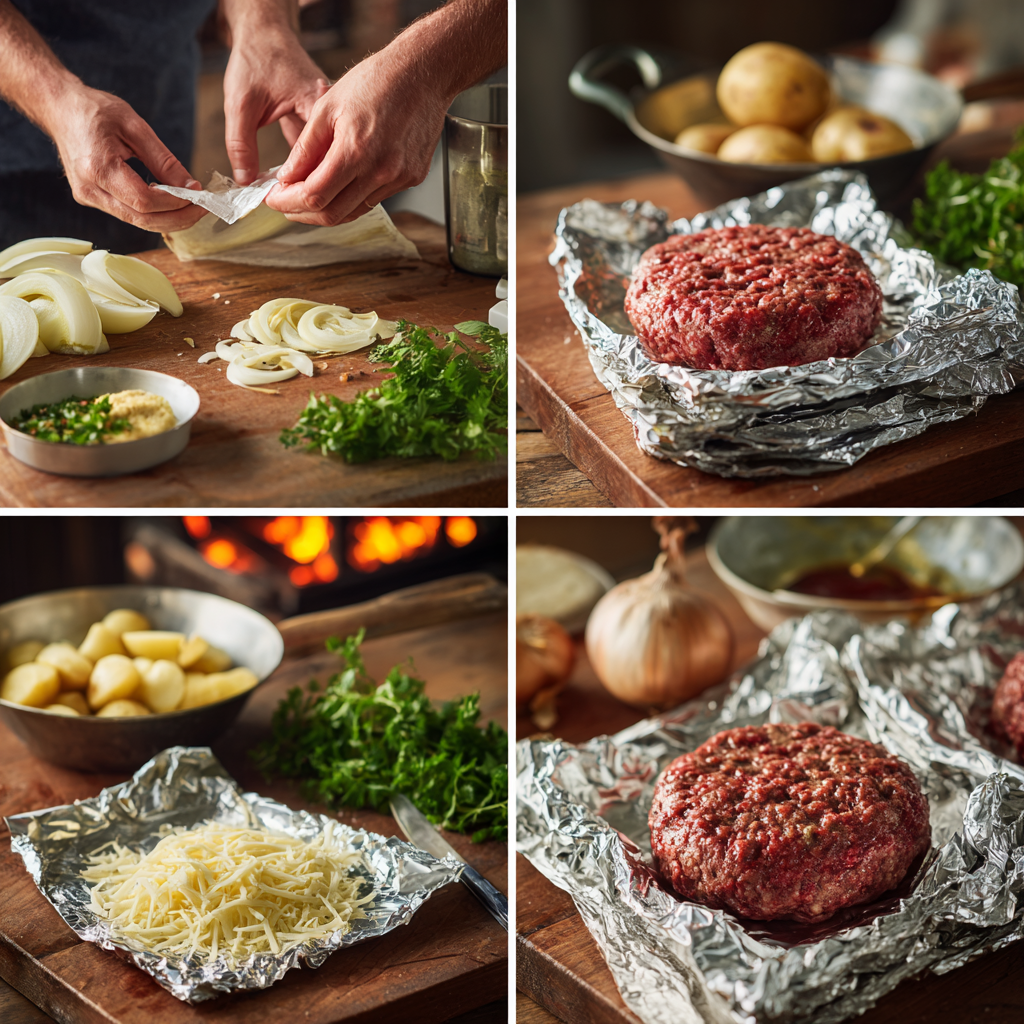
- In a medium bowl, combine ground beef and dry onion soup mix. Form into 4 patties and set aside.
- In a large bowl, mix sliced potatoes, diced carrots, sliced onions, olive oil, garlic powder, salt, and black pepper until well coated.
- Spray a 12″ x 18″ piece of foil with non-stick spray for each packet (4 total).
- Place 1/4 of the vegetable mixture in the center of each foil sheet.
- Top vegetables with 1 beef patty and spoon 2 tablespoons of condensed mushroom soup on top of each patty.
- Seal foil packets tightly by folding the sides and ends securely.
- Place foil packets beef-side-up on a large baking sheet and bake for 35–45 minutes, or until potatoes and carrots are tender.
- Carefully open packets and serve directly or transfer contents to plates.
Notes
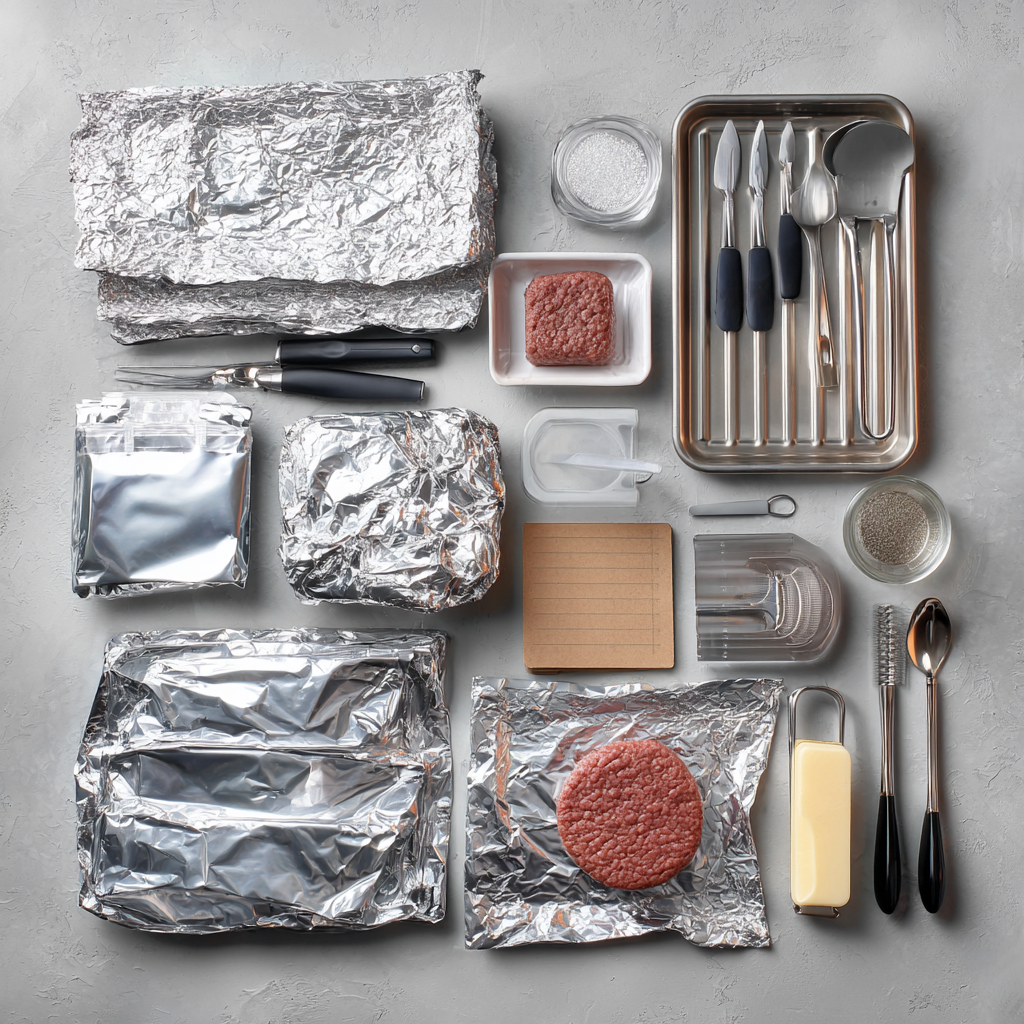
- Use heavy-duty foil to prevent tearing and ensure even cooking.
- These packets can also be cooked on the grill over medium heat for 30–35 minutes.
- Feel free to substitute other vegetables like zucchini or bell peppers.
Nutrition
- Serving Size: 1 foil packet
- Calories: 430
- Sugar: 5g
- Sodium: 820mg
- Fat: 22g
- Saturated Fat: 8g
- Unsaturated Fat: 11g
- Trans Fat: 0g
- Carbohydrates: 30g
- Fiber: 4g
- Protein: 27g
- Cholesterol: 75mg
Essential Ingredients for Perfect Burger Foil Packs
Choosing the Best Ground Beef and Vegetables
When it comes to building the best burger foil packs, your ingredient selection can make or break the meal. Start with lean ground beef, ideally 80/20, which provides just the right amount of fat to keep the patty juicy without creating a greasy mess inside the foil. For this recipe, 1 pound of lean ground beef is enough to form four flavorful patties.
Now, let’s talk vegetables. The real beauty of burger foil packs recipes for oven is how well they steam inside the sealed foil. Use peeled, thinly sliced potatoes (Yukon Gold or Russet work best) for a creamy texture. Toss in diced carrots for natural sweetness and crunch, and sliced onions to add depth and savory aroma. The trick? Cut everything uniformly so it cooks evenly in the foil.
For extra moisture and flavor, we love adding a layer of condensed cream of mushroom soup on top of the beef patty. It acts as a built-in gravy, soaking into the veggies and meat as it cooks.
Need more delicious ideas? Check out our easy mini chicken pot pies for a similar flavor-packed comfort dish.
Here’s a breakdown of ingredients for quick reference:
| Ingredient | Quantity | Notes |
|---|---|---|
| Lean ground beef | 1 lb | Form into 4 equal patties |
| Dry onion soup mix | 1 packet (1 oz) | Mixed into the beef |
| Potatoes | 4 small, peeled & sliced | Yukon or Russet preferred |
| Carrots | 2 cups, diced | Adds color & sweetness |
| Onion | 1 large, sliced | Use 2 small if preferred |
| Olive oil | 2 tbsp | Tossed with veggies |
| Garlic powder | 1 tsp | Flavor booster |
| Salt & pepper | To taste | Season vegetables |
| Condensed cream of mushroom soup | 1 can (10.5 oz) | 2 tbsp per foil pack |
Why Dry Onion Soup Mix Makes the Difference
One of the most underrated flavor hacks for easy burger foil packs recipe is the dry onion soup mix. Just one packet adds rich, beefy flavor and a savory edge to the patties, helping them stand out even more. This mix eliminates the need for chopping extra onions or adding a bunch of seasoning. It’s fast, flavorful, and foolproof.
Mix the dry soup mix directly into the raw ground beef before forming your patties. This ensures the seasoning spreads evenly throughout the meat, giving every bite that satisfying burst of umami.
Want a twist? Swap the mushroom soup with cheddar cheese soup or add a slice of pepper jack cheese inside the packet for a gooey surprise.
Step-by-Step Guide to Making Burger Foil Packs
How to Make a Foil Packet the Right Way
If you’ve never made burger foil packs before, you’re in for a surprisingly simple and satisfying experience. The goal is to create a tightly sealed cooking pouch that locks in heat and moisture, allowing all the flavors to blend beautifully.
Here’s a quick step-by-step to help you make a sturdy and leak-proof foil packet:
- Tear off a piece of aluminum foil roughly 12″x18″.
- Spray the dull side with non-stick cooking spray.
- Place a mound of your vegetable mixture (potatoes, carrots, onions) in the center.
- Lay a seasoned ground beef patty on top of the veggies.
- Spoon 2 tablespoons of condensed cream of mushroom soup over the patty.
- Bring the long sides of the foil up to meet in the center and fold tightly down several times.
- Fold in the short ends toward the center to seal tightly.
Proper sealing ensures the packet steams evenly and prevents leaks in your oven or grill.
These techniques also apply to other foil packet recipes for oven, not just burgers—think salmon, chicken, or sausage variations.
Need a dinner idea with a similar wrapping method? Try our garlic bread sloppy joes for a twist on sealed comfort food.
Layering Technique for Even Cooking and Juiciness
Creating a layered structure inside your burger foil pack ensures that the meat cooks thoroughly while the vegetables remain tender—not mushy. Here’s how to do it right:
- Veggies go on the bottom: Placing potatoes and carrots at the base gives them direct heat exposure, helping them soften faster.
- Beef patties in the middle: The juice from the meat will drip down and flavor the vegetables.
- Soup or sauce on top: This acts as a moisture shield and adds creamy richness.
When you bake or grill the foil packs, all components cook together in harmony. The meat stays juicy, the veggies soak up all the flavor, and you end up with a meal that looks—and tastes—like it took way more effort than it did.
Here’s a tip: Try assembling your burger foil packs in advance and refrigerating them until you’re ready to cook. That makes this a perfect meal prep idea or a ready-to-go foil packet meal for camping.
Oven vs Grill: Mastering the Cooking Methods for Burger Foil Packs
Making Burger Foil Packs in the Oven
When it comes to simplicity and consistent results, baking burger foil packs in the oven is a winning method. It requires minimal effort, no special equipment, and delivers tender vegetables with juicy, perfectly cooked beef patties—all wrapped up in a no-mess foil packet.
To bake your foil packs in the oven:
- Preheat your oven to 375°F, ensuring even heat circulation for both the meat and veggies.
- Arrange the foil packets on a large baking sheet, keeping the sealed side facing up to trap steam and flavors.
- Bake for 35 to 45 minutes, depending on the size of your potato slices and thickness of your beef patties.
- Let the packs sit for a few minutes before opening carefully—hot steam will be released.
This oven technique gives your burger foil packs recipe a slow-roasted quality that makes each bite taste like a warm, home-cooked hug. It’s especially great for cold nights when grilling outdoors isn’t an option but you still want that satisfying, all-in-one meal.
If you’re looking for other delicious baked dinners, don’t miss our hearty creamed cabbage ground beef casserole—it’s comfort food at its finest.
Grilling Hamburger Foil Packs for Smoky Flavor
If you’re after bold, flame-kissed flavor, grilling your burger foil packs is the way to go. It’s fast, flavorful, and ideal for summer evenings, tailgates, or campsite cooking.
To grill your burger foil packets:
- Preheat your grill to medium-high, around 400°F.
- Place the foil packs directly on the grill grates, seam-side up to prevent leaking.
- Grill for 20–25 minutes, flipping once halfway through for balanced cooking.
- Open one foil pack near the end to test tenderness. The potatoes should be soft, and the burger fully cooked through.
On the grill, hamburger foil packets develop a slight crisp around the edges—especially the onions and potatoes—adding texture to each bite. If you’re grilling at a campsite, nestle the packs in hot coals or place them on a grill grate over an open flame
Flavor Boosters and Binding Techniques
What Is the Best Way to Bind a Burger Patty?
Creating a juicy, well-formed patty is essential for burger foil packs to turn out just right. If your patties fall apart during cooking, you’ll end up with loose meat instead of a hearty burger. The key? Proper binding.
Here’s how to keep your patties intact, whether you’re baking or grilling:
- Skip the eggs and breadcrumbs—you don’t need them. Instead, mix in a packet of dry onion soup mix with your ground beef. It acts as both a flavor enhancer and natural binder due to its dehydrated onions and starches.
- Gently shape the patties by hand—don’t overwork the meat, or you’ll squeeze out the moisture and toughness will creep in.
- Chill patties in the fridge for 10–15 minutes before assembling your foil packets. This helps them hold shape during the initial cooking phase.
This approach works especially well when cooking over high heat, like in foil packet meals for camping, where you don’t want your burger to crumble into the fire.
Looking to experiment with other fillings? Discover great ideas like our cheesy taco potatoes—a skillet-style dish that uses a similar no-bind, full-flavor method.
Spices and Seasoning Mixes for Maximum Flavor
Let’s face it—no one wants a bland burger. Luckily, burger foil packs are a great canvas for seasoning blends and spice mixes that amplify taste without extra work.
Here are some flavor-packed additions you can mix directly into the beef or sprinkle over the veggies:
| Spice/Seasoning | Purpose |
|---|---|
| Dry onion soup mix | Umami base flavor |
| Garlic powder | Boosts savory richness |
| Smoked paprika | Adds warmth and a hint of BBQ |
| Cracked black pepper | Sharp, peppery kick |
| Worcestershire sauce | Deepens beef flavor |
| Chili flakes | Optional heat |
When you assemble your easy burger foil packs recipe, layer seasoning thoughtfully. Mix some into the beef, toss a little with the veggies, and let the mushroom soup tie it all together during cooking. This three-point seasoning approach ensures every element of the pack is loaded with taste.
Burger Foil Packs for Every Occasion
Foil Packet Meals for Camping Adventures
Few things match the ease and satisfaction of enjoying burger foil packs around a campfire. They’re compact, require no dishes, and cook perfectly over open flames. If you’re packing light but still want a warm, hearty meal, foil packet meals should be your go-to.
Here’s why they’re ideal for camping:
- Pre-assembled and portable: Assemble your foil packs at home, chill them in a cooler, and cook them fresh at your campsite.
- No pots or pans required: Just place the sealed foil directly on hot coals or a grill grate.
- Minimal cleanup: Once eaten, the foil folds up and gets tossed—no washing necessary.
When you’re surrounded by nature, the comforting smell of sizzling beef and roasted onions makes the experience even better. To keep things safe, use double layers of heavy-duty foil when placing directly on hot coals.
Need more campfire meal inspo? Don’t miss our garlicky honey-glazed beef cubes—perfect over an open flame alongside your burger packs.
You can also involve the kids. Let them assemble their own packets with chosen veggies and toppings. It’s an activity and a meal in one—perfect for family bonding under the stars.
Original Hobo Dinner: A Nostalgic Twist
Long before trendy meal kits and gourmet camping food, there was the original hobo dinner—a simple foil meal of ground beef, potatoes, and canned soup, cooked over a fire. It’s the true ancestor of today’s burger foil packs, and for good reason: it’s budget-friendly, filling, and flexible.
To give it a modern twist, we stick with the classic base but add a few upgrades:
- Use lean ground beef for better texture.
- Add fresh garlic powder and olive oil for depth.
- Top with condensed cream of mushroom soup for a creamy, old-school flavor that steams everything to perfection.
The nostalgia hits different when you’re enjoying this dish on a cool evening, wrapped in a blanket with the crackle of a fire nearby. It brings back that feeling of simplicity, comfort, and warmth.
Customizations for Family-Friendly Burger Foil Packs
Easy Burger Foil Packs Recipe with Kids in Mind
Getting dinner on the table that the whole family will actually eat? That’s the real challenge. Luckily, burger foil packs make it easy to customize meals for even the pickiest of eaters. Each packet can be tailored individually, which is a lifesaver for households with different tastes.
Here’s how to make your easy burger foil packs recipe kid-friendly:
- Swap out the veggies: Don’t force Brussels sprouts on your 6-year-old. Let kids choose from carrots, corn, or baby potatoes—vegetables they already like.
- Add a slice of cheese: Place cheddar or mozzarella over the beef patty before sealing the packet for melty goodness.
- Make it fun: Let children help build their own packs. It gives them ownership over dinner, which often leads to more adventurous eating.
For a mini version, form slider-sized patties and cook individual foil packs for little hands and smaller appetites. The process is the same, just cut down on the cook time by about 10 minutes.
Looking for more family-friendly ideas? Check out our cheeseburger mini sliders—they’re fun-sized and full of flavor.
These interactive dinners don’t just get kids involved—they reduce food waste by letting everyone eat what they enjoy.
Vegetarian and Keto-Friendly Alternatives
Burger foil packs are flexible enough to accommodate nearly any dietary need without sacrificing satisfaction.
Vegetarian Version:
Skip the beef and substitute with:
- Plant-based burger patties
- Portobello mushroom caps
- Sliced tofu marinated in garlic, soy sauce, and olive oil
Use veggie broth or mushroom gravy in place of cream soup and load the pack with zucchini, bell peppers, and sweet potatoes. Even meat lovers will be reaching for seconds.
Keto-Friendly Version:
Watching carbs? No problem. Just remove the potatoes and carrots, and instead use:
- Cauliflower florets
- Broccoli
- Sliced zucchini or green beans
Stick to full-fat ground beef, rich seasoning, and a low-carb cheese slice or dollop of keto-friendly sauce like garlic aioli or ranch. Bake or grill as usual.
Common Mistakes to Avoid in Burger Foil Pack Recipes
Overcooking and Undercooking: Timing Is Everything
One of the biggest frustrations with burger foil packs is pulling them out of the oven or grill only to find raw potatoes or dry beef. The secret? Timing and smart slicing.
Here’s how to get it right every time:
- Slice vegetables thinly and evenly—especially potatoes and carrots. Thick chunks take longer to cook and can leave you with half-raw bites while your burger is overdone.
- Avoid overly thick patties. Keep burgers about ½ to ¾ inch thick. This allows them to cook evenly along with the vegetables.
- Know your equipment. Oven temperatures can vary, and some grills run hotter than others. Always check your burger foil packs at the minimum time recommended (about 35 minutes for the oven, 20 minutes for the grill), then test one before serving.
Not sure if your pack is done? Carefully open one and pierce a potato with a fork. If it slides in easily and the beef is no longer pink, you’re good to go.
Want to explore another balanced one-dish dinner? Try our creamy garlic crab-stuffed mushrooms. It’s rich, satisfying, and just as impressive.
Why Foil Pack Sealing Technique Matters
It’s easy to think that all foil folds are created equal—but when it comes to burger foil packs, how you wrap them matters. A poor seal can lead to messy leaks, uneven cooking, or even burnt edges.
Here’s how to master the foil fold:
- Use heavy-duty aluminum foil: It resists tearing and holds up better to high heat.
- Double wrap if grilling: This prevents ash or flame damage, especially when cooking over direct coals.
- Create a steam pocket: Seal the foil loosely enough to allow steam to circulate inside the packet, but tightly enough to trap all the moisture.
A well-sealed pack not only protects your meal but enhances it—acting like a mini pressure cooker that infuses flavor and keeps the meat ultra-juicy.
If your foil skills need practice, test out different wrap styles before cooking the real thing. It’s worth the small extra effort to ensure a delicious, no-drip dinner.
Storage, Reheating & Leftover Ideas
Storing and Reheating Burger Foil Packs
One of the best things about burger foil packs is how well they hold up after cooking. Whether you’re making them ahead of time for the week or saving leftovers from a big camping trip, storage is a breeze.
Here’s how to store them properly:
- Let the packets cool completely before placing them in the fridge.
- Transfer to airtight containers or keep them sealed in the foil if well-wrapped.
- Refrigerate for up to 4 days.
For longer storage, burger foil packs freeze well too. Wrap each packet tightly in a second layer of foil or plastic wrap, then store in a zip-top freezer bag. They’ll stay good for up to 2 months.
Reheating is easy:
- Oven method: Place foil packet on a baking sheet and bake at 350°F for 15–20 minutes (if refrigerated) or 30–35 minutes (if frozen).
- Microwave method: Transfer contents to a microwave-safe dish, cover loosely, and heat in 1-minute intervals until warmed through. This works well if you removed the foil before storing.
Avoid microwaving the actual foil packet—foil and microwaves are a dangerous combo.
Looking for another make-ahead marvel? Try our no-bake peanut butter oat cups for the perfect meal-prep dessert to go with your burger packs.
Creative Ways to Repurpose Leftovers
Leftover burger foil packs are gold for reinventing quick meals. Don’t just reheat—transform.
Here are some creative leftover makeovers:
| Leftover | New Dish Idea |
|---|---|
| Cooked burger patty | Crumble into scrambled eggs or breakfast burritos |
| Potatoes & carrots | Add to a breakfast hash or stir into soup |
| All contents | Stuff into pita or wrap for a quick handheld lunch |
| Beef & onions | Top a baked potato or melt into grilled cheese |
You can also dice everything and toss it into a skillet with a touch of butter for a crispy, reheated hash. Or layer leftovers onto flatbread with cheese and toast for a quick open-faced sandwich.
No matter how you use them, burger foil packs offer more than just a one-time dinner—they’re the starting point for multiple meals with zero stress.
Why This Is the Best Burger Foil Packs Recipe You’ll Try
Burger foil packs are more than just a dinner shortcut—they’re a reliable, flavorful, and fuss-free way to feed your family or your camping crew. With minimal prep, customizable ingredients, and nearly zero cleanup, these foil-packed meals have become a staple in kitchens and campgrounds for good reason.
From the tender, juicy patties to the perfectly steamed vegetables and savory mushroom sauce, each packet delivers a hearty, satisfying bite. Whether baked in the oven or grilled over an open flame, burger foil packs offer a consistently delicious meal without the need for fancy tools or hours in the kitchen.
Their flexibility is what really makes them shine. You can make them kid-friendly, vegetarian, low-carb, or fully loaded depending on your mood—or what’s in your fridge. Plus, they store well and reheat beautifully, making them perfect for meal prep or next-day lunches.
If you’ve been searching for a go-to, family-approved, and endlessly adaptable meal, look no further. This truly is the best burger foil packs recipe to keep on hand, whether you’re cooking indoors or out under the stars.Tray this : Bone In Ribeye
How do you make a foil packet?
To make a foil packet, tear off a sheet of heavy-duty aluminum foil (around 12″x18″), spray it with non-stick spray, and place your ingredients in the center. Fold the long edges over the mixture and crimp them together. Then fold in the short ends, sealing tightly. This method creates a pouch that traps steam and flavor during cooking.
Can you wrap burgers in aluminum foil?
Yes, wrapping burgers in aluminum foil helps lock in moisture and flavor. It’s a great method for grilling or baking as it steams the meat with vegetables and seasonings. Just be sure the foil is tightly sealed to avoid leakage.
What is the best way to bind a burger?
For foil-packed burgers, mixing in a packet of dry onion soup mix works wonders. It adds flavor and helps hold the patty together without the need for eggs or breadcrumbs. Gently forming the patties without overmixing is also crucial for maintaining juiciness.
How long do you cook hamburger foil dinners?
In the oven, hamburger foil packs should be baked at 375°F for 35–45 minutes. On the grill, they’ll be ready in 20–25 minutes over medium-high heat. Timing may vary depending on the thickness of your patties and how thin your veggies are sliced.