
Cheesy Garlic Butter Rollups are the ultimate comfort food—warm, gooey, and bursting with garlicky goodness. In this comprehensive guide, we’re diving deep into every flaky layer of these melt-in-your-mouth delights. Whether you’re a home chef or a weekend baker, you’ll get the full scoop: from dough prep and cheesy fillings to expert tips on proofing, freezing, reheating, and more. Plus, you’ll discover variations like cheesy garlic bread swirls and garlic rolls with store-bought rolls.
About Cooking Flash:
Here at About page, we’re more than just recipes—we’re a flavor-packed story of passion. Founded by a home-cook-turned-food-lover who grew up savoring buttery bread with her grandmother, our recipes are built with love, simplicity, and flavor in mind. These cheesy garlic butter rollups are a nod to our kitchen roots—a perfect blend of nostalgic comfort and bold modern flavors.
Don’t miss our Cheesy Garlic Butter Mushroom Stuffed Chicken for another twist on cheesy garlic indulgence.
Table of Contents
Table of Contents
Why Everyone’s Obsessed with Cheesy Garlic Butter Rollups
– What Makes Cheesy Garlic Butter Rollups So Irresistible?
– The Rise of These Flavor-Packed Rolls in Modern Kitchens
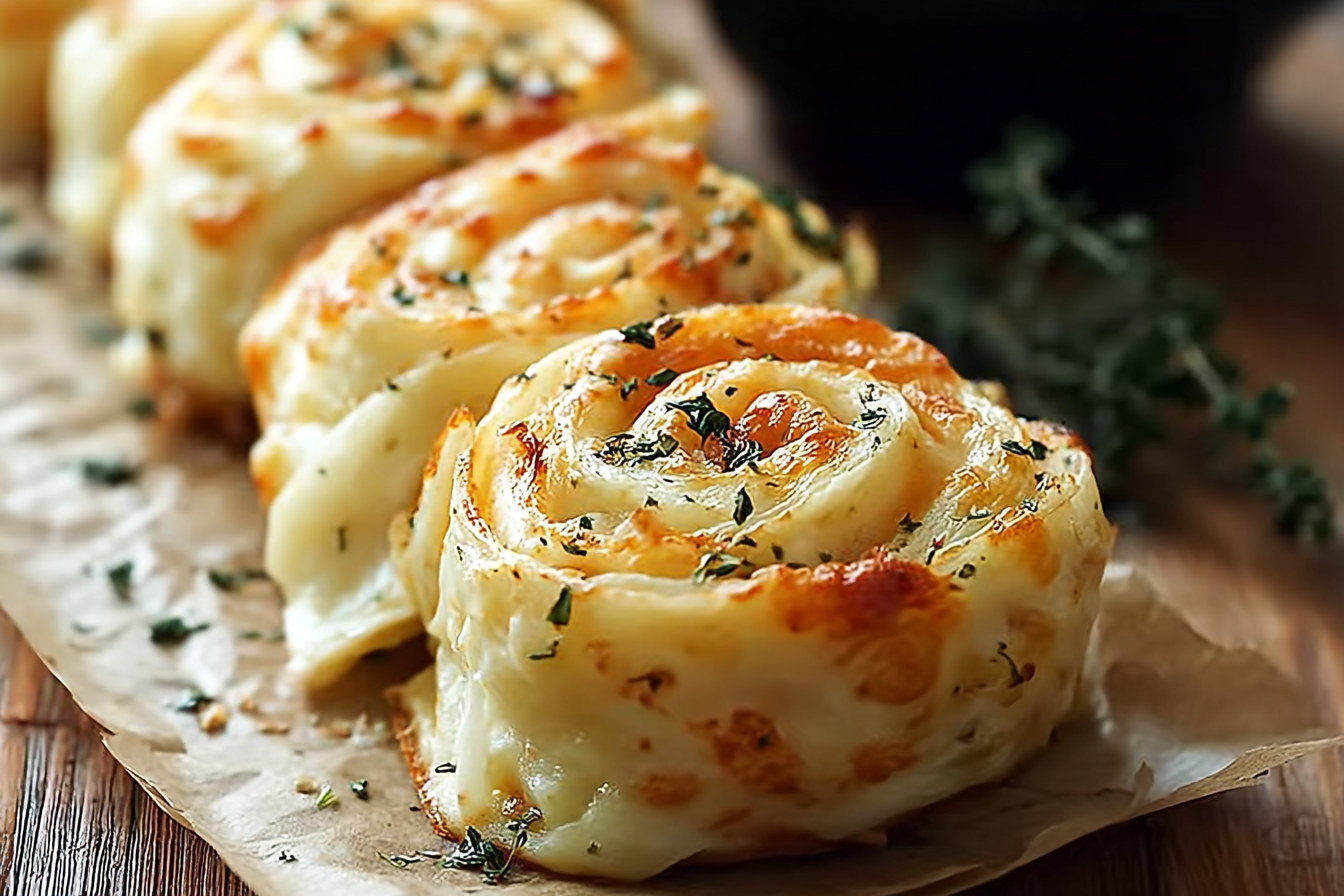
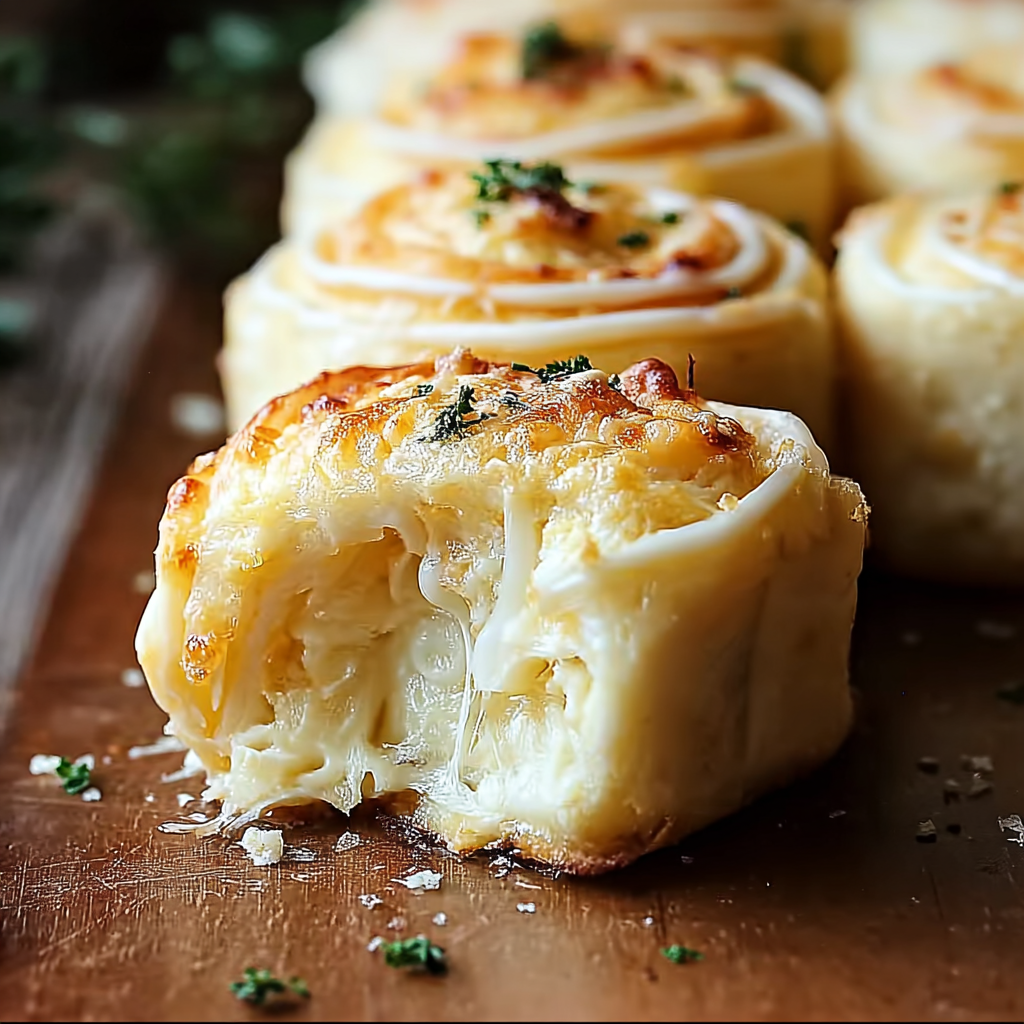
Cheesy Garlic Butter Rollups have quickly become a beloved staple in home kitchens—and it’s not hard to understand why. From their gooey cheese centers to the crisp golden swirl of garlicky dough, these rollups take everything people love about garlic bread and turn it into a warm, buttery bite-sized experience.
These aren’t your average garlic rolls. No, these cheesy garlic butter rollups combine the softness of freshly proofed dough with the richness of homemade roasted garlic butter and the pull of melted mozzarella cheese in every layer.
Why do these stand out?
- Roasted garlic brings mellow, caramelized depth that fresh garlic can’t match
- Soft dough rolled tightly ensures flavor in every bite
- Cheese gets sealed inside, turning molten and stretchy
- Garlic butter is layered throughout—not just brushed on top
It’s the full experience—fragrant, rich, soft, and indulgent.
You’ve probably come across similar names: cheesy garlic bread swirls, garlic bread roll ups, or even the creative cheesy garlic crinkle pie—all inspired by the growing trend of twisted, rolled, and filled bread ideas that are easy to bake and hard to resist.
– Are Cheesy Garlic Butter Rollups Different from Garlic Rolls?
Absolutely. Garlic rolls typically get brushed with garlic butter only after baking. But with cheesy garlic butter rollups, every inch of the dough gets coated before baking—locking in moisture, flavor, and richness. Plus, the filling of cheese means every bite offers gooey goodness, not just garlic.
So while you might love garlic rolls with store-bought rolls, these scratch-made beauties take things to the next level with homemade flavor and fluffy, tender texture.
Check out our take on a similar buttery twist: Cheesy Garlic Butter Mushroom Stuffed Chicken—it’s another way to enjoy layers of cheesy garlic flavor with a juicy protein punch.
Don’t miss our Easy Cheesy Garlic Chicken Wraps if you’re craving more wrap-style garlic and cheese flavor in your weekly menu.
Print
Irresistibly Easy Cheesy Garlic Butter Rollups You’ll Crave Again!
- Prep Time: 2 hours 30 minutes (includes proofing and garlic roasting)
- Cook Time: 25 minutes
- Total Time: 2 hours 55 minutes
- Yield: 6 rolls 1x
- Category: Bread
- Method: Baking
- Cuisine: Fusion
- Diet: Vegetarian
Description
These Cheesy Garlic Butter Rolls are soft, fluffy, and packed with roasted garlic flavor and melty mozzarella cheese. Made with homemade dough and rich garlic butter, they’re perfect as a side, appetizer, or indulgent snack.
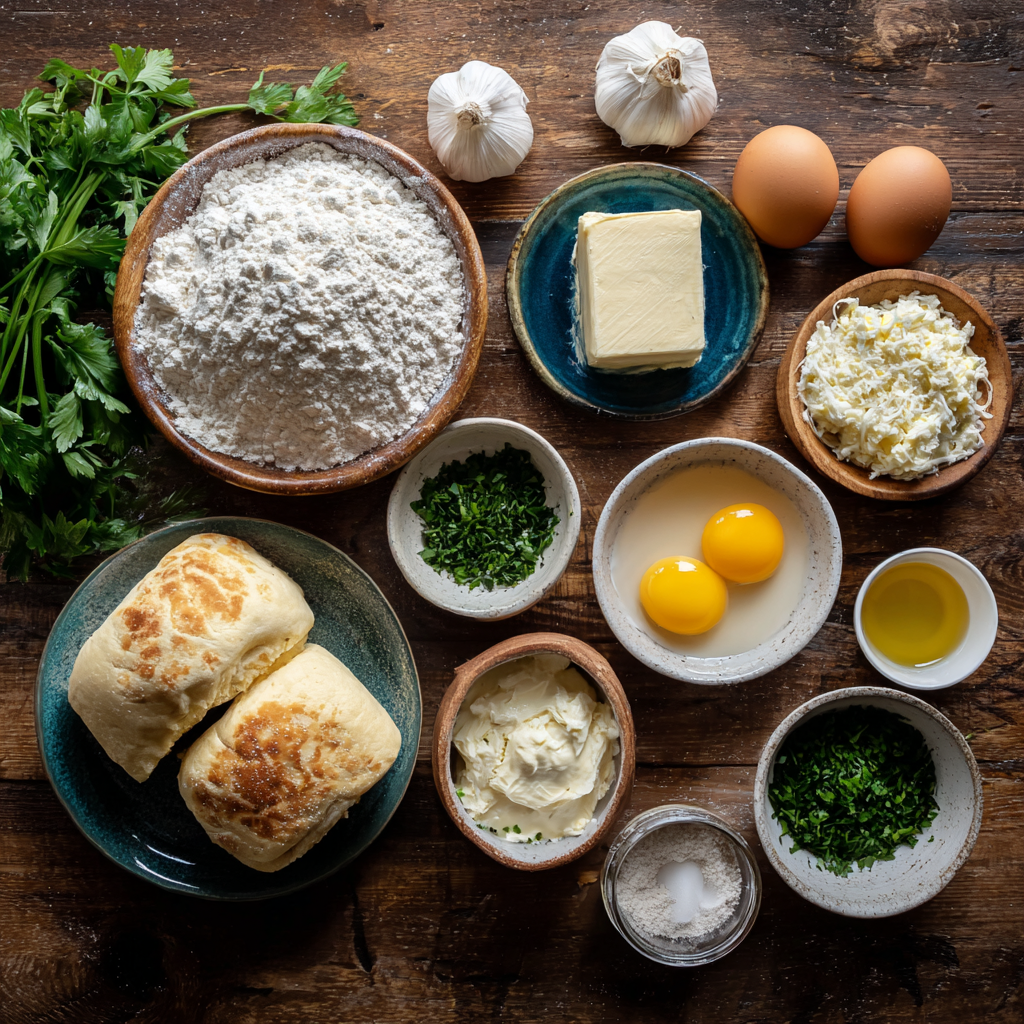
Ingredients
- Garlic Butter:
- 1 garlic head
- Sprinkle of salt
- 30 grams olive oil
- 50 grams butter
- 1 tablespoon fresh parsley, chopped
- Dough:
- 90 grams warm milk
- 7 grams active dry yeast
- 25 grams honey
- 200 grams all-purpose flour
- 50 grams bread flour
- 20 grams milk powder (optional)
- 25 grams butter
- 2 egg yolks
- 1 1/2 teaspoons salt
- 1 tablespoon sugar
- Filling:
- 200 grams mozzarella cheese
- Prepared garlic butter (from above)
- Egg Wash:
- 1 egg
Instructions
- Roast the Garlic: Cut the top off a garlic head, place in a ramekin, drizzle with olive oil, sprinkle with salt, cover with foil, and roast at 160°C (320°F) for 2 hours until soft.
- Make Garlic Butter: Mash the roasted garlic and mix with softened butter, chopped parsley, and 2 tablespoons of garlic-infused oil. Set aside.
- Activate Yeast: In a bowl, combine warm milk, yeast, and honey. Let proof for 10 minutes until frothy.
- Prepare Dough: In a mixing bowl, combine flours, sugar, milk powder, softened butter, salt, egg yolks, and the yeast mixture. Mix until combined.
- Knead: Knead the dough using a stand mixer with a dough hook for 15–20 minutes until smooth and elastic.
- First Proof: Place dough in a greased bowl, cover, and proof in a warm place (29°C/85°F) for about 1.5 hours or until doubled in size.
- Roll Out: Roll the dough into a rectangle about 1/4 cm (1/8 inch) thick.
- Add Filling: Spread prepared garlic butter over the dough, then sprinkle evenly with mozzarella cheese.
- Shape Rolls: Roll the dough tightly into a log and cut into 6 equal portions using a knife or unflavored dental floss.
- Second Proof: Arrange rolls on a baking sheet, cover, and proof again for 30 minutes until puffy.
- Bake: Preheat oven to 175°C (350°F). Brush rolls with egg wash and bake for 20–25 minutes, checking at 20 minutes.
- Finish: Brush freshly baked rolls with remaining garlic butter and garnish with chopped parsley. Serve warm.
Notes
- You can prepare the garlic butter ahead and refrigerate until ready to use.
- If you prefer a sweeter bread, increase the honey slightly.
- Use a silicone baking mat or parchment for easier cleanup.
Nutrition
- Serving Size: 1 roll
- Calories: 320
- Sugar: 4g
- Sodium: 360mg
- Fat: 18g
- Saturated Fat: 10g
- Unsaturated Fat: 6g
- Trans Fat: 0g
- Carbohydrates: 30g
- Fiber: 1g
- Protein: 10g
- Cholesterol: 75mg
Building Blocks of Flavor – Ingredient Guide for Cheesy Garlic Butter Rollups
– Essential Ingredients That Create the Magic
– Secrets to Perfecting Soft, Buttery Dough Every Time
When it comes to cheesy garlic butter rollups, every ingredient plays a role in crafting the unforgettable aroma, texture, and taste. From golden roasted garlic to stretchy mozzarella tucked inside tender dough, the balance of richness and softness begins with what you mix in.
Let’s walk through each element and uncover what makes this recipe shine.
1. Garlic Butter: The Heart of Every Rollup
Roasting a whole garlic head might seem like a lot of work, but trust us—it’s worth it. Roasted garlic turns creamy, sweet, and mellow, without the sharp bite raw garlic can leave behind.
Ingredients for Garlic Butter FOR Cheesy Garlic Butter Rollups:
- 1 whole garlic head – roasted for that rich, savory depth
- 30g olive oil – enhances richness and supports roasting
- 50g unsalted butter – the base for the spread
- Sprinkle of salt – to balance the sweetness of garlic
- 1 tbsp chopped parsley – for a fresh herby finish
Once roasted, the garlic is mashed and blended into softened butter, then mixed with olive oil and parsley for an aromatic, spreadable base.
2. The Dough: Light, Soft & Flavor-Packed
The dough for these cheesy garlic butter rollups is designed to be soft but strong enough to hold the buttery, cheesy filling. It starts with a well-proofed yeast mixture and finishes with buttery richness and just enough structure.
Key Ingredients in Dough FOR Cheesy Garlic Butter Rollups:
- 90g warm milk – activates the yeast and adds moisture
- 7g active dry yeast – the rise-maker
- 25g honey – feeds the yeast and adds a touch of sweetness
- 200g all-purpose flour + 50g bread flour – perfect balance of soft and chewy
- 20g milk powder (optional) – for a rich, milky flavor
- 25g butter – softness and buttery notes throughout
- 2 egg yolks – richness and elasticity
- 1 ½ tsp salt – for flavor control
- 1 tbsp sugar – boosts browning and balances flavor
The cheesy garlic butter rollups dough gets kneaded for 15–20 minutes using a stand mixer until it’s smooth, stretchy, and no longer sticky. Proper kneading ensures the dough can trap the buttery garlic and hold shape while baking.
Looking for inspiration? Try our Crabby Shrimp Stuffed Garlic Bread Bombs for another dough-based garlic delight with a seafood twist.
3. Filling & Toppings: Bringing It All Together
Filling:
- 200g shredded mozzarella – stretches beautifully when melted
- Prepared garlic butter – spread over every inch of dough
After rolling out the dough thin, slather the entire surface with your homemade garlic butter. Then sprinkle with a generous layer of mozzarella—this ensures every bite oozes cheese.
Egg Wash & Final Touch:
- 1 egg – lightly beaten to brush over the tops
- Extra garlic butter + parsley – for post-bake brushing
This final step gives your cheesy garlic butter rollups that irresistible glossy finish and buttery aroma that makes them shine fresh out of the oven.
Bonus Tip: Why Balance Matters
Many ask: Why are my rolls dense? The answer often lies in how the dough was handled. Skipping proper kneading or under-proofing can result in heavier, tougher rolls.
We’ll dig into all that dough science in Part 3.
Before we get there, don’t miss our Garlic Butter Mushroom Linguine—it’s another meal where garlic butter steals the show.
How to Make Cheesy Garlic Butter Rollups Step by Step
– The Complete Homemade Method for Perfect Rollups
– From Roasting Garlic to Rolling Dough Like a Kitchen Pro
If you’re ready to dive into buttery, cheesy, pull-apart goodness, this is the part where your cheesy garlic butter rollups take shape—literally. With a little time and care, you’ll turn simple ingredients into golden, bakery-style rolls that smell amazing and taste even better.
Let’s break it all down so you can bake with confidence from your own kitchen.
Step 1: Start with Roasting the Garlic FOR Cheesy Garlic Butter Rollups
Garlic is the flavor hero here—but not just any garlic. Roasting a whole head slowly brings out a sweet, mellow taste that blends beautifully with butter and cheese.
Here’s what to do:
- Slice the top off one whole garlic bulb
- Place it in a small baking dish or ramekin
- Drizzle with olive oil and sprinkle a pinch of salt
- Cover tightly with foil
- Roast at 160°C (320°F) for 2 hours
Once done, the cloves will be soft and caramel-colored—perfect for smashing into rich, savory butter.
Step 2: Make the Garlic Butter Spread FOR Cheesy Garlic Butter Rollups
Now that your garlic is golden and soft, it’s time to turn it into a flavorful spread that’s the heart of these rollups.
Combine:
- The roasted garlic cloves (squeezed out)
- 50 grams softened butter
- 2 tablespoons garlic-infused olive oil
- 1 tablespoon chopped fresh parsley
Mix until smooth. Set this aside—it will be your go-to for filling and brushing later.
Step 3: Activate the Yeast FOR Cheesy Garlic Butter Rollups
To make your dough rise nice and fluffy, the yeast needs to “wake up” in a warm liquid.
In a bowl:
- Stir together 90 grams warm milk, 7 grams active dry yeast, and 25 grams honey
- Let it sit for 10 minutes until it looks frothy and bubbly
This shows the yeast is alive and ready to lift your dough.
Step 4: Mix and Knead the Dough
With the yeast ready, it’s time to bring everything together to form a smooth, rich dough.
Into a large bowl, add:
- The frothy yeast mixture
- 200 grams all-purpose flour
- 50 grams bread flour (for structure)
- 20 grams milk powder (optional but makes it richer)
- 25 grams softened butter
- 2 egg yolks
- 1 tablespoon sugar
- 1½ teaspoons salt
Knead this mixture using a dough hook or by hand for 15–20 minutes, until it becomes elastic and slightly glossy. Cover and let it rise for about 90 minutes in a warm space until it’s doubled in size.
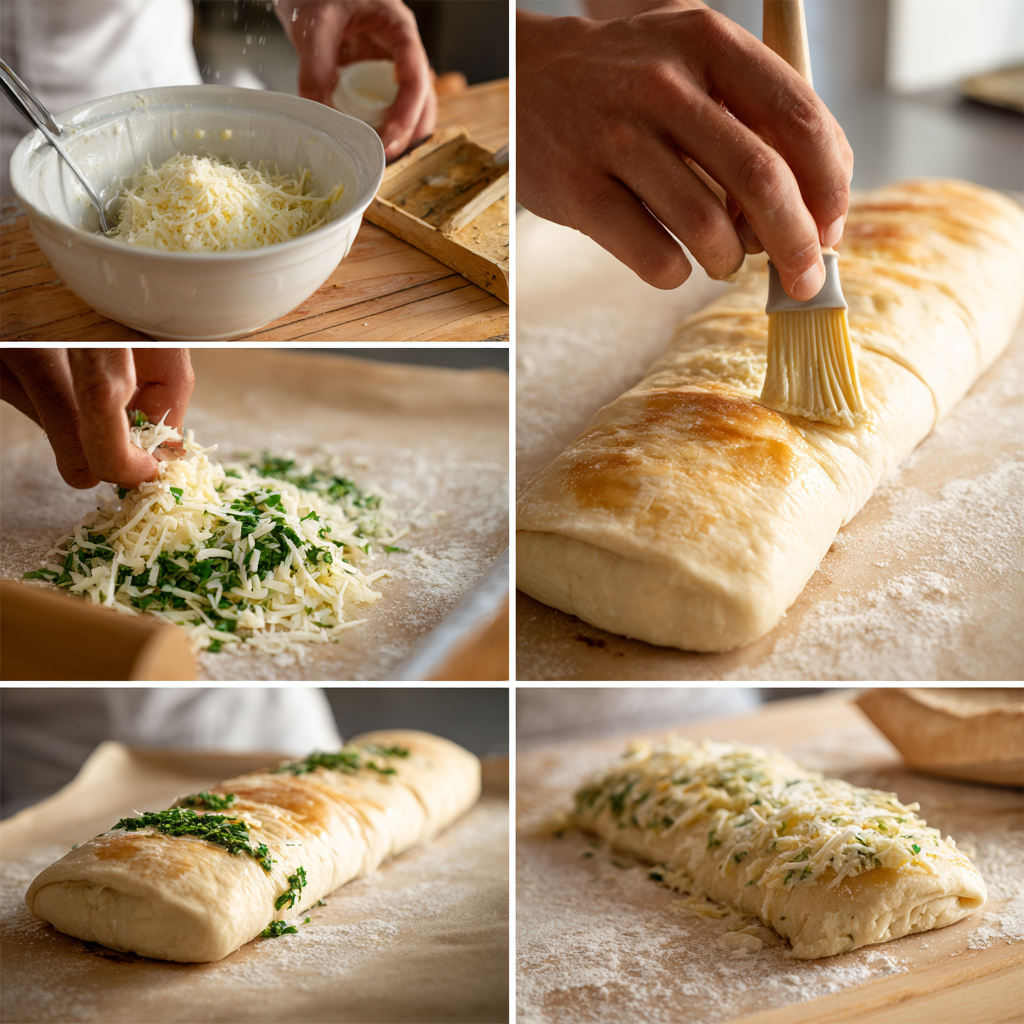
Step 5: Roll and Fill
Once the dough is proofed and puffy, roll it out into a flat rectangle on a clean, floured surface.
Then:
- Spread the garlic butter all over the dough
- Sprinkle 200 grams of shredded mozzarella cheese evenly
- Roll it up tightly from the long edge, creating a cheese-filled log
This layered technique ensures every bite is full of melty, garlicky goodness.
Step 6: Slice and Proof Again
To create individual rollups, slice the log into 6 equal pieces using a sharp knife or unflavored dental floss.
Place the rolls cut-side up on a lined baking tray, giving each one room to rise. Cover loosely and let them rest for 30–40 minutes, or until they’re visibly puffier.
Want more roll-style recipes? Check out Crabby Shrimp Stuffed Garlic Bread Bombs—a delicious twist on classic savory bread rolls.
Step 7: Time to Bake
Preheat your oven to 175°C (350°F).
Before baking:
- Beat 1 egg and brush it over each roll for a golden top
- Bake for 20–25 minutes, until the tops are golden brown and cheese is bubbling
You’ll know they’re done when they smell incredible and sound slightly hollow when tapped on top.
Step 8: Finish with Extra Flavor
Right out of the oven, brush the rolls again with the remaining garlic butter and sprinkle with parsley. This adds that shiny, restaurant-style finish and another layer of flavor.
Don’t miss our Cheesy Garlic Butter Mushroom Stuffed Chicken if you’re loving this cheesy garlic combo and want more main dish ideas.
Fixing Flatness – Why Cheesy Garlic Butter Rollups Sometimes Fail
– Common Mistakes That Make Rolls Dense
– Easy Tips to Master Dough Proofing Like a Baker
Not every batch of cheesy garlic butter rollups comes out soft and fluffy on the first try—and that’s okay. If your rolls are turning out dense, heavy, or just not quite right, you’re not alone. This section tackles the most common issues people face and how to fix them, so you can enjoy bakery-quality results at home every time.
Why Are My Rollups Coming Out Dense?
A dense texture usually means the dough didn’t rise properly—or didn’t have enough structure to trap air. Here are the likely culprits:
1. Under-proofing the Dough
If the dough hasn’t had enough time to rise, it won’t have the air bubbles needed to make the rollups light. Even if the flavor is there, the texture will feel compact and doughy.
Solution:
Let your dough rise until it has visibly doubled in size—this usually takes 90 minutes in a warm spot. For the second rise (after shaping), give it another 30–40 minutes. Avoid rushing this step.
2. Over-proofing the Dough
Yes, too much proofing can also hurt. If dough rises too long, the gluten structure weakens, and the rolls deflate while baking.
Solution:
Set a timer. Dough should feel pillowy and spring back gently when poked—not deflate or feel hollow. Don’t let it sit too long in a hot area.
Yeast Tips: How to Get the Best Rise Every Time
The rise is what gives cheesy garlic butter rollups their fluffy bite. If the yeast isn’t happy, neither is your dough.
3. Old or Inactive Yeast
If your yeast has expired or has been exposed to moisture or air, it won’t foam properly and can ruin your dough’s rise.
Fix:
Always check the date on your yeast packet. Test it in warm milk and honey before mixing. If it doesn’t bubble after 10 minutes—it’s no good.
4. Using Milk That’s Too Hot
Hot milk can kill your yeast before it starts working, preventing rise altogether.
Fix:
Use milk that’s just warm to the touch—about 100°F (38°C). Anything above 110°F is risky.
Don’t miss our Easy Cheesy Garlic Chicken Wraps for another creative use of garlic butter and soft dough!
Kneading Mistakes That Ruin Texture
Poor kneading can make the dough tough or too loose to rise properly. Here’s what to watch for:
5. Not Kneading Long Enough
Without enough kneading, gluten doesn’t develop. That means the dough can’t hold air pockets, which results in dense or flat rolls.
Fix:
Use a dough hook for 15–20 minutes, or knead by hand until the dough is elastic, smooth, and springs back slightly when poked.
6. Too Much Flour During Shaping
Adding too much flour when rolling out the dough can dry it out and make the rollups tough.
Fix:
Lightly dust your surface with flour—just enough to prevent sticking. Your dough should stay soft and slightly tacky, not stiff.
Environment Matters: Don’t Proof in a Cold Kitchen
Dough loves warmth—but not heat. A cold kitchen can slow your rise dramatically.
Quick Tip:
Create a proofing zone by turning your oven on for 1 minute, then turning it off. Place the dough inside with the light on. Or, proof near a sunny window or on top of the fridge.
How to Tell When Your Dough is Proofed Just Right
If you’ve ever wondered how do I know when the dough is proofed enough? — here’s the test:
The Finger Dent Test:
- Gently press two fingers into the dough
- If the dent springs back slowly and partially, it’s ready
- If it springs back immediately, it needs more time
- If it doesn’t spring back at all, it may be over-proofed
Knowing this small trick can make a huge difference in the final texture of your cheesy garlic butter rollups.
Bonus Insight: Humidity and Elevation Affect Your Rise
If you live in a dry or high-altitude area, your dough might rise too fast or bake unevenly.
Solution:
Adjust your proofing time and temperature. In high-altitude areas, consider adding 1–2 extra tablespoons of flour and keeping your dough slightly cooler.
Looking for another savory dough-based dish? Try our Garlic Butter Mushroom Linguine to round out your dinner with garlicky pasta perfection.
The Ultimate Guide to Storing, Reheating & Freezing Cheesy Garlic Butter Rollups
– Preserve Softness, Flavor & Cheesiness Like a Pro
– Smart Storage Hacks for Busy Bakers and Leftover Lovers
Whether you’re meal-prepping ahead of time or simply have a few leftover rolls, you’ll want to know how to keep your cheesy garlic butter rollups fresh, fluffy, and just as flavorful the next day—or even next month.
With the right techniques, these golden swirls can taste freshly baked long after they leave the oven. Let’s explore how to store, reheat, and freeze your garlic cheese rollups without sacrificing texture or taste.
How to Store Cheesy Garlic Butter Rollups for Short-Term Freshness
If you’re planning to eat your rollups within a day or two, you’ll want to store them properly to avoid them turning dry or rubbery.
Here’s what to do:
- Let the rollups cool completely on a wire rack
- Wrap them individually in foil or place in an airtight container
- Keep at room temperature for up to 24 hours, or
- Refrigerate for up to 4 days for longer shelf life
If stored cold, bring them back to life by reheating before serving.
Reheating Garlic Cheese Rollups – Keep Them Soft, Never Soggy
We’ve all been there—leftover garlic rolls that turn tough in the microwave or dried out in the oven. But don’t worry, there’s a better way.
Oven Method (Best for Texture):
- Preheat to 325°F (165°C)
- Wrap each roll in foil to keep it moist
- Heat for 10–12 minutes, or until the center is warm and the cheese is gooey
Microwave Method (Fastest):
- Wrap a single rollup in a slightly damp paper towel
- Microwave on low power for 15–20 seconds
- Let it sit for a few seconds to redistribute heat
Either way, reheated cheesy garlic butter rollups are best brushed with a little fresh garlic butter after warming to boost flavor and shine.
Freezing Cheesy Garlic Butter Rollups – Yes, You Can!
Want to enjoy homemade garlic rolls anytime with zero stress? Freezing them is the answer.
These rollups freeze beautifully—either before or after baking—making them the perfect make-ahead treat for busy weeks, holidays, or unexpected guests.
To Freeze After Baking:
- Cool rolls completely
- Wrap each one in foil or plastic wrap
- Place in a freezer-safe bag
- Freeze for up to 2 months
To Freeze Before Baking:
- Assemble and slice the dough into rolls
- Place on a baking sheet and freeze unbaked until solid
- Store in a sealed container
- When ready, thaw in the fridge overnight, then proof for 30–45 minutes before baking
This method lets you prep today and enjoy freshly baked cheesy garlic butter rollups whenever you like
Reheating Frozen Garlic Rollups Without Drying Them Out
When you’re ready to serve, you don’t even need to thaw if you’re in a hurry.
Oven Reheat From Frozen:
- Preheat to 325°F (160°C)
- Keep the rollups wrapped in foil
- Bake for 15–18 minutes, or until fully heated through
To finish, brush with fresh garlic butter and sprinkle a touch of parsley for that warm, homemade feel.
Craving more freezer-friendly recipes? Don’t miss our Crabby Shrimp Stuffed Garlic Bread Bombs, packed with melty cheese and bold garlic flavor.
Freshness Tip: Add Garlic Butter After Reheating
No matter how you warm them, nothing revives cheesy garlic butter rollups better than a final brush of garlic butter after heating. This adds shine, aroma, and that fresh-from-the-oven feel all over again.
Flavor Twists – Creative Cheesy Garlic Butter Rollup Variations to Try
– Beyond the Basics: Customize, Swap, and Experiment
– How to Reinvent Cheesy Garlic Butter Rollups Every Time You Bake
One of the best things about cheesy garlic butter rollups is how versatile they are. Sure, the classic recipe is buttery, garlicky perfection—but why stop there? With just a few tweaks, you can reinvent these rolls in countless ways using new ingredients, techniques, or even shortcuts from your pantry.
Let’s explore some crave-worthy variations that will keep this recipe fresh and fun no matter how many times you bake it.
1. Use Store-Bought Dough for a Faster Version
Pressed for time? You can still enjoy garlic rollups without making the dough from scratch.
Try These Shortcuts:
- Refrigerated pizza dough – rolls out easily and bakes soft
- Pre-made crescent roll sheets – great for bite-sized versions
- Frozen dinner roll dough – let it thaw, roll it out, then fill
These alternatives make it easy to create garlic rolls with store-bought rolls in under 30 minutes. Just be sure to still spread your homemade garlic butter and mozzarella inside.
2. Mix Up the Cheese for New Flavors
Mozzarella is a fan favorite for its melty texture, but it’s not the only cheese that works beautifully in these rollups.
Cheeses to Experiment With:
- Sharp cheddar – adds bold flavor and color
- Provolone or gouda – smooth and rich
- Parmesan – sprinkle inside and on top for an umami punch
- Cream cheese – mix with herbs for a creamy center
Feel free to mix two or three cheeses for a custom blend. These new flavors can turn your cheesy garlic butter rollups into something completely different every time.
3. Add Herbs and Spices to the Dough or Butter
Herbs do more than garnish—they can transform the aroma and depth of your rollups. So, if you’ve ever wondered can I add herbs to the dough?—the answer is a big yes.
Great Add-Ins:
- Dried oregano or basil in the dough
- Rosemary or thyme in the garlic butter
- Chili flakes for a spicy kick
- Black pepper and garlic powder to intensify flavor
Mix them into your butter or sprinkle over the cheese layer before rolling. It’s an easy way to elevate the taste without extra effort.
4. Try Cheesy Garlic Bread Swirls and Scrolls
If you want a slightly different look or serving style, consider changing how you roll and bake the dough.
Fun Shapes to Try:
- Cheesy garlic bread swirls – bake them in a muffin tin for individual bites
- Cheesy garlic bread scrolls – roll up jellyroll-style and slice thinner
- Mini pinwheels – great for party platters and appetizers
These shapes are fun, creative, and perfect for holidays, events, or anytime you want to impress with presentation.
Looking for more creative appetizers? Check out our Cheesy Garlic Butter Mushroom Stuffed Chicken for a bold and cheesy main course idea.
5. Transform Your Rollups into a Cheesy Garlic Crinkle Pie
Feeling adventurous? Turn your rollup dough into a savory pie by arranging the rolled slices in a pie dish and baking them together. This twist—similar to a cheesy garlic crinkle pie—makes for a stunning dinner table centerpiece.
How to Do It:
- Roll up your filled dough as usual
- Arrange slices cut-side up in a greased pie pan
- Brush with extra garlic butter
- Bake until golden and bubbling
Slice and serve like a pie—cheesy, garlicky swirls in every piece!
6. Add Protein or Veggies to Make It a Meal
Want to turn your cheesy garlic butter rollups into something more filling? Add a little something extra inside.
Great Additions:
- Cooked bacon bits or ham
- Sautéed mushrooms or spinach
- Caramelized onions
- Sun-dried tomatoes
These extras not only boost the flavor, but they can also make the rollups satisfying enough for lunch or a light dinner.
Endless Possibilities from One Simple Recipe
With just a few changes—different dough, cheeses, herbs, shapes, or add-ins—you can spin your classic rollups into endless new creations. Whether you want quick garlic rolls with store-bought dough or are baking a cheesy garlic swirl for a party, these variations make your recipe exciting every time.
Don’t miss our Garlic Butter Mushroom Linguine if you’re looking to serve your rollups alongside a rich, garlicky pasta.
People Also Search For – Delicious Alternatives & Inspired Garlic Butter Creations
– Explore More Cheesy, Buttery, and Rolled Recipes
– From Garlic Bread Swirls to Crinkle Pies, Here’s What to Try Next
Once you’ve fallen in love with cheesy garlic butter rollups, it’s hard not to crave more buttery, baked creations that offer the same cozy comfort and melty satisfaction. That’s why it’s no surprise that food lovers are also searching for recipes that deliver similar flavors in new, exciting forms.
Below, we’ll explore trending twists, creative rollup cousins, and the internet’s most searched-for cheesy garlic variations.
Cheesy Garlic Butter Rollups Recipe Variations
If you’ve already mastered the classic rollup, you might be ready for slight modifications that still follow the same technique.
Popular modifications include:
- Using different cheeses (cheddar, gouda, or a blend)
- Adding jalapeños or caramelized onions inside
- Swapping parsley for cilantro or basil
- Baking them in a muffin tin for individual portions
These tiny changes can help you build your own cheesy garlic butter rollups recipe that feels personal and totally crave-worthy.
Easy Cheesy Garlic Butter Rollups (Quick Version)
For days when you want the taste but not the wait, a shortcut version is a game changer. Many home bakers search for easy cheesy garlic butter rollups, which typically use store-bought dough or pre-shredded cheese to cut prep time in half.
Time-saving hacks:
- Ready-made pizza dough
- Garlic powder instead of roasted garlic
- Melted butter infused with dried herbs
- Pre-rolled and cut dough for baking directly
This version delivers the same cheesy satisfaction with a much faster turnaround—perfect for weeknights or lazy Sundays.
Garlic Rolls With Store-Bought Rolls
Using frozen or refrigerated rolls is a great way to simplify the process while still getting the flavor of homemade.
Try this method:
- Thaw frozen dinner rolls or use crescent roll sheets
- Flatten, spread with garlic butter, add mozzarella
- Roll, bake, and brush with more butter post-bake
You’ll still get melty centers and golden tops with these garlic rolls with store-bought rolls, but with much less effort.
Garlic Butter Spread for Rolls – Make It Once, Use It Everywhere
A rich garlic butter spread is the secret weapon behind every cheesy bite. If you’re searching for garlic butter spread for rolls, you’re really looking for versatility.
Core ingredients:
- Roasted garlic cloves or garlic paste
- Softened unsalted butter
- Olive oil (optional for richness)
- Salt, chopped parsley, and optional red chili flakes
Use it on:
- Fresh bread before baking
- As a topping after baking
- In pasta, wraps, or grilled veggies
It’s not just for rollups—it’s your go-to spread for everything.
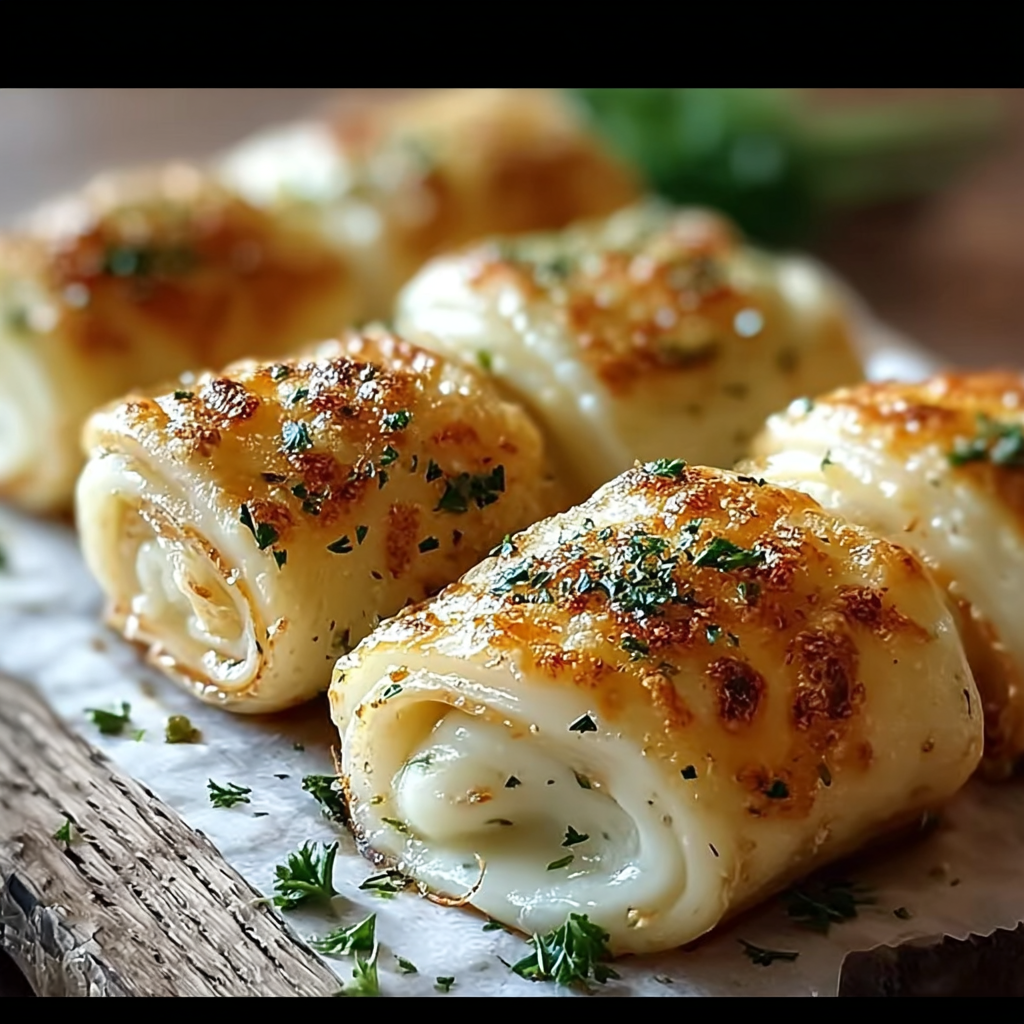
Cheesy Garlic Bread Swirls & Scrolls – Visual and Flavor Appeal
For a fun twist on appearance, many bakers turn to cheesy garlic bread swirls or cheesy garlic bread scrolls. These versions keep the same flavors but add a new presentation style.
Swirl & Scroll Tips:
- Roll dough into a log, slice, and bake in a spiral shape
- Arrange in muffin tins for perfect single-serve portions
- Sprinkle cheese and butter inside and on top before baking
Both are party-friendly and freeze well, just like your traditional rollups.
Don’t miss our Cheesy Garlic Butter Mushroom Stuffed Chicken if you’re in the mood for a main dish packed with cheesy garlic flavor.
Cheesy Garlic Crinkle Pie – The Bold Cousin to Rollups
One of the more artistic and unique creations trending now is the cheesy garlic crinkle pie—a twisty, flaky, pan-baked cousin to the rollup.
What is it?
- Layers of phyllo or thin dough brushed with garlic butter
- Filled with cheese and rolled or crinkled before baking
- Baked in a round dish until golden and crispy on the edges
This dish is perfect for dinner parties, brunches, or when you want to show off a little in the kitchen.
Garlic Bread Roll Ups – A Snackable Classic
Don’t confuse these with the dough-based rollups—they’re often made with sliced sandwich bread, rolled flat and filled with garlic butter and cheese.
Perfect for:
- Quick appetizers
- Party trays
- Air fryer experiments
These garlic bread roll ups are great for kids and ideal for dipping into sauces like marinara, ranch, or pesto.
Why These Recipes Are So Popular
Across social media and food blogs, garlic-and-cheese bakes are the ultimate comfort food. These searches show just how versatile and beloved these ingredients are.
From savory pies to scrolls and shortcuts, there’s a version of cheesy garlic butter rollups for everyone—whether you’re baking from scratch or throwing something together last minute.
Looking for more garlicky inspiration? Check out our Garlic Butter Mushroom Linguine to create a full garlic-themed dinner experience.
Wrapping It Up – Cheesy Garlic Butter Rollups Made Easy
– A Simple Recipe That Leaves a Lasting Impression
– From Dough to Golden Swirl, You’ve Got This
Baking cheesy garlic butter rollups isn’t just about combining flour, butter, and cheese—it’s about creating something warm, rich, and undeniably satisfying. These rolls are more than a side dish. They’re the kind of food that brings people together, fills your kitchen with incredible aroma, and delivers comfort in every bite.
Whether you’re baking them for the first time or adding your own twist after your tenth batch, this recipe has everything you need to succeed.
What You’ve Learned Along the Way
With each section, you’ve uncovered the building blocks of this irresistible recipe. Now you know:
- How to make garlic butter from roasted cloves
- How to knead and proof dough for a soft, fluffy result
- What to do when rolls turn dense or don’t rise
- The best methods for reheating and freezing without ruining the texture
- How to experiment with cheeses, herbs, and fillings
- Creative rollup variations from scrolls to cheesy garlic pies
These aren’t just helpful tricks—they’re skills that you’ll carry into every future bake
Cheesy Garlic Butter Rollups Are Just the Beginning
This recipe opens the door to endless kitchen inspiration. The buttery swirls can be filled with anything from herbs to meats, shaped into pies or spirals, or served alongside soups, salads, or pasta.
Every batch can be different. Every version can be your own.
And best of all? These rollups don’t require special tools or advanced techniques—just a little patience, passion, and good ingredients.
Ready to try more garlicky creations? Check out our Crabby Shrimp Stuffed Garlic Bread Bombs and Easy Cheesy Garlic Chicken Wraps to explore more ways garlic and cheese can shine together.
Don’t Skip That Final Touch
Before you serve your freshly baked rollups, take a moment to brush on that extra garlic butter. It’s a small step—but it’s the detail that adds shine, richness, and restaurant-level flavor. It brings the whole dish together.
That warm, buttery glaze on top? That’s what makes your homemade rolls feel—and taste—absolutely unforgettable.
From start to finish, these cheesy garlic butter rollups are meant to be savored, shared, and baked again and again. So roll up your sleeves and get ready for another round—because once you make them, you’ll keep coming back.
Here’s to golden crusts, melty centers, and buttery fingers.If you’re looking for a slightly different take, this version of Cheesy Garlic Butter Rollups offers an old-fashioned twist that’s rich, buttery, and easy to prepare
Happy baking!
Can I Add Herbs to the Dough?
Absolutely! Adding herbs is a fantastic way to boost the flavor of your rollups. You can mix dried or fresh herbs directly into the dough or stir them into your garlic butter mixture.
Great herbs to use:
Dried oregano or basil
Chopped fresh parsley or chives
Rosemary or thyme (finely minced)
These additions complement the garlic and cheese beautifully without overwhelming the roll.
Why Are My Rolls Dense Instead of Soft?
Dense rolls are usually a sign that your dough didn’t rise properly—or wasn’t kneaded enough.
Common causes of dense rollups:
Under-proofed dough: The dough needs enough time to double in size.
Weak yeast: If your yeast is expired or inactive, the dough won’t rise.
Short kneading time: Gluten needs time to develop structure and airiness.
Letting your dough rest in a warm environment and ensuring your yeast is active will make a huge difference in texture.
How Do I Reheat Garlic Cheese Rolls Without Drying Them Out?
To keep cheesy garlic butter rollups soft and melty when reheating, use low heat and cover them to lock in moisture.
Best reheating methods:
Oven: Wrap rolls in foil and heat at 325°F (160°C) for 10–12 minutes.
Microwave: Wrap in a damp paper towel and heat for 15–20 seconds.
Pro tip: After reheating, brush the tops with fresh garlic butter for a flavor boost.