
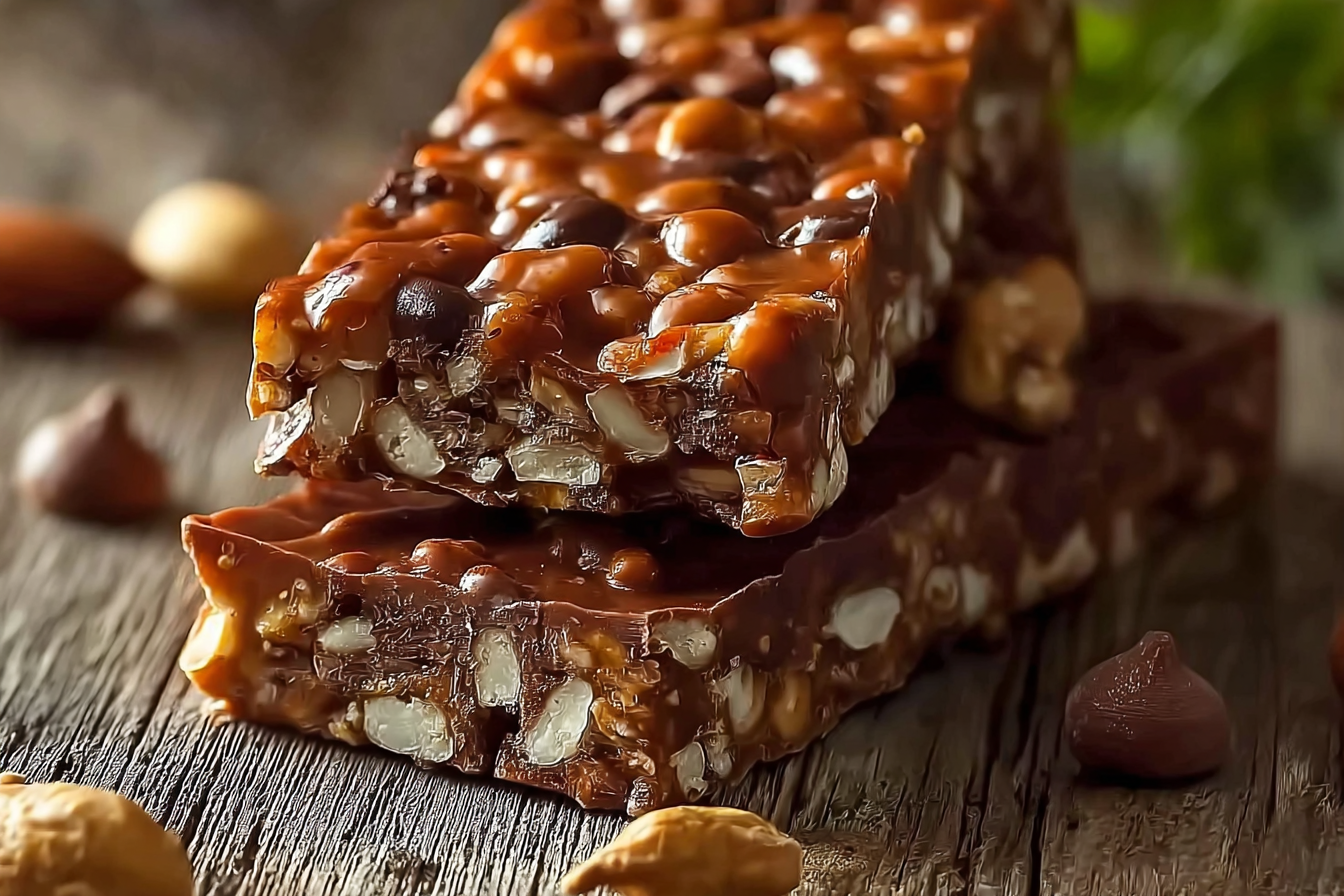
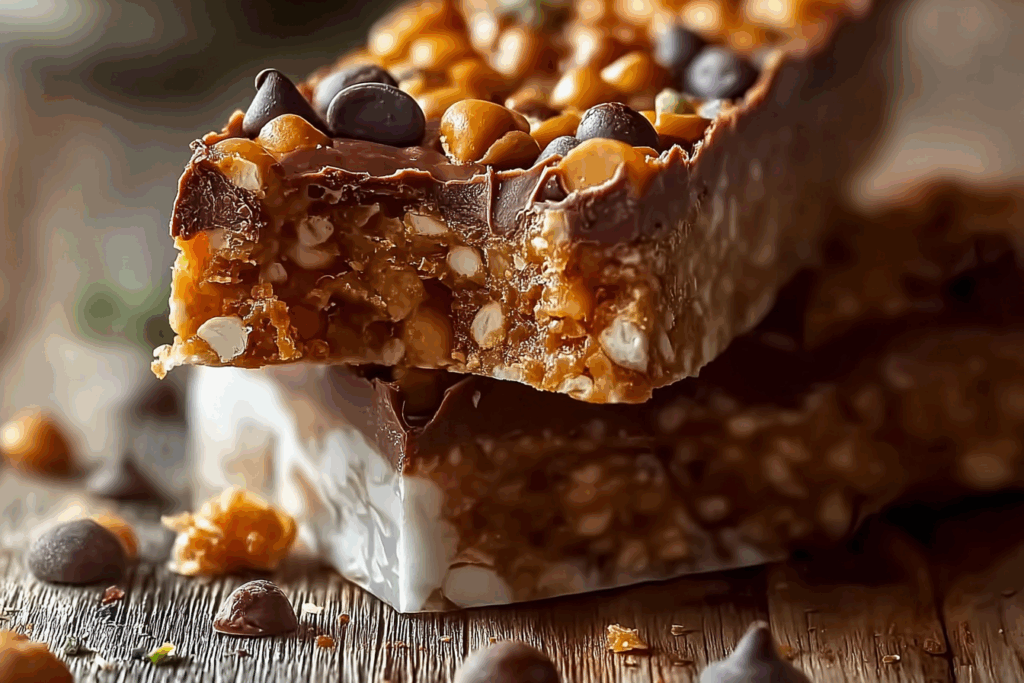
There’s something undeniably satisfying about the first snap of a homemade crunch bar. That crisp, chocolaty sound followed by the melt-in-your-mouth smoothness is pure bliss. These 3-Ingredient Crunch Bars capture that nostalgic magic — simple, sweet, and perfectly crunchy. They come together in minutes and deliver a delightful texture that makes it almost impossible to stop at just one piece.
Behind the Recipe
This recipe was born out of those late-night chocolate cravings when you want something indulgent but don’t feel like baking. It’s inspired by the classic candy bars many of us grew up with, but made with a homemade twist that feels fresher and more personal. Just a bowl, a spatula, and a few minutes — and suddenly you’ve created something that feels like a hug in chocolate form.
Recipe Origin or Trivia
Crunch bars have been around for decades, with roots in mid-20th-century candy making. The idea of combining chocolate with puffed rice or cereal came from confectioners looking to add texture and lightness without overpowering sweetness. Today, this style of treat is beloved across the world, appearing in everything from energy bites to festive snack mixes.
Why You’ll Love 3-Ingredient Crunch Bars
Versatile: You can shape them into bars, bites, or even crumble them over ice cream for a fun topping.
Budget-Friendly: Just three pantry staples make a whole batch of treats that rival any store-bought chocolate bar.
Quick and Easy: Melt, mix, set — and you’re done!
Customizable: Try swapping the cereal or adding a drizzle of peanut butter for extra flair.
Crowd-Pleasing: Everyone, from kids to adults, lights up at the first crunch.
Make-Ahead Friendly: These store beautifully in the fridge, ready whenever your sweet tooth calls.
Great for Leftovers: Crumble leftovers into yogurt, trail mix, or smoothies for a little chocolate boost.
Chef’s Pro Tips for Perfect Results
A little care goes a long way in getting that perfect balance of smooth and crisp:
- Use quality chocolate: The flavor of your bars depends entirely on the chocolate, so pick one you love.
- Work quickly: Once the chocolate is melted, combine the ingredients promptly to keep the texture light.
- Line your pan: Parchment paper ensures easy removal and perfectly smooth edges.
- Chill properly: Allow the bars to set fully in the refrigerator for clean slices and perfect crunch.
Kitchen Tools You’ll Need
Before you begin, gather these simple kitchen helpers:
- Mixing Bowl: For melting and combining all the ingredients.
- Rubber Spatula: Helps mix the chocolate and cereal evenly.
- 8×8-inch Baking Pan: Ideal size for even bars.
- Parchment Paper: Keeps bars from sticking and makes cleanup effortless.
- Knife: For slicing neat, uniform bars.
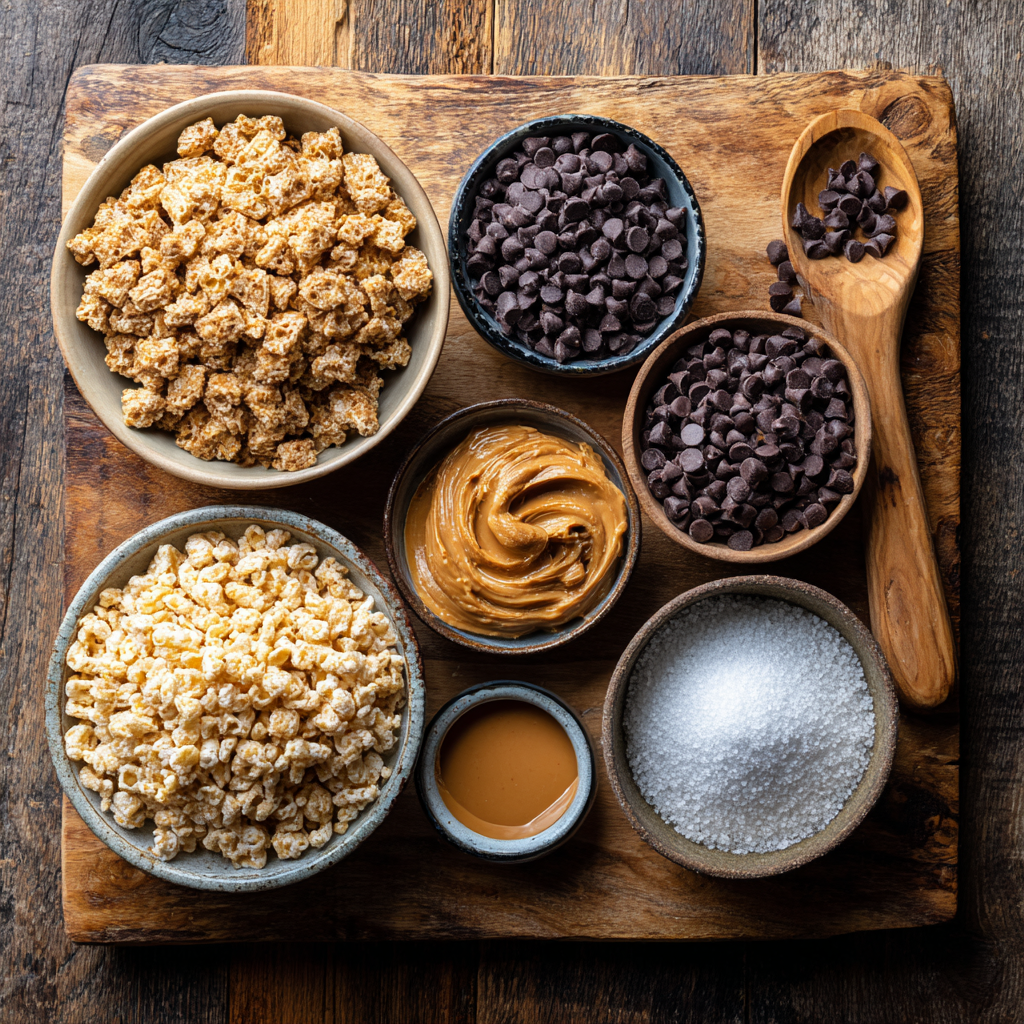
Ingredients in 3-Ingredient Crunch Bars
What makes these bars magical is their simplicity. Each ingredient brings texture, flavor, and a touch of nostalgia.
- Chocolate Chips: 2 cups (semi-sweet or milk) — provide a smooth, rich base that holds everything together.
- Peanut Butter: ½ cup — adds creaminess and a subtle nutty flavor that complements the chocolate.
- Crispy Rice Cereal: 2 cups — gives that irresistible crunch that defines this treat.
Ingredient Substitutions
Sometimes you just want to switch things up — here’s how:
- Peanut Butter: Almond butter or sunflower seed butter.
- Chocolate Chips: Dark, white, or vegan chocolate chips.
- Crispy Rice Cereal: Cornflakes or puffed quinoa for a different crunch.
Ingredient Spotlight
Crispy Rice Cereal: This humble ingredient is what gives the bars their signature light crunch. It’s airy, crisp, and absorbs just enough chocolate to stay perfectly balanced.
Peanut Butter: Adds depth, silkiness, and that rich flavor contrast to the sweet chocolate.
Instructions for Making 3-Ingredient Crunch Bars
Before you dive in, take a deep breath and enjoy the simplicity of this recipe. In just a few steps, you’ll have something truly satisfying.
- Preheat Your Equipment: Line an 8×8-inch pan with parchment paper and lightly grease it for easy removal.
- Combine Ingredients: In a microwave-safe bowl, melt the chocolate chips and peanut butter together in 30-second intervals, stirring until smooth and glossy.
- Prepare Your Cooking Vessel: Have your lined pan ready nearby — this mixture sets quickly once combined.
- Assemble the Dish: Fold in the crispy rice cereal, coating every piece evenly with the melted chocolate mixture.
- Cook to Perfection: Pour the mixture into the prepared pan and smooth out the top with a spatula.
- Finishing Touches: Tap the pan lightly on the counter to remove air bubbles, then refrigerate for about 1 hour or until firm.
- Serve and Enjoy: Slice into bars and enjoy that satisfying snap with each bite.
Texture & Flavor Secrets
The beauty of these bars lies in the contrast: a crisp, light crunch surrounded by silky chocolate. The peanut butter rounds out the sweetness with a creamy finish, while the chocolate provides a rich, cocoa-forward flavor that lingers.
Cooking Tips & Tricks
A few little extras can take these bars from good to unforgettable:
- Use a mix of milk and dark chocolate for a more complex flavor.
- Add a sprinkle of flaky sea salt on top before chilling for a gourmet touch.
- To keep bars glossy, avoid overheating the chocolate during melting.
What to Avoid
Even the simplest recipes have their pitfalls — here’s how to steer clear:
- Don’t overheat the chocolate; it can seize and lose its smooth texture.
- Avoid adding cereal too early; let the chocolate cool slightly so it doesn’t become soggy.
- Don’t rush the chilling step; the crunch develops as the bars fully set.
Nutrition Facts
Servings: 12
Calories per serving: 210
Note: These are approximate values.
Preparation Time
Prep Time: 10 minutes
Cook Time: 0 minutes
Total Time: 1 hour 10 minutes (including chilling)
Make-Ahead and Storage Tips
These bars are perfect for planning ahead. You can make them up to three days in advance and store them in an airtight container in the refrigerator. For longer storage, freeze them for up to two months, layering parchment paper between bars to prevent sticking. When ready to enjoy, let them sit at room temperature for a few minutes for the best texture.
How to Serve 3-Ingredient Crunch Bars
Serve them chilled for maximum crunch or slightly softened for a meltier bite. They pair wonderfully with a glass of milk, a hot cup of coffee, or even a scoop of vanilla ice cream.
Creative Leftover Transformations
- Crumble them into ice cream sundaes.
- Chop into small chunks for cookie mix-ins.
- Blend into milkshakes for a chocolate crunch upgrade.
Additional Tips
For extra flair, drizzle melted white chocolate on top before chilling or sprinkle crushed nuts for added texture. These small touches make your bars look bakery-worthy with minimal effort.
Make It a Showstopper
Slice the bars neatly and stack them on a rustic wooden board. Add a light dusting of cocoa powder or a few chocolate curls on top — the presentation will make your simple treat feel like a café dessert.
Variations to Try
- Mint Crunch Bars: Add ½ teaspoon mint extract to the melted chocolate.
- Salted Caramel Crunch Bars: Swirl in a few spoonfuls of caramel before setting.
- Nutty Delight: Mix in chopped almonds or hazelnuts for extra crunch.
- White Chocolate Raspberry: Use white chocolate and stir in freeze-dried raspberries.
- Espresso Infusion: Add a teaspoon of instant coffee for mocha-style bars.
FAQ’s
Q1: Can I use natural peanut butter?
Yes, just make sure it’s well-stirred so the oil doesn’t separate.
Q2: How long do these last?
They keep up to one week in the refrigerator.
Q3: Can I make them vegan?
Absolutely, just use dairy-free chocolate and plant-based peanut butter.
Q4: Can I use another nut butter?
Yes, almond or cashew butter work beautifully.
Q5: How do I cut them cleanly?
Use a sharp knife warmed under hot water, then wiped dry before each slice.
Q6: Can I double the recipe?
Yes, simply use a 9×13-inch pan for a bigger batch.
Q7: Do I need to refrigerate them?
Refrigeration helps them stay crisp, but room temperature works if your kitchen isn’t too warm.
Q8: Can I add mix-ins like nuts or coconut?
Definitely, just keep total volume balanced so they still set properly.
Q9: Can I gift these?
They make excellent homemade gifts! Wrap them in parchment and tie with ribbon.
Q10: Can I use white chocolate?
Yes, though the bars will be sweeter, so balance with a pinch of salt.
Conclusion
And there you have it — the easiest, crunchiest, most satisfying little chocolate treats you can whip up in minutes. 3-Ingredient Crunch Bars prove that simplicity often leads to the most irresistible results. Trust me, once you’ve made a batch, you’ll find yourself coming back to them again and again. They’re quick, delightful, and worth every bite
Print
3-Ingredient Crunch Bars
- Prep Time: 10 minutes
- Cook Time: 0 minutes
- Total Time: 1 hour 10 minutes
- Yield: 12 bars
- Category: Dessert
- Method: No-Bake
- Cuisine: American
- Diet: Vegetarian
Description
These 3-Ingredient Crunch Bars are the perfect blend of creamy chocolate, nutty peanut butter, and crispy cereal. Quick to make and impossible to resist, they’re a no-bake treat that brings back nostalgic candy bar memories with every bite.
Ingredients
- Chocolate Chips: 2 cups (semi-sweet or milk) – provide a smooth, rich base that holds everything together.
- Peanut Butter: ½ cup – adds creaminess and a subtle nutty flavor that complements the chocolate.
- Crispy Rice Cereal: 2 cups – gives that irresistible crunch that defines this treat.
Instructions
- Preheat Your Equipment: Line an 8×8-inch pan with parchment paper and lightly grease it for easy removal.
- Combine Ingredients: In a microwave-safe bowl, melt the chocolate chips and peanut butter together in 30-second intervals, stirring until smooth and glossy.
- Prepare Your Cooking Vessel: Have your lined pan ready nearby as the mixture sets quickly once combined.
- Assemble the Dish: Fold in the crispy rice cereal, coating every piece evenly with the melted chocolate mixture.
- Cook to Perfection: Pour the mixture into the prepared pan and smooth out the top with a spatula.
- Finishing Touches: Tap the pan lightly on the counter to remove air bubbles, then refrigerate for about 1 hour or until firm.
- Serve and Enjoy: Slice into bars and enjoy that satisfying snap with each bite.
Notes
- Use a mix of milk and dark chocolate for a deeper flavor.
- Add a sprinkle of flaky sea salt before chilling for a gourmet touch.
- Let the bars chill fully for the crispiest texture.
Nutrition
- Serving Size: 1 bar
- Calories: 210
- Sugar: 14g
- Sodium: 75mg
- Fat: 12g
- Saturated Fat: 6g
- Unsaturated Fat: 5g
- Trans Fat: 0g
- Carbohydrates: 22g
- Fiber: 2g
- Protein: 4g
- Cholesterol: 0mg